
Granny Square Bag Free Crochet Pattern
If you’re looking for a stylish, functional, and customizable crochet project, the Granny Square Bag is it! This hobo-style crochet handbag is made up of just 10 granny squares, making it a fun and approachable project for crocheters of all skill levels. The best part? You’re not limited to one type of square. You can use the pattern’s suggested square, go for a traditional granny square, or try unique motif designs to create a bag that’s completely your own.
This post contains affiliate links. At no extra cost to you, I may receive a small commission from purchases made through affiliate links, which helps me to keep bringing awesome free content!
Whether you love classic crochet style or want something fresh and modern, the granny square bag is versatile enough to match your vision. Add a lining, swap out the strap, or embellish it with buttons and tassels—the options are endless!
Why You’ll Love the Granny Square Bag
Crocheting a bag from granny squares has so many perks:
- Quick build – With only 10 squares, you’ll see your project come together fast.
- Customizable design – Use solid colors, stripes, or motif squares for different looks.
- Adjustable size – The finished size depends on your yarn, hook, and square size.
- Great stash buster – Mix leftover yarns for a colorful patchwork effect.
- Functional & stylish – The hobo shape makes it practical while still on-trend.
This is one of those patterns that looks impressive but doesn’t require complicated shaping. Once your squares are ready, the assembly process creates the bag shape almost like magic!
What Makes a Granny Square Bag Special?
Granny squares are a staple in the crochet world. They’re portable projects, satisfying to finish, and can be joined in countless ways. When used for accessories like bags, they instantly transform into a functional piece of art.
The hobo-style construction of this bag gives it a slouchy, relaxed shape that looks chic while holding plenty of essentials. Add a lining and it becomes strong enough for everyday use, or leave it unlined for a lightweight market tote.
Unlike mass-produced handbags, your granny square bag can be one-of-a-kind, because you control all of the details: what square designs (you can even mix and match), the colors, finishing techniques, and embellishments. Everything is up to you!
Likewise you could adjust the yarn: Change the weight and/or fibers for different looks.
Yarn Choices and Fiber Options
One of the best features of this project is that it works with nearly any yarn. Here are some ideas:
- Cotton yarns – Perfect for a sturdy, washable bag that’s great for daily use or summer markets.
- Acrylic yarns – Affordable and colorful, making it easy to experiment with shades.
- Wool or wool blends – Give your bag warmth, structure, and a cozy vibe.
- Textured yarns – Try tweeds, ombrés, or self-striping yarns for a unique finish.
Keep in mind: the yarn weight will affect your finished size. Thinner yarn (like DK) will make smaller squares and a more petite bag, while bulky yarns will create a larger, statement-making tote.
Adjusting the Size of Your Bag
Besides changing the yarn weight, you can also choose a square with a set finished measurement. Because the assembly method is universal, you can easily customize the finished dimensions:
- Smaller bag – Use smaller squares (like 4”) or lightweight yarn. Great for kids or evening purses.
- Larger bag – Work larger squares (6–8”) or use bulky yarn for a roomy tote or beach bag.
You can even play with proportions: try mixing different square patterns but keep them the same size, or add extra rounds to enlarge the design.
Color Combinations to Try
Choosing colors is half the fun! Here are some ideas to spark inspiration:
- Classic two-tone – White borders with bright centers (like the sample).
- Patchwork rainbow – Each square in a different color.
- Seasonal shades – Pastels for spring, jewel tones for fall, or red and green for Christmas.
- Monochrome chic – Different shades of one color for an ombré effect.
This is also a fantastic stash-busting project, so pull out those partial skeins you’ve been saving.
Granny Square Options
This pattern includes instructions for a specific square, but you’re not locked into it. You can:
- Use the classic granny square for a vintage-inspired look (just stop when it measures 4-6″).
- Try flowers for a whimsical touch, like the Primrose Square or the Victorian Romance Square.
- Work with seasonal themes—Pumpkin Granny Square or Acorn Granny Square for fall, Watermelon Granny Square, Citrus Granny Square, or Native Sun Square for summer.
- Choose geometric squares for a modern style, like the Mingle Square or Rorschach Square.
Assembly Made Simple
Even though we’re not diving into step-by-step instructions here, it’s worth noting how satisfying the assembly is. You’ll lay out the 10 squares in a special arrangement, join them together, and suddenly your flat motifs turn into a bag with shape and style.
Because the method is so straightforward, you can swap squares in and out without worrying about complicated math. As long as the squares are the same size, you’re good to go!
Strap and Finishing Options
Every crocheter loves options, and the strap is a big one. You can:
- Make a strap from the included instructions
- Make a thicker strap for comfort, especially for heavier loads.
- Add wooden or metal rings to attach the strap for a modern look.
- Use premade leather or fabric straps for a mixed-media style.
Don’t forget the finishing touches! Lining your bag will give it extra strength and keep items from poking through. You can also add a zipper, magnetic snap, or button closure.
Perfect for Gifting and Craft Fairs
The Granny Square Bag makes a thoughtful handmade gift. Because it’s customizable, you can tailor the colors to match your recipient’s favorite shades or style.
It’s also an excellent choice for craft fairs and markets. Shoppers love practical handmade items, and bags always sell well. You can make a batch in different sizes and colors for a beautiful display. I suggest following the season of the craft fair!
How to get the Granny Square Bag Crochet Pattern
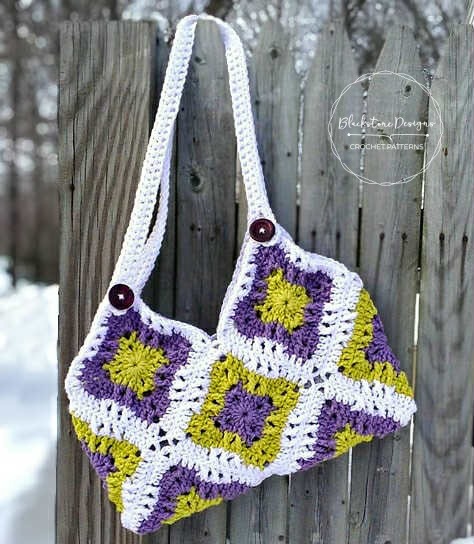
Granny Square Bag
Crochet Pattern
Option 1: Continue scrolling for free pattern instructions on this site
Option 2: Purchase the ad-free PDF that includes tutorial photos from one of my shops
Materials
Worsted Weight Yarn (#4)
- #1307 Lavender (Center)
- #1223 Grass (Middle)
- #1005 White (Outer Edge)
4 – 1” buttons
Gauge
2 rounds = 1” (with worsted weight yarn)
Finished Measurements
Purse measures 14”W x 10.5”H (with worsted weight yarn)
Stitch Guide
ch = chain
dc = double crochet
FPdc = Front Post double crochet
FPhdc = Front Post half double crochet
FPsc = Front Post single crochet
FPtr = Front Post treble crochet
sc = single crochet
sl st = slip stitch
Skill Level
Intermediate
Written in U.S. Crochet Terms
Notes
- Beginning ch 3 counts as the first stitch.
- Where asterisks appear, repeat the instructions between them.
- All front post stitches in the pattern are completed the same as a regular stitch, except that instead of inserting the hook in the two top loops, you will insert the hook around the post (from previous round), inserting from front to back.
- Be mindful of the stitches called for in pattern, as they change within each round. Stitches used for “X” stitches are longer than the stitches used for the rest of the round.
- Be mindful of when color changes are made, please make sure you make the changes where specified in pattern, they are not made when you join round.
- Squares will be sewn together corner to corner; diamond shape.
Special Stitches
V-Stitch (v-st) = dc, ch 3, dc in same space
Shell (sh) = 2 dc, ch 3, 2 dc in same space
Instructions
SQUARES (Make 10)
R1. Beginning with Color A: ch 6, join with sl st, ch 3 (counts as dc), [v-st, 2dc] 3X, v-st, dc, sl st into top of the beginning ch 3 to join.
R2. Sl st into the next dc, ch 3, [*v-st in next ch 3, dc in the next dc, fpdc in each of the next 2 dc*, 1 dc in the next dc] 3X, repeat from * to *; sl st into the top of the beginning ch 3 to join.
R3. Sl st into next dc, change to Color B: ch 3, [*sh in next ch 3, dc in the next dc, skip the next dc, fptr in the next fpdc, fptr in the skipped dc, skip the next fpdc, fptr in the next dc, frtr in the skipped fpdc*, 1dc in the next dc] 3X. Repeat from * to *; sl st into the top of the beginning ch 3 to join.
R4. Ch 3, dc in each of the next 2 dcs, [*v-st in the next ch 3, dc in each of the next 3 dcs, fpdc in each of the next 4 fp sts *, dc in each of the next 3 dcs] 3X, Repeat from * to *; sl st into the top of the beginning ch 3 to join.
R5. Sl st into next dc, change to Color C: ch 3, dc in each of the next 2 dcs, [*sh in next ch 3, dc in each of the next 3 dcs, skip the next dc, fptr in the next fpdc, fptr in the skipped dc, fpdc in each of the next 2 fpdcs, skip the next fpdc, fptr in the next dc, frtr in the skipped fpdc*, dc in each of the next 3 dcs] 3X. Repeat from * to *; sl st into the top of the beginning ch 3 to join.
STRAPS (Make 2)
R1. Fsc 75, ch 1, turn (75)
R2. sc x 2, ch 3, sk 3, sc x 65, ch 3, sk 3, sc x 2, ch 1, turn (69 sc’s, 2 ch-3 sps)
R3. sc x 2, 3 sc in ch-3 sp, sc x 65, 3 sc in ch-3 sp, sc x 2. Fasten. (75)
Finishing
- Block squares so they measure 5.5” side to side.
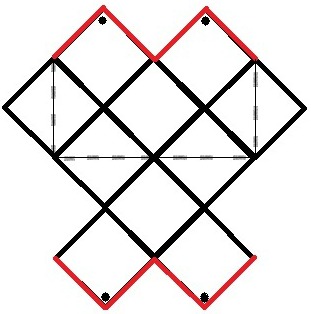
- Sew squares together as shown in the diagram, holding them with right sides together and using a whip stitch.
- Fold along the dotted lines as show in photo below and sew the side squares in place.
- Hide all strings.

And that’s the Easy 10 Granny Square Bag!
The Granny Square Bag is proof that crochet can be both practical and beautiful. With just 10 squares and some clever assembly, you’ll have a stylish hobo-style bag that’s customizable in every way.
So grab your yarn, pick your favorite square design, and start building your new favorite accessory. Who knew 10 little squares could create something so versatile?
Don’t forget to share!
Tag me on Instagram at @blackstone_designs or use the hashtag #BlackstoneDesignsCrochet so I can share your makes with the community!
Join our crochet community group!
Come on over and join the Blackstone Designs Crochet Community on Facebook for fun CALs and giveaways, plus exclusive sales, pattern support, and so much more!
Happy Crocheting!

Written Purse Pattern © 2015 Sonya Blackstone of Blackstone Designs. Please do not sell, share, or modify this pattern, but instead share the link to where the pattern can be found. You may sell items you make with this pattern. This pattern, as with all Blackstone Designs/Sonya Blackstone patterns, are not for educational use without written permission from the designer.
Sonya Blackstone is a participant in the Amazon Services LLC Associates Program, an affiliate advertising program designed to provide a means for us to earn fees by linking to Amazon.com and affiliated sites.




I was really wanting to make the Windmill bag. Unfortunately, the instructions for the squares are missing. It says make 10. follow instructions for rounds 1 – 5….then goes straight into instructions for making the straps.
Hi Brenda!
This post has been updated!
-Sonya