
How to Make the Boxer Pot Holder – Free Crochet Pattern
The Boxer Pot Holder is part of the Puppy Dog Pot Holder series. These crochet potholders make the perfect gift for dog lovers!
This post contains affiliate links. At no extra cost to you, I may receive a small commission from purchases made through affiliate links, which helps me to keep bringing awesome free content!
This crochet pot holder has a front pocket for gifts for the recipient, like recipe cards, baked goods, and cooking utensils!
Boxer Moms and Dads would love to receive this pot holder as a gift; I’m speaking from experience.

The previous Puppy Dog Pot Holder release was the Chihuahua and in that post I talked about how my sister had a Chihuahua named Max who had a Boxer named Gus in his pack.
Well, this pot holder looks like that Gus!
Gus is another one of my fur nephews! He is the goofiest oaf of a dog, but he is so sweet and cuddly, just the bestest love bug!

Of course when I planned the Puppy Dog Pot Holder series, and immediately knew I was going to make Max the Chihuahua, that also meant I had to make Gus the Boxer.
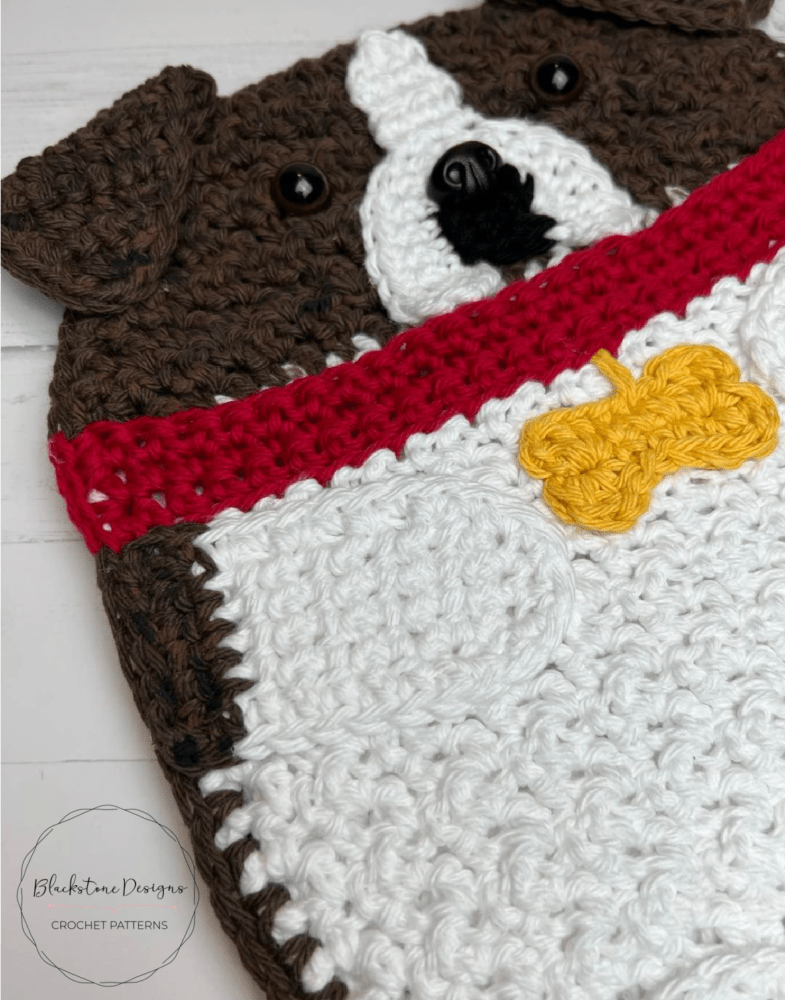
As you can tell from the photo above, Gus’ coat makes him a Flashy Brindle Boxer, and I could not find a matching cotton yarn, so I had to get creative with that!

I made the base pieces using a darker brown yarn, then I took acrylic paint in black and medium brown, watered them down a bit, and made splotches all over him to give it the brindle effect.
However, if you’re planning to make this Boxer pot holder as decorative purposes only, there is a perfect acrylic yarn: Lion Brand Heartland in Sequoia.
Although the pot holder in the photos is custom, you can still use the same pattern instructions and make yours in whatever colors will match your giftee’s Boxer!
You can also check out my filler suggestions in my Amazon Storefront!
Materials
100% Cotton Worsted Weight Yarn (#4)
- White – 150 yards
- Brown – 150 yards
- Collar Color – 50 yards
- Tag Color – 10 yards
I/9/5.50mm Hook
18mm Animal Eyes or Black Buttons
21mm Dog Nose or Black Button
Yarn Needle
Scissors
Optional Materials:
1/4 yd 100% Cotton Batting (Optional, but recommended)
Rotary Cutter (For cutting batting)
Black Embroidery Floss
Gauge
12 sts x 12 rows = 4″
Gauge is not critical for this project
Finished Measurements
9.25″W x 10.25″H
Stitch Guide
arnd = around
ch = chain
dc = double crochet
dec = single crochet decrease
sc = single crochet
sc3tog = See Special Stitches
sl st(s) = slip stitch(es)
Skill Level
Intermediate
Written in U.S. Terms


Notes
- Plastic can melt when coming in contact with hot dishes, so it may be better to stitch on the eyes and nostrils; especially if gifting. You could also add a warning label to the pot holder if you go forward with using plastic pieces.
- 100% cotton yarn (and batting) is recommended. Acrylics can melt if they become too hot.
- Batting is used for heat resistance. This will provide more padding and protection from hot surfaces, however, two layers of crocheted cotton is typically thick enough for short term protection (from oven to stove top). Cotton Batting can be found in any store that sells fabric.
- A yard of fabric (batting) = 36″H, 1/4 yard of fabric = 9″H, but the width is 54″ wide and batting doesn’t have a specific cutting direction.
- Beginning chains do not count as stitches.
- When stitches appear in parentheses, work those stitches in the same space.
- When asterisks appear, repeat the instructions between them.
- Muzzle shown is custom and is not represented in the instructions.
- This Boxer Pot Holder has a Flashy Brindle coat. I created this look by starting with a dark brown yarn base and painted splotches on with acrylic paint in black and medium brown.
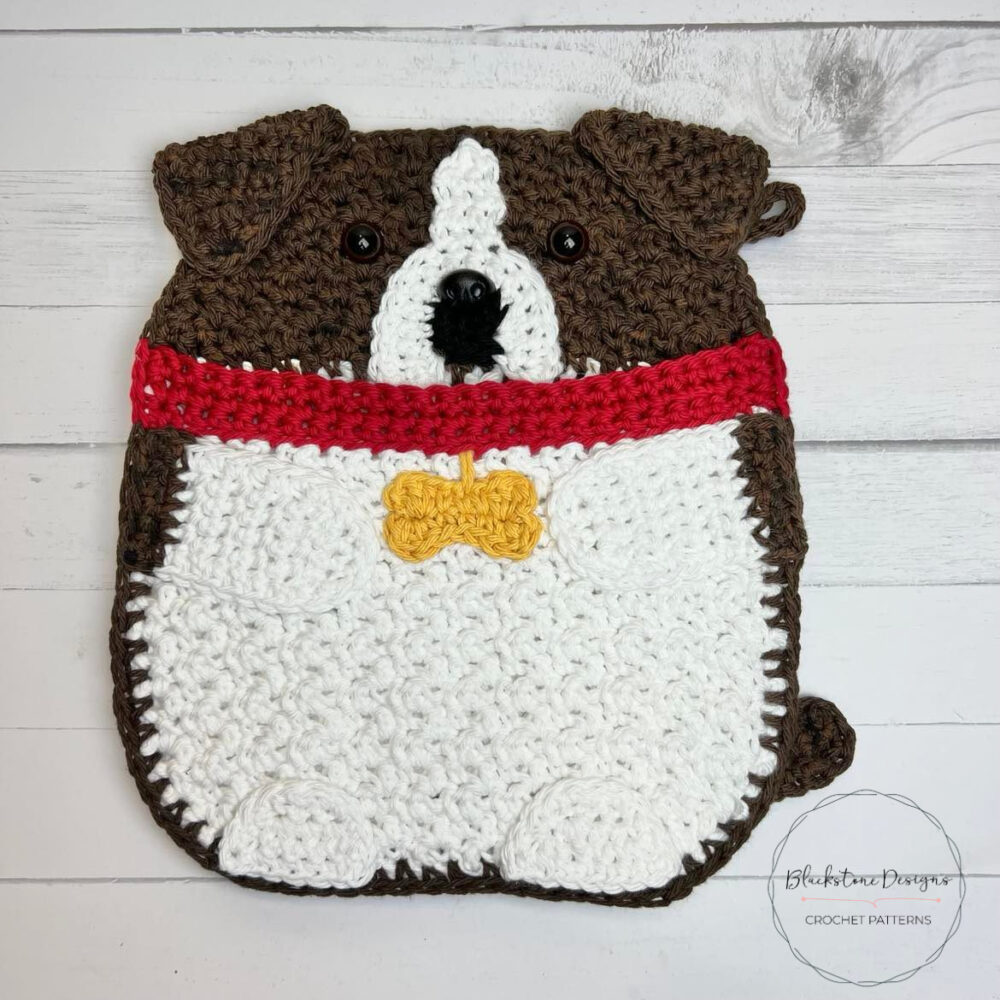
- Please use the finished project image for help in assembling. Additional tutorial photos are at the end.
- There is a printable recipe card included on the last page.
- PRO TIP: Remembering that scs are worked into dcs and dcs are worked into scs (in subsequent rows) is helpful in working through this pattern quickly without having to read every row.
Special Stitches
Single Crochet Three Together (sc3tog) = *Insert hook in stitch and draw up a loop* over the next 3 stitches, yarn over, draw loop through all four loops on the hook.
Instructions
LARGE BACK PANEL (Make 1)
With Brown,
R1. Ch 20, sc in 2nd ch from hook, *dc in next, sc in next* across, turn (19)
R2. Ch 1, (sc, dc) in first st, sc in next, *dc, sc* across, (dc, sc) in the last st, turn (21)
R3. Ch 1, (sc, dc) in first st, sc in next, *dc, sc* across, (dc, sc) in the last st, turn (23)
R4. Ch 1, (sc, dc) in first st, sc in next, *dc, sc* across, (dc, sc) in the last st, turn (25)
R5. Ch 1, *dc, sc* across, dc in last st, turn (25)
R6. Ch 1, *sc, dc* across, sc in last st, turn (25)
R7-21. Repeat R5 & 6
R22. Ch 1, dec, *sc, dc* across, sc, dec, turn (23)
R23. Ch 1, *sc, dc* across, sc in last, turn (23)
R24. Ch 1, dec, *dc, sc* across, dc, dec, turn (21)
R25. Ch 1, *dc, sc* across, dc in last, turn (21)
R26. Ch 1, dec, *sc, dc* across, sc, dec, turn (19)
R27. Ch 1, *sc, dc* across, sc in last, turn (19)
R28. Ch 1, dec, *dc, sc* across, dc, dec, turn (17)
R29. Ch 1, dec, *dc, sc* across, dc, dec; Fasten. (15)
LARGE FRONT PANEL (Make 1)
With White,
R1. Ch 20, sc in 2nd ch from hook, *dc in next, sc in next* across, turn (19)
R2. Ch 1, (sc, dc) in first st, sc in next, *dc, sc* across, (dc, sc) in the last st, turn (21)
R3. Ch 1, (sc, dc) in first st, sc in next, *dc, sc* across, (dc, sc) in the last st, turn (23)
R4. Ch 1, (sc, dc) in first st, sc in next, *dc, sc* across, (dc, sc) in the last st, turn (25)
R5. Ch 1, *dc, sc* across, dc in last st, turn (25)
R6. Ch 1, *sc, dc* across, sc in last st, turn (25)
R7-21. Repeat R5 & 6
R22. Ch 1, dec, *sc, dc* across, sc, dec, turn (23)
R23. Ch 1, *sc, dc* across, sc in last, turn (23)
With Brown,
R24. Ch 1, dec, *dc, sc* across, dc, dec, turn (21)
R25. Ch 1, *dc, sc* across, dc in last, turn (21)
R26. Ch 1, dec, *sc, dc* across, sc, dec, turn (19)
R27. Ch 1, *sc, dc* across, sc in last, turn (19)
R28. Ch 1, dec, *dc, sc* across, dc, dec, turn (17)
R29. Ch 1, dec, *dc, sc* across, dc, dec; Fasten. (15)
POCKET PANEL (Make 1)
With White,
R1. Ch 20, sc in 2nd ch from hook, *dc in next, sc in next* across, turn (19)
R2. Ch 1, (sc, dc) in first st, sc in next, *dc, sc* across, (dc, sc) in the last st, turn (21)
R3. Ch 1, (sc, dc) in first st, sc in next, *dc, sc* across, (dc, sc) in the last st, turn (23)
R4. Ch 1, (sc, dc) in first st, sc in next, *dc, sc* across, (dc, sc) in the last st, turn (25)
R5. Ch 1, *dc, sc* across, dc in last st, turn (25)
R6. Ch 1, *sc, dc* across, sc in last st, turn (25)
R7-17. Rep R5 & 6
With Collar Color,
R18. Ch 1, sl st across, turn (25)
R19. Ch 1, sc in top loop across, turn (25)
R20. Ch 1, sc across, turn (25)
R21. Ch 1, sc across; Fasten. (25)

MUZZLE
With White,
R1. Make magic ring, ch 1, 6 sc in ring (6)
R2. 2 sc arnd, sl st to join, turn (12)
R3. BLO: Ch 1, 3 sc, sc x 8, 3 sc, leave remaining 2 sts unworked, turn (14)
R4. Ch 1, 2 sc, sc x 12, 2 sc, turn (16)
R5. Ch 1, 2 sc, sc x 14, 2 sc; Fasten. (18)
R6. With muzzle face up, count 8 sts up from the bottom right, attach yarn in the 8th st, Ch 1, sc in the same stitch as ch and in next 4 sts, turn (5)
R7. Ch 1, dec, sc, dec, turn (3)
R8-10. Ch 1, sc across, turn; Fasten at the end of R10.
FRONT/TOP PAWS (Make 2)
With White,
R1. Ch 4, sc in 2nd st and in each st across, turn (3)
R2. Ch 1, 2 sc, sc, 2 sc, turn (5)
R3. Ch 1, sc across, turn (5)
R4-9. Repeat R3
With Brown,
R10-11. Repeat R3; at the end of R11 turn slightly and sc in the end of each row down the side, sc in each st across the bottom, sc in the end of each row up the other side; Fasten.
BACK PAWS (Make 2)
With White,
R1. Ch 4, sc in 2nd st and in each st across, turn (3)
R2. Ch 1, 2 sc, sc, 2 sc, turn (5)
R3. Ch 1, 2 sc, sc x 3, 2 sc, turn (7)
R4. Ch 1, sc across; at the end of R4 turn slightly and sc in the end of each row down the side, sc in each st across the bottom, sc in the end of each row up the other side; Fasten.
EARS (Make 2)
With Brown Color,
R1. Ch 8, sc in 2nd st and in each st across, turn (7)
R2-3. Ch 1, sc across, turn (7)
R4. Ch 1, dec, sc x 3, dec, turn (5)
R5-6. Ch 1, sc across, turn (5)
R7. Ch 1, dec, sc, dec, turn (3)
R8. Ch 1, sc across, turn (3)
R9. Ch 1, sc3tog; at the end of R9 turn slightly and sc in the end of each row down the side, sc in each st across the bottom, sc in the end of each row up the other side, sl st to join in 1st side st; Fasten.
TAIL
With Brown,
R1. Ch 3, sc in 2nd and in last st, turn (2)
R2-4. Ch 1, sc across, turn (2)
R5. Ch 1, dec; at the end of R5, turn slightly and sc in the end of each row down the side, sc in each st across the bottom, sc in the end of each row up the other side; Fasten.
COLLAR TAG
With Tag Color,
Ch 6, (hdc, dc, hdc) in 2nd ch from hook, sc x 3 over next three chs, (hdc, dc, hdc, sl st, hdc, dc, hdc), sc x 3, (hdc, dc, hdc, sl st) in first st; Fasten. (12)
HANGER
With Fur Color,
Ch 16, sl st in back bump of 2nd ch and across; Fasten. (15)
Finishing
- If using plastic safety nose: Insert the safety nose into the top center of the muzzle between two stitches on R2. Attach the Dog Muzzle to the front center of one large panel, over R22-28.
- If using plastic safety eyes: Insert eyes between R26-27, one on each side of the muzzle, leaving no stitches between the eyes and muzzle.
- Measure and cut batting, so it’s the same size as the large panel, minus ¼” around the edges.
- Lay bottom large panel flat and lay batting over the top. Lay the top large panel over the batting, sandwiching the batting between the two large panels.
- Thread needle with coordinating yarn and on large panel: Insert needle from front to back, then from back to front one stitch over, close to the upper right corner. Tie tails into a knot. — Repeat this step 8 more times in the following locations: right center, bottom right corner, bottom middle, center, upper middle, upper left corner, left center, bottom left corner. <This step tacks the 3 layers together and holds the batting in place. >
- Insert hook under the panel and pull the tails and knots to the inside of the pot holder to hide them.
- Lay pocket panel over the top large panel.
- Insert hook in bottom right corner, through all 3 layers, and single crochet in the same space and in the end of each row up the side, in each stitch across the top, and end of each row down the left edge, and in each stitch across the bottom. Fasten. Make sure you’re working through all crochet layers around. To do this I started with tan, switched to navy to work across the collar, then switched back to tan. Do not crochet across the top of the pocket.
- Dog Ears:
- Fold 1 corner of Dog Ears R9 down to R7 and attach in place. Make sure the ears have the opposite corners folded, so they attach correctly to the opposite sides of the head.
- Attach the folded corner to the top edge of the front large panel over the “corner” of the panel; tilt the tips of the ears outward slightly. The top outer edge of the ear will be hanging off the edge of the pot holder.
- Attach Top Paws over rows 11-17 approximately, tipped downward.
- Attach Bottom Paws over rows 1-4, with the flat side on the bottom, leaving approximately 5 stitches between them.
- Attach R1-2 of the tail to the back panel over R6-7 approximately. Tilt outward slightly, so it appears as a “docked” tail.
- Attach the collar tag to the front center of top large panel between R17-18.
- Attach the hanger to the desired upper corner.
- Optional: Stitch on a mouth with the embroidery floss.
- Hide all strings.
And that’s how you crochet a Boxer Pot Holder!
I hope you’ve enjoyed this pattern! Come on over to the Blackstone Designs Crochet Community to show it off!
Happy Crocheting!

Written pattern and photographs © 2023 Sonya Blackstone of Blackstone Designs. Please do not sell, share, or modify this pattern, but instead share the link to where the pattern can be found. You may sell items you make with this pattern. This pattern, as with all Blackstone Designs/Sonya Blackstone patterns, are not for educational use without written permission from the designer. All rights reserved.
Sonya Blackstone is a participant in the Amazon Services LLC Associates Program, an affiliate advertising program designed to provide a means for us to earn fees by linking to Amazon.com and affiliated sites.


