
Bayberry Cardigan – Free Lacy Crochet Cardigan Pattern (XS–5X)
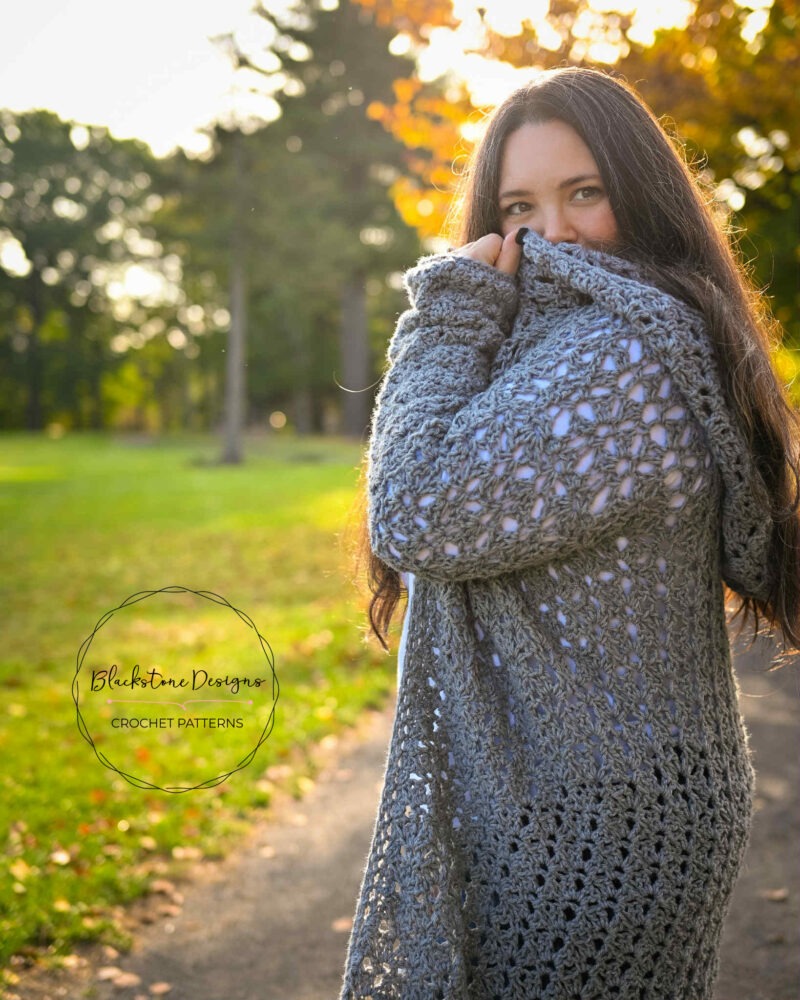
The Bayberry Cardigan crochet pattern is everything you want in a handmade garment—stylish, customizable, and comfortable to wear. This free crochet cardigan pattern is designed to be a long, lacy, open front cardigan with adjustable length and sleeves, plus an optional belt for added shaping.
Written in adult sizes XS through 5X, it’s truly a size-inclusive crochet cardigan pattern that flatters all body types. And if you love making matching sets, there’s also a child-size Bayberry Cardigan available so you can create coordinating looks.
This post contains affiliate links. At no extra cost to you, I may receive a small commission from purchases made through affiliate links, which helps me to keep bringing awesome free content!
When you’re looking for a project that blends relaxing stitches with stunning results, the Bayberry Cardigan crochet pattern is a must-make. The lacy stitch pattern is light and airy, giving the cardigan beautiful drape and movement. Since it’s an open front crochet cardigan, you can throw it on over any outfit to instantly upgrade your look.
Whether you’re crocheting your first adult garment or you’ve made plenty of sweaters before, this cardigan strikes the perfect balance between easy construction and elegant design.
Why You’ll Love This Free Crochet Cardigan Pattern
This isn’t just another cardigan—it’s a handmade wardrobe essential.
- Lacy stitch design makes it breezy enough for warm weather but cozy with long sleeves in winter.
- Open front construction is flattering, flexible, and easy to wear.
- Customizable fit with adjustable length and sleeve options.
- Optional belt allows you to change up the look and add shaping at the waist.
- Written for XS–5X so everyone can enjoy making and wearing it.
If you’ve ever wanted a cardigan that works with dresses, jeans, or leggings alike, this free crochet cardigan pattern has you covered.
Features of the Bayberry Cardigan
A Lacy Crochet Cardigan That’s Timeless
The lace stitch pattern keeps the fabric light, giving it a breathable feel and soft drape. It’s textured enough to be visually interesting, but not so fussy that it overpowers your outfit.
An Open Front Cardigan with Custom Fit
The open front design makes this cardigan easy to layer over anything. It’s flattering for all body types and can be styled casually or dressed up.
Adjustable Length, Sleeves, and Belt Options
You choose the final look. Make it hip-length for a casual shrug or go longer for a dramatic duster cardigan. Pick between short, three-quarter, or long sleeves. Add a crocheted belt to cinch the waist—or leave it flowing for boho chic.
Size-Inclusive Crochet Cardigan Pattern (XS–5X)
One of the best things about this design is that it’s written for nine adult sizes: XS, S, M, L, XL, 2X, 3X, 4X, and 5X. The Bayberry Cardigan crochet pattern is intentionally designed with a relaxed fit, so it’s forgiving and flattering on all shapes.
If you prefer a looser drape, size up. For a more tailored fit, make the size closest to your actual measurements. Because of the modular construction, it’s easy to add or subtract rows to fine-tune your custom fit.
Customizing your Crochet Cardigan
The Bayberry Cardigan crochet pattern is designed with flexibility in mind, so you can tailor it to match your personal style while still keeping the beautiful lacy look.
- Length Options – Work fewer rows for a shorter, casual cardigan, or extend the length for a dramatic duster-style piece.
- Sleeve Choices – Choose sleeveless, short sleeves, three-quarter sleeves, or full-length sleeves depending on the season and your preferred style.
- Belt Option – Add a crocheted belt (or use one you already own) to cinch the waist and give the cardigan a more fitted silhouette.
- Fiber Choices – While the pattern requires worsted weight (#4) yarn for proper sizing and drape, you can explore different fibers. Cotton, bamboo, or linen blends give it a lighter, breathable finish, with a sheen, while acrylic or wool blends make it warmer, cozier, but matte.
*Make sure to match the pattern gauge! - Color Play – Neutrals like cream, black, or gray create a classic, versatile garment, while bold jewel tones or gradient yarns transform the cardigan into a statement piece.
- Fit Adjustments – Stick to your true size for a tailored fit or size up for an oversized, relaxed look.
Even with the set yarn weight requirement, these customization options ensure that every Bayberry Cardigan you make can feel completely unique.
Styling the Bayberry Cardigan Crochet Pattern
One of the reasons the Bayberry Cardigan crochet pattern is such a favorite is its ability to adapt to different outfits, occasions, and even seasons. With its lacy stitch design and open-front construction, this cardigan instantly elevates your look without sacrificing comfort.
Dress It Up for Special Occasions
For weddings, brunches, or evenings out, the Bayberry Cardigan layers beautifully over dresses and skirts. Try pairing it with a flowy maxi dress for a breezy, boho-inspired outfit, or slip it on over a slim-fit cocktail dress for an elegant touch. Adding the optional belt defines your waistline and creates a polished, pulled-together look that feels chic yet effortless. Neutral tones like black or cream keep it classic, while a jewel-tone cardigan—think sapphire or emerald—adds a bold statement.
Casual Everyday Layering
On more relaxed days, style your Bayberry Cardigan with jeans and a simple t-shirt or tank top. The lacy design makes even the most basic outfit feel intentional and stylish. Pair it with ankle boots in fall or sandals in summer for a versatile, year-round outfit. You can also throw it over leggings and a tunic top for errands, coffee dates, or working from home. It’s cozy without being bulky, making it perfect for those in-between weather days.
Belted for a Fitted Look
Want something a little more structured? Use the optional crochet belt or a slim leather belt from your closet to cinch the cardigan at the waist. This instantly transforms the look from flowy and relaxed to office-appropriate or dinner-ready. Belted styling works especially well when layering over straight-leg trousers, pencil skirts, or fitted dresses, giving you a more tailored silhouette.
Seasonal Versatility
Because the Bayberry Cardigan is lightweight but still substantial, you’ll find yourself reaching for it in every season.
- Spring: Toss it over a floral sundress for an extra layer during cool mornings.
- Summer: Use it as a breezy coverup for sleeveless tops or even as a stylish beach layer over swimsuits.
- Fall: Pair it with jeans, boots, and a scarf for that cozy autumn vibe.
- Winter: Work it up in a warm fiber like wool blend and wear it over long sleeves for a soft, snuggly extra layer.
No matter how you style it, the Bayberry Cardigan crochet pattern is the kind of handmade garment that works just as well for special occasions as it does for everyday wear.
Matching Child Size Bayberry Cardigan
For an extra special touch, you can make the matching child-size Bayberry Cardigan. It features the same lace stitch design, open front, and customization options. Together, they’re perfect for:
- Mommy-and-me photo shoots
- Handmade holiday gifts
- Coordinating family outfits
If you love making pieces that connect generations, this is a pattern set you don’t want to miss.
Tips for Crocheting the Bayberry Cardigan
Making a garment can feel intimidating, but this pattern makes it approachable.
Swatch for gauge – Getting gauge ensures the cardigan fits properly.
Pick yarn with drape – Acrylics & wool are warm and sturdier, while fibers like bamboo or cotton blend will be more flowy.
Use stitch markers – They’ll help keep track of lace repeats.
Try it on as you go – The open design makes it easy to check fit while working.
Block your finished cardigan – Blocking opens up the lace and smooths the fabric.
Time Commitment and Skill Level
The Bayberry Cardigan crochet pattern is designed for intermediate crocheters. The lace stitch repeat is easy to memorize once you’ve worked a few rows, but the shaping, seaming, and attention to stitch counts make this project more advanced than a beginner-friendly cardigan. If you’ve completed a few garments or enjoy working with lace stitches, you’ll find this pattern both approachable and rewarding.
In terms of time, expect this to be a longer project compared to accessories or small wearables. On average:
- Marathon Crocheters can finish this in a week or less, possibly even a weekend, working on it in marathon sessions of a few hours or more a day.
- Consistent crocheters may finish in about 2–3 weeks, working a little each day.
- Casual crocheters who pick it up in the evenings or on weekends may need 4–6 weeks to complete.
- Yarn and size choice can affect the timeline—larger sizes and longer lengths naturally take more time.
While the Bayberry Cardigan isn’t a “weekend project,” it’s the kind of make that feels worth every stitch. Watching the lacy fabric grow row by row is satisfying, and the finished garment is something you’ll reach for season after season.
How to Get the Bayberry Crochet Cardigan Pattern

Bayberry Cardigan Crochet Pattern
Option 1: Continue scrolling for free pattern instructions on this site
Option 2: Purchase the ad-free PDF that includes tutorial photos from one of my shops
About the Materials
The Bayberry Cardigan shown was made with Lion Brand Pound of Love. A good substitute for this yarn is Knit Picks Brava. You can also use a yarn with different fibers. For instance, if you prefer wools, try Lion Brand Wool Ease or Knit Picks Wool of the Andes, but again, make sure the gauge is the same as what the pattern states.
You will need both the 10.00mm crochet hook and a 6.50mm crochet hook to make this sweater, plus a yarn needle and scissors.
The Crochet Pattern
Keep reading for a list of what you need to make the Bayberry Cardigan for Adults, including the stitch pattern instructions!


That’s the Bayberry Cardigan Crochet Pattern!
The Bayberry Cardigan crochet pattern combines style, comfort, and versatility in one beautiful project. With its lacy stitches, adjustable fit, optional belt, and full size range from XS–5X, it’s a cardigan you’ll want to make in more than one color.
Don’t forget—there’s a child-size Bayberry Cardigan too, so you can make a matching set. (This pattern will be free on our website soon).
This is more than just a free crochet cardigan pattern—it’s a handmade wardrobe staple you’ll treasure for years.

Don’t forget to share!
If you make the Bayberry Cardigan, I’d love to see them! Tag me on Instagram at @blackstone_designs or use the hashtag #BayberryCardigan so I can share your makes with the community.
Join our crochet community group!
Come on over and join the Blackstone Designs Crochet Community on Facebook for fun CALs and giveaways, plus exclusive sales, pattern support, and so much more!

Happy Crocheting!

Written pattern and photographs © 2025 Sonya Blackstone of Blackstone Designs. Do not sell, share, or modify this pattern, but instead share the link to where the pattern can be found. You may sell items you make with this pattern. This pattern, as with all Blackstone Designs/Sonya Blackstone patterns, are not for educational use without written permission from the designer. All rights reserved.
Sonya Blackstone is a participant in the Amazon Services LLC Associates Program, an affiliate advertising program designed to provide a means for us to earn fees by linking to Amazon.com and affiliated sites.



Quit saying the pattern is “free on the blog” when you won’t grant access unless we resubscribe to your emails every time we visit your website. One subscription should be sufficient.
Hello!
Consider it like signing into a website! You aren’t going to receive multiple emails, just the one, and the pattern is still free on this website, you just need to sign in to see it.
If you don’t want to subscribe, you can always purchase the PDF version from Etsy or Ravelry!
-Sonya