
Giant Great White Shark Amigurumi Free Pattern
Follow this crochet pattern to make a Giant Shark Amigurumi that can also double as a pillow! He’s so soft and cuddly, you’ll want to take him everywhere!
This post contains affiliate links. At no extra cost to you, I may receive a small commission from purchases made through affiliate links, which helps me to keep bringing awesome free content!
What better way to wrap up Shark Week than crocheting a Giant Shark Amigurumi? He’s big and squishy and lots of fun to make!
Crocheting this Giant Great White Shark is a fantastic way to challenge your skills and create something truly adorable.
These cute and snuggly creatures offer an opportunity to experiment with different crochet stitches and techniques, making it an ideal project for both confident beginners and experienced crocheters alike.
This big fluffy guy even had my kids fighting over who got to keep him, because he is so sweet and lovable!
And let’s not even get started on how many compliments you will receive! We took him to the lake for his photoshoot and other beach goers were in awe of the Giant Shark Amigurumi!
If you like crocheting amigurumi animals, you may also like Flamingo Friend, Tully the Turtle, or Jellyfish Amigurumi!
How to get the Giant Shark Amigurumi Crochet Pattern:

Giant Shark Amigurumi Crochet Pattern
Option 1: Continue scrolling for free pattern instructions on this site
Option 2: Purchase the ad-free PDF that includes tutorial photos from one of my shops
Option 3: Purchase the “15 Shark Crochet Patterns” ebook.
This pattern is part of the Crochet Shark Week event! Go to the Main Post for event details!
Materials
Chenille Super Bulky Weight Yarn (#6)
- Gray [16.5oz/350yds]
- White [4.6oz/96yds]
- Black [Scraps]
Soft Worsted Weight Yarn (#4)
- White [Scraps] (Teeth)
K/10.5/6.50mm Hook
F/5/3.75mm Hook (Teeth)
24mm Safety Eyes
Fiberfill Stuffing
Yarn Needle
Scissors
Gauge
8 sc x 8 rows = 4”
Gauge is not critical for this project
Finished Measurements
29”Long; 33” Circumference
Stitch Guide
arnd = around
ch = chain
dc = double crochet
dec = single crochet decrease
hdc = half double crochet
sc = single crochet
sc3tog = single crochet three together
sl st(s) = slip stitch(es)
st(s) = stitch(es)
Skill Level
Easy
Written in U.S. Terms


Notes
- Beginning chains do not count as stitches.
- Where asterisks appear, repeat the instructions between them.
- Where parenthesis appear, work those stitches all into the same space.
- Stuff the body generously, but be careful not to overstuff and stretch the stitch, because it will leave gaps and stuffing will pop through.
- Chenille yarn = 100% Polyester and is also known as “blanket yarn”.
- Optional: Use sewing pins to hold pieces in place while you attach them.
Pro Tip: I use hot glue to tack my pieces in place! - Tutorial photos are at the end of the pattern.
Crochet Shark Instructions
BODY
With Gray,
R1. Magic Ring, ch 1, 6 sc in ring (6)
R2. 2 sc arnd (12)
R3. *2 sc, sc* arnd (18)
R4. *sc x 3, 2 sc x 3, sc x 3* 2X (24)
R5. *sc x 2, 2 sc, sc, 2 sc, sc x 2, 2 sc, sc, 2 sc, sc x 2* 2X (32)
R6. *sc x 4, 2 sc x 2, sc x 4, 2 sc x 2, sc x 4*, 2X (40)
R7. *sc x 4, 2 sc, sc x 2, 2 sc, sc x 4, 2 sc, sc x 2, 2 sc, sc x 4* 2X (48)
R8. sc arnd (48)
R9. *2 sc, sc x 7* arnd (54)
R10. *2 sc, sc x 8* arnd (60)
R11. *2 sc, sc x 9* arnd (66)
R12. *2 sc, sc x 10* arnd (72)
R13-33. sc arnd (72):
Insert Safety Eyes between R14 & 15, approximately 34 sts apart.
R34. *dec, sc x 10* arnd (66)
R35-36. sc arnd (66)
R37. *dec, sc x 9* arnd (60)
R38-39. sc arnd (60)
R40. *dec, sc x 8* arnd (54)
R41-42. sc arnd (54)
R43. *dec, sc x 7* arnd (48)
R44-45. sc arnd (48)
R46. *dec, sc x 6* arnd (42)
R47-48. sc arnd (42)
R49. *dec, sc x 5* arnd (36)
R50-51. sc arnd (36)
Begin Stuffing
R52. *dec, sc x 4* arnd (30)
R53-54. sc arnd (30)
R55. *dec, sc x 3* arnd (24)
R56-57. sc arnd (24)
R58. *dec, sc x 2* arnd (18)
R59-60. sc arnd (18)
R61. *dec, sc* arnd (12)
R62-63. sc arnd (12)
Finish Stuffing
R64. dec arnd (6)
R65-66. sc arnd; Fasten. (6)

BELLY PATCH
With White,
R1. Ch 12, sc in 2nd ch from hook and across, turn (11)
R2. Ch 1, 2 sc, sc x 9, 2 sc, turn (13)
R3. Ch 1, 2 sc, sc x 11, 2 sc, turn (15)
R4. Ch 1, 2 sc, sc x 13, 2 sc, turn (17)
R5. Ch 1, 2 sc, sc x 15, 2 sc, turn (19)
R6. Ch 1, 2 sc, sc x 17, 2 sc, turn (21)
R7. Ch 1, 2 sc, sc x 19, 2 sc, turn (23)
R8. Ch 1, 2 sc, sc x 21, 2 sc, turn (25)
R9-30. Ch 1, sc across, turn (25)
R31. Ch 1, dec, sc x 21, dec, turn (23)
R32. Ch 1, dec, sc x 19, dec, turn (21)
R33. Ch 1, dec, sc x 17, dec, turn (19)
R34. Ch 1, dec, sc x 15, dec, turn (17)
R35. Ch 1, dec, sc x 13, dec, turn (15)
R36. Ch 1, dec, sc x 11, dec, turn (13)
R37. Ch 1, dec, sc x 9, dec, turn (11)
R38. Ch 1, dec, sc x 7, dec, turn (9)
R39. Ch 1, dec, sc x 5, dec, turn (7)
R40. Ch 1, dec, sc x 3, dec, turn (5)
R41. Ch 1, dec, sc, dec, turn (3)
R42. Ch 1, sc3tog, turn (1)
R43. Ch 1, sc, do not turn (1)
R44. Ch 1, sc in the end of each row and in each st arnd the outside; Fasten.
PECTORAL FIN (Make 2)
With Gray,
R1. Magic Ring, ch 1, 4 sc in ring (4)
R2. sc arnd (4)
R3. *2 sc, sc* 2X (6)
R4. *2 sc, sc x 2* 2X (8)
R5. *2 sc, sc x 3* 2X (10)
R6. *2 sc, sc x 4* 2X (12)
R7. *2 sc, sc x 5* 2X (14)
R8. sc arnd (14)
R9. *2 sc, sc x 6* 2X (16)
R10. sc arnd (16)
R11. *2 sc, sc x 7* 2X (18)
R12. sc arnd (18)
R13. *2 sc, sc x 8* 2X (20)
R14. sc arnd (20)
R15. *2 sc, sc x 9* 2X (22)
R16. sc arnd; Fasten. (22)

1ST DORSAL FIN (FRONT)
With Gray,
R1. Magic Ring, ch 1, 4 sc in ring (4)
R2. sc arnd (4)
R3. *2 sc, sc* 2X (6)
R4. sc arnd (6)
R5. *2 sc, sc x 2* 2X (8)
R6. sc arnd (8)
R7. *2 sc, sc x 3* 2X (10)
R8. sc arnd (10)
R9. *2 sc, sc x 4* 2X (12)
R10. sc arnd (12)
R11. 2 sc x 2, sc x 10 (14)
R12. sc, 2 sc x 2, sc x 11 (16)
R13. sc x 2, 2 sc x 2, sc x 12 (18)
R14. sc x 3, 2 sc x 2, sc x 13 (20)
R15. *2 sc, sc x 4* arnd (24)
R16. *2 sc, sc x 3* arnd; Fasten. (30)
2ND DORSAL FIN (REAR)
With Gray,
R1. Magic Ring, ch 1, 4 sc in ring (4)
R2. *2 sc, sc* 2X (6)
R3. *2 sc, sc x 2* 2X (8)
R4. *2 sc, sc x 3* 2X (10)
R5. *2 sc, sc x 4* 2X; Fasten. (12)
UPPER CAUDAL FIN
With Gray,
R1. Magic Ring, ch 1, 4 sc in ring (4)
R2. sc arnd (4)
R3. *2 sc, sc* 2X (6)
R4. sc arnd (6)
R5. *2 sc, sc x 2* 2X (8)
R6. sc arnd (8)
R7. *2 sc, sc x 3* 2X (10)
R8. sc arnd (10)
R9. *2 sc, sc x 4* 2X (12)
R10. sc arnd (12)
R11. *2 sc, sc x 5* 2X (14)
R12. sc arnd (14)
R13. *2 sc, sc x 6* 2X (16)
R14. sc arnd (16)
R15. 2 sc x 2, sc x 14 (18)
R16. sc, 2 sc x 2, dec, sc x 12, dec (18)
R17. Repeat R16; Fasten. (18)
LOWER CAUDAL FIN
With Gray,
R1. Magic Ring, ch 1, 4 sc in ring (4)
R2. sc arnd (4)
R3. *2 sc, sc* 2X (6)
R4. sc arnd (6)
R5. *2 sc, sc x 2* 2X (8)
R6. sc arnd (8)
R7. *2 sc, sc x 3* 2X (10)
R8. sc arnd (10)
R9. *2 sc, sc x 4* 2X (12)
R10. sc arnd (12)
R11. *2 sc, sc x 5* 2X (14)
R12. sc arnd (14)
R13. *2 sc, sc x 6* 2X (16)
R14. sc arnd; Fasten. (16)
TEETH
With White,
Ch 31, hdc in 2nd ch from hook, (ch 3, sl st to 1st ch), sc in next ch from ch-31, sl st in next ch from ch-31, *hdc, (ch 2, sl st to 1st ch), sc, sl st* 9X; Fasten. (10 “teeth”)
Finishing
- With Black, stitch a mouth onto Belly Patch between R8-9, centered and working across 11 stitches, bring the edges of the mouth diagonally down to R11.
- Line teeth up just under the mouth, following the stitch line, and attach (only the chain, leave “teeth” loose).
- Stitch nostrils onto Belly Patch on R44 (finishing round) lined up with R4.
- Attach Belly Patch to bottom of body, so R1 of belly goes across R1 of body (cutting the round half and half), bring belly patch down so R43 is centered on the tail.
- Flatten Pectoral Fin and attach to the side of the body of R23-31, so it sits on top of the belly patch. Repeat with the other side.
- Flatten 1st Dorsal Fin and attach to top of body centered over R32-41.
- Flatten 2nd Dorsal Fin and attach to top of body centered over R51-55.
- Flatten Upper Caudal Fin and attach to the top of the tail centered over R60 to the end, leaving a small piece hanging loose off the end.
- Flatten Lower Caudal Fin and attach to opposite side of Upper Caudal Fin, over R61 to the end, leaving a small piece hanging loose off the end; stitch the loose ends of the Upper and Lower Caudal Fins together to join.
- With Black, stitch gills onto body sides starting at the belly patch and working over 8 or 9 stitches; 1st Gill: between R31-32, 2nd Gill: between R32-33, 3rd Gill: between R33-34. Repeat on the other side.
- Hide all strings.
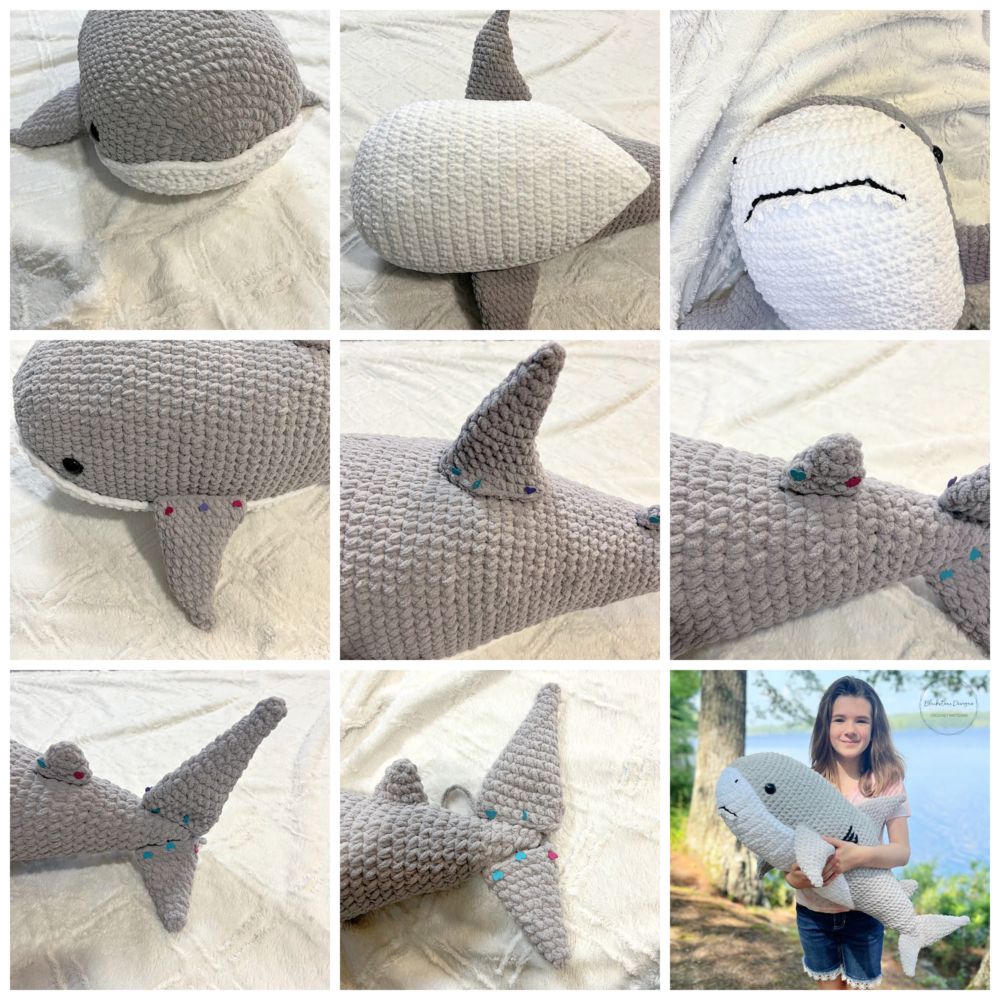
And that’s how you Crochet a Giant Shark Amigurumi!

Join our crochet community group!
Come on over and join the Blackstone Designs Crochet Community on Facebook for fun CALs and giveaways, plus exclusive sales, pattern support, and so much more!
Don’t forget to share!
Tag me on Instagram at @blackstone_designs or use the hashtag #BlackstoneDesignsCrochet so I can share your makes with the community!
Happy Crocheting!

Written pattern and photographs © 2023 Sonya Blackstone of Blackstone Designs. Please do not sell, share, or modify this pattern, but instead share the link to where the pattern can be found. You may sell items you make with this pattern. This pattern, as with all Blackstone Designs/Sonya Blackstone patterns, are not for educational use without written permission from the designer. All rights reserved.
Sonya Blackstone is a participant in the Amazon Services LLC Associates Program, an affiliate advertising program designed to provide a means for us to earn fees by linking to Amazon.com and affiliated sites.


Thank you for the fun patterns this week. I have to ask is the red a typo on this pattern? I don’t see it used anywhere.
Hi Amanda!
Yes, that was a typo! Originally I had designed the mouth differently, but changed it and forgot to remove it from the pattern.
Thanks for letting me know!
-Sonya
I think rounds 38-39 should be a count of 60, am I correct? It says 66, but I just did the decrease row of 9 stitches and 1 decrease for a total of 60 stitches.
Hi Kari!
Yes, that was a copy/paste error! Thanks for pointing it out!!
-Sonya
i’m at row 40 right now, but when you first start the shark, which part of the shark is it??
Hello!
When starting the shark, you are starting at the head.
-sonya
I hate autocorrect. The above question is 4-7 of the body be around?
Hi Linda!
Yes, the body is worked in continuous rounds unless otherwise stated.
-Sonya
I still can’t figure out where to place the eyes. Only thing I see is between rows 14-15. How far apart?
Thank you
Hi Leslie!
There should be approximately 34 sts between the eyes.
-Sonya
Thank you Sonya. Now I am having trouble with the belly. The stitch count gets wonky. When you chain one at the beginning of each row, which chain from the hook do you start?
Hi Leslie!
You start in the 2nd ch from hook for a total of 11 sc.
-Sonya
Hi just wondering how much stuffing i should buy for this? would i need only 12oz or more like 50oz?
Thanks!
Hi Franny!
I purchased a 50oz bag!
-Sonya
Hi, love this design! But I’m stuck on figuring out how to attach the belly patch and was wondering how to do so, it it with a typical stitch or single crochets?
Thanks for the help in advance!
Karissa
Hi Karissa!
I attached the belly patch with hot glue, but you can stitch it on also, whichever method you prefer.
-Sonya
Hello, I am excited to make this shark. My daughter has been asking me to do on and a frog as well. This is my first time doing this type of project, so wish me luck. I will send you a photo when it is complete. Thanks for an amazing pattern.
How exciting! I can’t wait to see it!
-Sonya
Can you help me figure out how to attach a row of teeth (31 stitches) to a mouth that spans 11 stitches plus 2-3 on each end as it slants down 2 rows ?
Hi Sherri!
The teeth should be worked in a worsted weight yarn, which is much thinner, and therefore takes more stitches to cover the same amount of space.
-Sonya
hi! I’m just wondering around how much the materials cost in total, and how long this took? My friend wants me to make this for her, but I want to know the commitment level before I begin. thanks in advance!
Hi Marcia!
I think it cost about $40 in supplies, but that will depend on what materials you purchase and from where.
For instance: buying generic filling vs name brand, buying Bernat Blanket yarn vs Mainstays from walmart…etc.
-Sonya
hello , I am 11 years old and I started crocheting since I was 7 .
This isn’t my first time to crochet plushie. I need to finish this project in one week because I want to give it to my best friend as a birthday gift. is it possible?
Hello!
It is possible to get it done in a week! It just depends on how easy it is for you to work with fluffy yarns!
-Sonya