Free Road Trip Mittens Crochet Pattern
There’s something special about having a project you can toss in your bag and work on anywhere — in the passenger seat, at appointments, during kids’ activities, or while relaxing at home. The Road Trip Mittens are exactly that kind of project: simple, cozy, and satisfying to work up no matter where your day takes you.
This post contains affiliate links. At no extra cost to you, I may receive a small commission from purchases made through affiliate links, which helps me to keep bringing awesome free content!
These mittens feature gentle texture, clean striping, and a comfy fit that makes them perfect for everyday winter wear. They’re quick to make, easy to customize, and ideal for gift giving. Whether this is your first time crocheting mittens or your fiftieth, this pattern is a relaxing, go-to project you’ll want to make again and again.
In this post, we’ll walk through everything you need to know about the Road Trip Mittens — from yarn choices and fit to customization ideas and tips for getting the perfect pair.
And don’t forget the matching Road Trip Beanie!
Why You’ll Love the Road Trip Mittens
If you’re looking for a mitten pattern that works for just about anyone, this one checks all the boxes:
Easy, relaxing stitches
The Road Trip Mittens use simple stitches that create a lightly textured fabric. No complicated shaping or advanced techniques required.
Perfect for on-the-go crocheting
The repeat stays the same through most of the mitten, making it easy to work on without constantly checking your pattern.
Warm without being bulky
The stitch pattern lays flat and creates a soft, flexible fabric that feels great to wear.
Customizable color options
The stripes give you plenty of room to play with color — solids, variegated yarns, neutrals, bold colors, you name it.
Great for gifting
Mittens are always a hit during the holidays, and this pair looks polished enough to give as a handmade gift.
A Closer Look at the Design
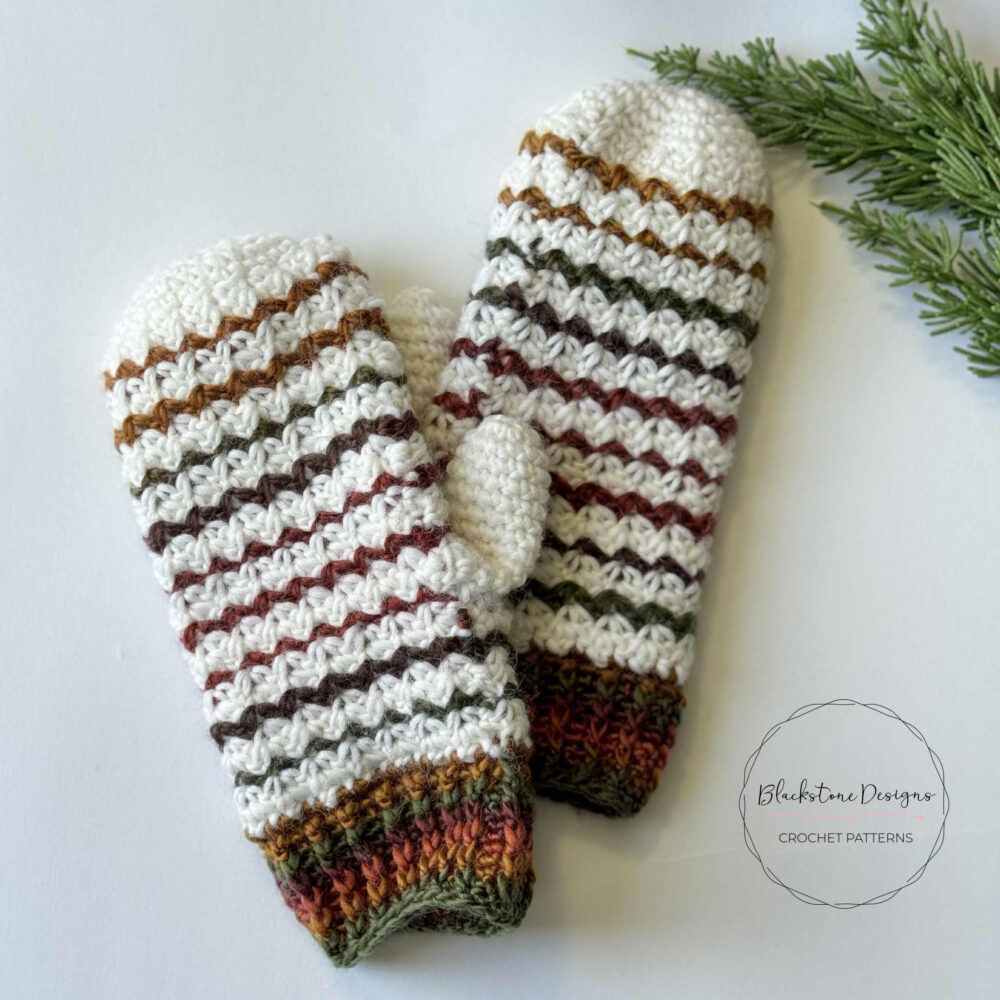
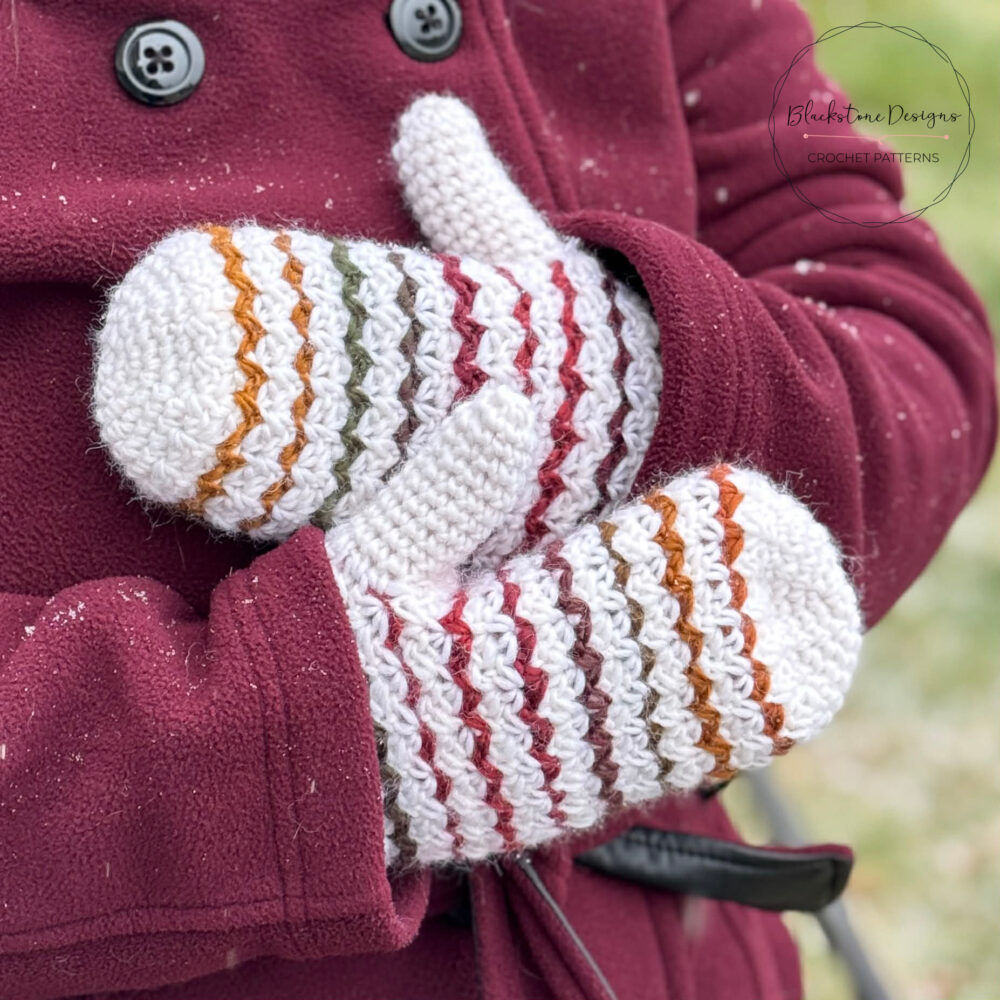
The Road Trip Mittens have a classic look with a modern touch. They’re lightly textured, simple to wear, and easy to pair with any winter outfit. The striping adds a little visual interest without making the project complicated, and the clean shape keeps the mittens looking neat and intentional.
These are the kind of mittens that look great whether you’re out running errands, heading to work, or enjoying a snowy walk.
The Texture
The stitch repeat creates a soft, subtle texture that gives the mittens a nice handmade feel without being overly raised or bulky. The fabric works up flat and even, making the mittens warm and comfortable while still keeping a sleek overall look.
The Color Play
The stripes are one of the standout features of this design, and you can tailor them to your own style. Use:
- Earthy neutrals
- Bright winter tones
- Soft pastels
- Deep jewel colors
- Christmas-themed stripes
- Variegated yarn for effortless color changes
- Leftover scraps for a fun, scrappy pair
The mittens look great in one solid color too if you prefer something simple and classic.
The Fit
These mittens are designed with a comfortable, easy fit. They’re not too tight, not too loose — just snug enough to keep the cold out while still giving your hands room to move. The thumb shaping is smooth and simple, and the cuff has just the right amount of stretch to stay in place without digging in.
Whether you’re wearing them around town or on a winter adventure, they feel great and keep your hands cozy.
Customizing Your Mittens
One of the best things about the Road Trip Mittens is how easy they are to customize. Here are a few ideas:
Go solid
Skip the stripes for a classic winter mitten with timeless style.
Add color blocking
Use one color for the cuff, another for the body, and a third for the thumb.
Make a matching set
Pair them with the Road Trip Beanie for a coordinated winter bundle.
Use variegated yarn
Let the yarn do the colorwork for you — effortless and beautiful.
Adjust the cuff length
Longer cuff = extra cozy. Shorter cuff = quicker project.
Create a scrappy version
Use leftover yarn for a fun, playful set of stripes.
Time Commitment & Skill Level
Time: Approximately 1.5-2 hours per mitten (depending on size)
Skill Level: Advanced beginner to intermediate
If you know all the basics, you’re comfortable with front-post stitches, and can maintain even tension, you’ll have no trouble completing this project.
Yarn + Materials
The Road Trip Mittens call for worsted weight yarn, which makes them warm, practical, and easy to find in a huge variety of colors. You can use solids, stripes, or color-changing yarn depending on the look you want. I did use wool yarns for the pair shown, but other fibers can be used!
Yarn Options:
- Acrylic or acrylic blends – durable and washable
- Wool blends – warm, breathable, and great for cold climates
- Color-changing yarns – create beautiful striping with minimal effort
- Stash yarn – great for using up leftovers
You’ll also need the hook size recommended in the pattern and a few standard notions.
Perfect For…
Everyone! These mittens make wonderful gifts for:
- Teens and adults
- Teachers
- Coworkers
- Friends and family
- Market shoppers
- Anyone who loves cozy winter accessories
They’re also great for craft fairs and holiday markets — quick to make and easy to customize for different color preferences.
How to Get the Road Trip Mittens Crochet Pattern

Road Trip Mittens
Crochet Pattern
Option 1: Continue scrolling for free pattern instructions on this site
Option 2: Purchase the ad-free PDF that includes tutorial photos from one of my shops
About the Materials
The Road Trip Mittens were made with Worsted Weight Yarn, specifically Lion Brand Wool Ease Roving Origins and Loops & Threads Facets.
Good substitutes for Loops & Threads Facets are Lion Brand Landscapes, Red Heart Unforgettable, and Scheepjes Wanderlust.
You will also need an H/8/5.00mm crochet hook, yarn needle, and scissors.
The Crochet Pattern
Keep reading for a list of what you need to make the Road Trip Mittens, including the stitch pattern instructions!


Materials
Lion Brand Wool Ease Roving Yarn (#4)
- Solid (A) [<2.5oz / <150yds]
Lion Brand Landscapes Yarn (#4)
- Variegated (B) [<1.5oz /<120yds]
G/6/4.00mm Hook
Yarn Needle
Scissors
Gauge
6.25 spider sts x 14 rows = 3” (When flat)
Sizes (Calf Measurement)
Toddler (5”C / 4”L Hand)
Child (6”C / 5”L Hand)
Small Adult (7”C / 6”L Hand)
Large Adult (8”C / 7.5”L Hand)
Stitch Guide
arnd = around
ch = chain
FPdc = Front Post Double Crochet
sc = single crochet
sl st(s) = slip stitch(es)
st(s) = stitch(es)
Skill Level
Easy
Pattern Written in U.S. Terms
Notes
- Beginning ch-1 does not count as a stitch
- Sizes are separated out.
- These mittens are worked from the top down.
- When asterisks appear, repeat steps between them: *to*.
- Where parenthesis appear within the instructions, work those stitches into the same space.
- This pattern is a no sew, one piece pattern, worked in continuous rounds. The thumb is worked onto the mitten (not sewn on).
- The thumbhole “corner” is where the chain stitches meet the base stitches.
- Gauge: Spider stitch = (sc, ch 1, sc) in each ch-1 space across
Instructions
TODDLER
MITTEN BODY
With Color A,
R1. Magic ring, ch 1, 6 sc in ring (6)
R2. 2 sc arnd (12)
R3. *2 sc, sc* arnd (18)
R4. *2 sc, sc x 2* arnd (24)
R5. Ch 1, *skip 1, (sc, ch 1, sc)* arnd, sl st to join in 1st sc, turn (24)
R6. Ch 1, (sc, ch 1, sc) in each ch-1 space arnd, sl st to join in 1st sc, turn (24)
With Color B,
R7. Ch 1, (sc, ch 1, sc) in each ch-1 space arnd, sl st to join in 1st sc, turn (24)
With Color A,
R8-9. Ch 1, (sc, ch 1, sc) in each ch-1 space arnd, sl st to join in 1st sc, turn (24)
R10-18. Repeat R7-9 (following color change pattern)
With Color B,
R19. Ch 4, skip 2 ch-1 spaces, (sc, ch 1, sc) in each ch-1 space arnd, sl st to join in ch-4 space, turn <Thumbhole Created>
With Color A,
R20. (sc, ch 1, sc) in each ch-1 space arnd, *(sc, ch 1, sc), skip 1* 2X across back bump of ch-4, sl st to join in 1st sc, turn
R21. Ch 1, (sc, ch 1, sc) in each ch-1 space arnd, sl st to join in 1st sc, do not turn
With Color B,
R22. Ch 1, (sc, ch 1, sc) in each ch-1 space arnd sl st to join in 1st sc, turn
R23-24. Repeat R22 (following color change pattern), turn; Fasten Color A.
With Color B,
R25. Ch 1, sc in each sc arnd (skipping ch-1 spaces for R25), sl st to join, do not turn (24)
R26. Ch 1, *FPdc, sc* arnd, sl st to join, turn (24)
R27-30. Repeat R25-26; Fasten at the end of R30.
THUMBS
R1. Attach yarn to thumbhole opening, sc in each ch and st arnd (8)
R2-6. sc arnd (8)
R7. dec arnd (4); Cut tail and weave through remaining sts, then pull tight to close. Secure tail. Repeat on other mitten.
CHILD
MITTEN BODY
With Color A,
R1. Magic ring, ch 1, 6 sc in ring (6)
R2. 2 sc arnd (12)
R3. *2 sc, sc* arnd (18)
R4. *2 sc, sc x 2* arnd (24)
R5. *2 sc, sc x 5* 4X (28)
R6. Ch 1, *skip 1, (sc, ch 1, sc)* arnd, sl st to join in 1st sc, turn (28)
R7. Ch 1, (sc, ch 1, sc) in each ch-1 space arnd, sl st to join in 1st sc, turn (28)
With Color B,
R8. Ch 1, (sc, ch 1, sc) in each ch-1 space arnd, sl st to join in 1st sc, turn (28)
With Color A,
R9-10. Ch 1, (sc, ch 1, sc) in each ch-1 space arnd, sl st to join in 1st sc, turn (28)
R11-22. Repeat R8-10 (following color change pattern)
With Color B,
R23. Ch 6, skip 2 ch-1 spaces, (sc, ch 1, sc) in each ch-1 space arnd, sl st to join in ch-6 space, turn <Thumbhole Created>
With Color A,
R24. (sc, ch 1, sc) in each ch-1 space arnd, *(sc, ch 1, sc), skip 1* 3X across back bump of ch-6, sl st to join in 1st sc, turn
R25. Ch 1, (sc, ch 1, sc) in each ch-1 space arnd, sl st to join in 1st sc, turn
With Color B,
R26. Ch 1, (sc, ch 1, sc) in each ch-1 space arnd, sl st to join in 1st sc, turn
R27-31. Repeat R26 (following color change pattern), turn; Fasten Color A.
With Color B,
R32. Ch 1, sc in each sc arnd (skipping ch-1 spaces for R32), sl st to join, do not turn (28)
R33. Ch 1, *FPdc, sc* arnd, sl st to join, turn (28)
R34-39. Repeat R32-33 Fasten at the end of R39.
THUMBS
R1. Attach yarn to thumbhole opening, sc in each ch and st arnd (10)
R2-8. sc arnd (10)
R9. dec arnd (5); Cut tail and weave through remaining sts, then pull tight to close. Secure tail. Repeat on other mitten.
SMALL ADULT
MITTEN BODY
With Color A,
R1. Magic ring, ch 1, 6 sc in ring (6)
R2. 2 sc arnd (12)
R3. *2 sc, sc* arnd (18)
R4. *2 sc, sc x 2* arnd (24)
R5. *2 sc, sc x 3* arnd (30)
R6. *2 sc, sc x 14* 2X, sl st to join, do not turn (32)
R7. Ch 1, *skip 1, (sc, ch 1, sc)* arnd, sl st to join in 1st sc, turn (32)
R8. Ch 1, (sc, ch 1, sc) in each ch-1 space arnd, sl st to join in 1st sc, turn (32)
With Color B,
R9. Ch 1, (sc, ch 1, sc) in each ch-1 space arnd, sl st to join in 1st sc, turn (32)
With Color A,
R10-11. Ch 1, (sc, ch 1, sc) in each ch-1 space arnd, sl st to join in 1st sc, turn (32)
R12-26. Repeat R9-11 (following color change pattern)
With Color B,
R27. Ch 6, skip 3 ch-1 spaces, (sc, ch 1, sc) in each ch-1 space arnd, sl st to join in ch-6 space, turn <Thumbhole Created>
With Color A,
R28. (sc, ch 1, sc) in each ch-1 space arnd, *(sc, ch 1, sc), skip 1* 3X across back bump of ch-6, sl st to join in ch-6 space, turn
R29. Ch 1, (sc, ch 1, sc) in each ch-1 space across, sl st to join in 1st sc, turn
With Color B,
R30. Ch 1, (sc, ch 1, sc) in each ch-1 space across, sl st to join in 1st sc, turn
R31-35. Repeat R30 (following color change pattern); do not turn at the end of R35.
With Color B,
R36. Ch 1, sc in each sc arnd (skipping ch-1 spaces for R36), sl st to join, do not turn (32)
R37. Ch 1, *FPdc, sc* arnd, sl st to join, turn (32)
R38-45. Repeat R36-37; Fasten at the end of R45.
THUMBS
R1. Attach yarn to thumbhole opening, sc in each ch and st arnd (12)
R2-10. sc arnd (12)
R11. dec arnd (6); Cut tail and weave through remaining sts, then pull tight to close. Secure tail. Repeat on other mitten.
LARGE ADULT
MITTEN BODY
With Color A,
R1. Magic ring, ch 1, 6 sc in ring (6)
R2. 2 sc arnd (12)
R3. *2 sc, sc* arnd (18)
R4. *2 sc, sc x 2* arnd (24)
R5. *2 sc, sc x 3* 4X (30)
R6. *2 sc, sc x 4* 2X (36)
R7. Ch 1, *skip 1, (sc, ch 1, sc)* arnd, sl st to join in 1st sc, turn (36)
R8. Ch 1, (sc, ch 1, sc) in each ch-1 space arnd, sl st to join in 1st sc, turn (36)
With Color B,
R9. Ch 1, (sc, ch 1, sc) in each ch-1 space arnd, sl st to join in 1st sc, turn (36)
With Color A,
R10-11. Ch 1, (sc, ch 1, sc) in each ch-1 space arnd, sl st to join in 1st sc, turn (36)
R12-29. Repeat R9-11 (following color change pattern)
With Color B,
R30. Ch 8, skip 3 ch-1 spaces, (sc, ch 1, sc) in each ch-1 space arnd, sl st to join in ch-8 space, turn <Thumbhole Created>
With Color A,
R31. (sc, ch 1, sc) in each ch-1 space arnd, *(sc, ch 1, sc), skip 1* 4X across back bump of ch-8, sl st to join in 1st sc, turn
R32. Ch 1, (sc, ch 1, sc) in each ch-1 space arnd, sl st to join in 1st sc, turn
With Color B,
R33. Ch 1, (sc, ch 1, sc) in each ch-1 space arnd, sl st to join in 1st sc, turn
R34-41. Repeat R33 (following color change pattern); do not turn at the end of R41.
With Color B,
R42. Ch 1, sc in each sc arnd (skipping ch-1 spaces for R42), sl st to join, do not turn (36)
R43. Ch 1, *FPdc, sc* arnd, sl st to join, turn (36)
R44-51. Repeat R42-43; Fasten at the end of R51.
THUMBS
R1. Attach yarn to thumbhole opening, sc in each ch and st arnd (14)
R2-12. sc arnd (14)
R13. dec arnd (7); Cut tail and weave through remaining sts, then pull tight to close. Secure tail. Repeat on other mitten.
Finishing
- Hide all strings.
- Optional: Add folding tags to cuff.
Now you have Road Trip Mittens!
If you’re looking for a winter project that’s warm, practical, and enjoyable to make, the Road Trip Mittens are an instant favorite. They’re simple without being boring, customizable without being fussy, and perfect for keeping your hands warm all season long.
I hope you enjoy making them as much as I enjoyed designing them!
Don’t forget to share!
If you make the Road Trip Mittens, I’d love to see it! Tag me on Instagram at @blackstone_designs or use the hashtag #blackstonedesigns so I can share your makes with the community.
Join our crochet community group!
Come on over and join the Blackstone Designs Crochet Community on Facebook for fun CALs and giveaways, plus exclusive sales, pattern support, and so much more!
Happy Crocheting!

Written pattern and photographs © 2025 Sonya Blackstone of Blackstone Designs. Do not sell, share, or modify this pattern, but instead share the link to where the pattern can be found. You may sell items you make with this pattern. This pattern, as with all Blackstone Designs/Sonya Blackstone patterns, are not for educational use without written permission from the designer. All rights reserved.
Sonya Blackstone is a participant in the Amazon Services LLC Associates Program, an affiliate advertising program designed to provide a means for us to earn fees by linking to Amazon.com and affiliated sites.