Classic Cables Boot Cuffs – Free Crochet Pattern
If you’ve ever wanted to try crochet cables, this pattern is the perfect place to start! The Classic Cables Boot Cuffs use one of the most common cable stitches, making it simple to learn and fun to make. These cozy boot cuffs work up quickly and add just the right touch of texture and handmade charm to your fall and winter outfits.
This post contains affiliate links. At no extra cost to you, I may receive a small commission from purchases made through affiliate links, which helps me to keep bringing awesome free content!
Whether you’re headed out for a walk in the crisp air or just want to add a pop of crochet style to your boots, this pattern is sure to become a favorite.
Let’s Talk Cables
Cables are made by working post stitches that cross over one another, and once you get into the rhythm, it’s surprisingly easy (and a little addictive!).
If you’ve never tried crochet cables before, this pattern is a great place to start. The cables featured are the style used most often in crochet projects and they are the most beginner friendly!
Plus, the Classic Cables Boot Cuffs are a small project, which makes them perfect for learning the technique and building your confidence before tackling larger cable patterns.
What are Boot Cuffs?
Crochet boot cuffs are short leg warmers that sit right at the top of your boots, giving the look of tall socks without the bulk. They’re a simple way to add warmth and a little personality to any outfit.
The Classic Cables Boot Cuffs take that idea and make it even better with a little extra texture. They’re stretchy, comfortable, and a great way to test out crochet cables if you’ve never made them before.
Boot Cuffs vs. Leg Warmers
| Feature | Boot Cuffs | Leg Warmers |
|---|---|---|
| Length | Short — usually 3–6″ tall | Long — often 10–18″ tall |
| Worn With | Tucked inside the top of boots | Over pants/tights, under or over boots |
| Purpose | Adds the look of tall socks without bulk | Adds warmth and coverage up the leg |
| Best For | Fall outfits, Winter outfits, layering | Cozy loungewear or colder climates |
| Yarn Use | Minimal — great stash buster! | Uses more yarn for full coverage |
In short: Boot cuffs are like the stylish “peek-a-boo” layer for your boots, while leg warmers are more about warmth and full coverage. Both are fun to make—but if you’re short on time or yarn, boot cuffs are the quick win!
Why You’ll Love the Classic Cables Boot Cuffs
- Quick to make. Perfect for craft fairs, gifts, or when you want a fast project between bigger makes.
- Beginner-friendly cables. Learn how to crochet cables the easy way with clear repeats and simple stitches.
- Practical and stylish. Adds warmth without bulk — perfect for layering and stops snow from getting into your boots.
- Gift-ready. These are small, packable, and always appreciated.
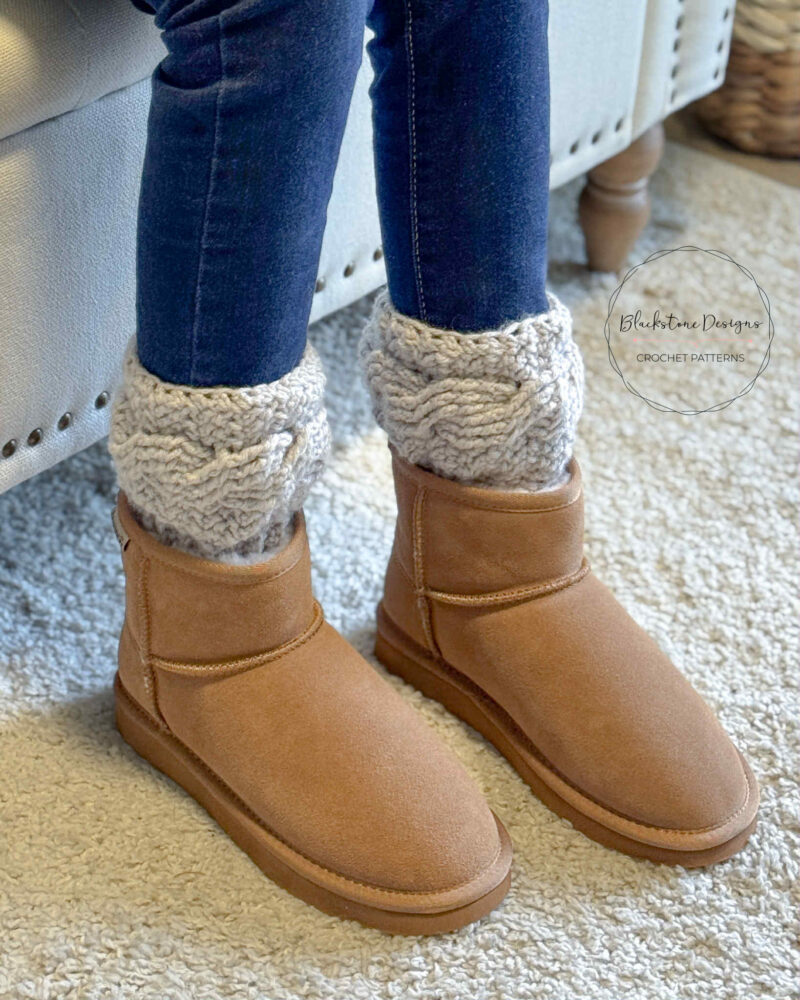
How to Style your Boot Cuffs
These cozy cuffs are as versatile as they are cute. Here are a few favorite ways to wear them:
- With tall boots and skinny jeans
- Tucked into ankle boots
- With tall boots, tights, and a flowy dress
- Over leggings with an oversized sweater
No matter your outfit, these boot cuffs add just the right amount of crochet charm.
Customization Ideas
One of the best parts about this pattern is how easy it is to make them your own. Here are a few simple ways to customize your Classic Cables Boot Cuffs:
- Add buttons or tags. Sew a button or faux leather tag to the top edge for a rustic finish.
- Try variegated yarns. A softly changing colorway makes the cables stand out even more.
- Mix colors. Work the ribbing and cables in different shades for a fun contrast.
- Use neutrals or brights. Soft cream and gray are classic choices, while jewel tones give your outfit a pop of color.
Each pair can look completely different just by changing the yarn or adding a small detail.
Time Commitment & Skill Level
Time: Approximately 1.5-2 hours
Skill Level: Advanced beginner to intermediate
If you know all the basics, you’re comfortable with front-post stitches, and can maintain even tension, you’ll have no trouble completing this project. This six stitch cable may look advanced, but once you understand the repeat, it flows beautifully.
Tips for Success
Watch your tension. When finishing the boot cuffs you will use slip stitches and single crochets: keep the tension looser here, so the boot cuffs maintain their stretchability.
Check your gauge. A quick swatch helps ensure your cuffs fit just right. Once you reach your final row of the main portion, make sure your strip measures within the calf measurement range to ensure fit.
Use stitch markers. They’re handy for keeping track of repeats.
Steam block lightly. It helps the cables open up and gives a neat finish.
Perfect For…
Gifting: Fast and beautiful, they’re ideal for birthdays and holidays.
Craft fairs: Uses minimal yarn and sells well as a cold weather accessory.
Donations: Great for charity drives or giving to those in need.
Stash-busting: Perfect for using up partial skeins of worsted weight yarn.
This pattern was designed for the 2025 Giftstravaganza Blog Hop!

The Giftstrabaganza Blog Hop is a crochet designer collaboration, where we design giftable crochet projects for your holiday celebrations! To learn more about this event, visit Underground Crafter!
To get your free PDF download from this site, click the button below!

How to Get the Classic Cables Boot Cuffs Crochet Pattern

Classic Cables Boot Cuffs Crochet Pattern
Option 1: Continue scrolling for free pattern instructions on this site
Option 2: Purchase the ad-free PDF that includes tutorial photos from one of my shops
About the Materials
The Classic Cables Boot Cuffs were made with Worsted Weight Yarn, specifically Loops & Threads Impeccable.
Other great yarn options are KnitPicks Brava, Knit Picks Wool of the Andes, and Lion Brand Heartland.
You will also need an H/8/5.00mm crochet hook and scissors.
The Crochet Pattern
Keep reading for a list of what you need to make the Classic Cables Boot Cuffs, including the stitch pattern instructions!


Materials
Worsted Weight Yarn (#4)
- Any Color [110,120,130,140yds]
H/8/5.00mm Hook
Yarn NeedleScissors
Gauge
1 cbl + 1 HBdc = 2”
Sizes (Calf Measurement)
S (10-12”)[25-30.5cm]
M (12-14”)[30.5-35.5cm]
L (14-16”)[35.5-41cm]
XL (16-18”)[41-46cm]
Stitch Guide
arnd = around
BPtrc = back post treble crochet
ch = chain
dc = double crochet
esc = See Special Stitches
FPtrc = front post treble crochet
HBdc = See Special Stitches
sc = single crochet
sl st(s) = slip stitch(es)
trc = treble crochet
Skill Level
Easy
Pattern Written in U.S. Terms
Notes
- Beginning chains do not count as stitches.
- When asterisks appear, repeat the instructions between them.
- The sizes listed are the calf sizes the boot cuffs should fit.
- At the end of the main portion, before seaming into a cuff, measure the strip to make sure it fits within the calf measurement range listed above.
- Boot Cuffs shown were made using Loops & threads Impeccable in the color Putty.
Special Stitches
Herringbone Double Crochet (HBdc): YO, insert hook in st, draw up a loop, pull through first loop on hook, YO, pull through first loop on hook, YO, pull through both loops.
Extended Single Crochet (esc): Insert hook, draw up a loop, YO, draw through 1st loop, Yarn over, draw through both loops
Instructions
BOOT CUFF BASE (Make 2)
R1. Ch 13, HBdc in 2nd ch from hook and across, turn (12)
R2. Ch 2, HBdc x 3, trc x 6, HBdc x 3, turn (12)
R3. Ch 2, HBdc x 3, skip 3 trc sts, FPtrc in next 3, FPtrc in 3 skipped sts, HBdc x 3 (in last 3 unworked sts), turn (12)
R4. Ch 2, HBdc x 3, BPtrc x 6 (in FPtrc’s, working top three and then bottom three in order), HBdc x 3, turn (12)
R5. Ch 2, HBdc x 3, FPtrc x 6, HBdc x 3, turn (12)
R6. Ch 2, HBdc x 3, BPtrc x 6, HBdc x 3, turn (12)
R7–23(27,31,35). Repeat R3-6 (12)
R24(28,32,36). Holding right sides together and lining up short ends, sl st across, working through both layers to join them; Flip right side out and continue:
R25(29,33,37). Ch 1, esc in the end of each row arnd; Fasten. (25)[29,33,37]
CUFF
R1. Attach yarn to bottom of seam on opposite side: Ch 1, sc arnd, sl st to join (25)[29,33,37]
R2. Ch 6, sc in 2nd ch from hook and in each ch across, sl st x 2 on boot cuff base, turn <Ribbed Cuff Started>
R3. Ch 1, BLO sc in each sc up cuff, turn, BLO sc in each sc down cuff, sl st x 2 on boot cuff base, turn
Repeat R3 until the last sc on base is worked, then flip boot cuff inside out, lining up short ends, sl st across, working through both layers to join them; Flip right side out.
Finishing
- Optional: Add embellishments over the seam to hide it.
- Hide all strings.
Now you have a Classic Cables Boot Cuffs!
The Classic Cables Boot Cuffs are a great project for anyone who wants to learn crochet cables without jumping into something large or complicated. They’re quick, practical, and full of texture — everything we love about a good crochet project.

Don’t forget to share!
If you make the Classic Cables Boot Cuffs, I’d love to see it! Tag me on Instagram at @blackstone_designs or use the hashtag #ClassicCables so I can share your makes with the community.
Join our crochet community group!
Come on over and join the Blackstone Designs Crochet Community on Facebook for fun CALs and giveaways, plus exclusive sales, pattern support, and so much more!
Happy Crocheting!

Written pattern and photographs © 2025 Sonya Blackstone of Blackstone Designs. Do not sell, share, or modify this pattern, but instead share the link to where the pattern can be found. You may sell items you make with this pattern. This pattern, as with all Blackstone Designs/Sonya Blackstone patterns, are not for educational use without written permission from the designer. All rights reserved.
Sonya Blackstone is a participant in the Amazon Services LLC Associates Program, an affiliate advertising program designed to provide a means for us to earn fees by linking to Amazon.com and affiliated sites.