Classic Cables Earwarmer – Free Crochet Pattern
If you love cozy textures and timeless stitches, the Classic Cables Earwarmer is going to be your new favorite cold-weather accessory. This free crochet pattern combines the elegant look of cables with the modern charm of the herringbone double crochet stitch, creating a headwrap that’s both stylish and functional.
This post contains affiliate links. At no extra cost to you, I may receive a small commission from purchases made through affiliate links, which helps me to keep bringing awesome free content!
Whether you’re bundling up for winter walks, gifting handmade accessories, or looking for something quick to sell at craft fairs, this earwarmer checks every box. It works up quickly, looks advanced (even though it’s easier than it looks!), and is completely customizable — from color to width to embellishments.
Let’s Talk Cables
If you’ve never crocheted cables before, this is the perfect pattern to learn on. The stitches create a stunning braid-like look that adds a pretty finish without complicated shaping.
Crochet cables are worked by crossing post stitches around each other (much easier than it sounds). Once you get the hang of the rhythm, you’ll want to add cables to everything!
The Classic Cables Earwarmer gives you that skill-building opportunity in a small, manageable project.
Why You’ll Love the Classic Cables Earwarmer
- Quick & satisfying: Finished in about an hour or two, depending on size.
- Warm & stretchy: The stitch pattern creates a thick, cozy fabric that fits comfortably.
- Stylish & textured: Those cables give an elegant, knit-look finish.
- Customizable: Adjust the width, length, or add embellishments.
- Beginner-friendly with a twist: Perfect for intermediate crocheters ready to try cables.
What Makes this Earwarmer Special
The beauty of this project lies in the contrast of texture. The herringbone double crochet stitch gives a subtle woven effect, while the cable section adds a dimensional twist that looks intricate and polished.
It’s a fun way to experiment with crochet cable stitches without committing to a full-sized project. And the best part? You only need a single skein of yarn to master those beginner-friendly cables.
Add the optional large flower applique for a feminine touch, or leave it plain for a clean, unisex look. Either way, this earwarmer is sure to turn heads!
Customization
This easy cable earwarmer is simple to adjust to your style:
- Add Width: Work a few extra chains in the beginning for a wider band.
- Make It Slimmer: Remove stitches before and after the cable section.
- Add Embellishments:
- A large crochet flower applique for a feminine flair.
- A faux-leather tag for a modern finish.
- A button or bow for extra detail.
- Color Play: Try stripes, ombré yarns, or make multiple in your favorite team colors!
Because it uses basic stitches with one advanced section, it’s easy to modify once you understand the pattern structure.
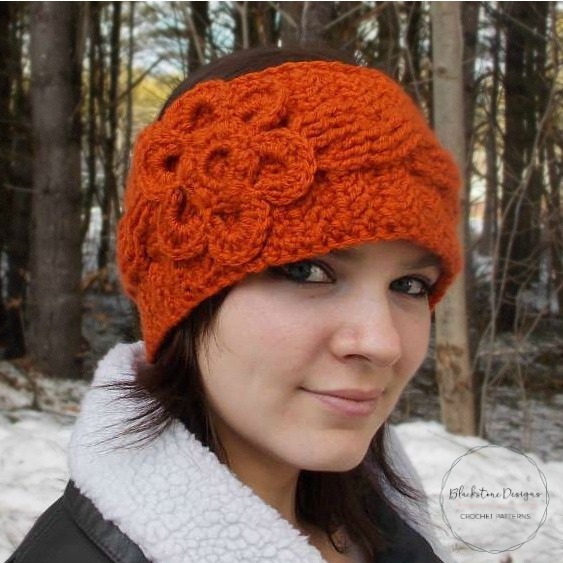
Styling the Classic Cables Earwarmer
This earwarmer is the perfect accessory for chilly days when you don’t want the bulk of a full hat.
Dress It Up: Pair your earwarmer with a wool coat, tall boots, and the matching flower applique for a cozy-chic look.
Keep It Casual: Throw it on with your favorite hoodie or puffer jacket for everyday errands, school drop-off, or winter walks.
Matching Sets: Make a coordinating scarf, mittens, or boot cuffs using the same stitches — it’s a great way to build a gift set or sell as a bundle.
Time Commitment & Skill Level
Time: Approximately 1–2 hours
Skill Level: Advanced beginner to intermediate
If you know all the basics, you’re comfortable with front-post stitches, and can maintain even tension, you’ll have no trouble completing this project. This six stitch cable may look advanced, but once you understand the repeat, it flows beautifully.
Tips for Beautiful Results
Choose the right yarn. Acrylics and wool blends show the cables well and lighter colors make the cables pop best (that doesn’t mean dark colors aren’t beautiful too, though!)
Block lightly. A quick steam helps even out the stitches and gives it that professional finish, just make sure not to stretch the earwarmer out.
Don’t over-tighten cables. Keep an even tension so the earwarmer stays stretchy and the herringbone rows don’t cinch.
Check your length. Measure around your head and minus 1-2″ before seaming to ensure a snug, comfortable fit.
Optional Flower Applique
If you love adding a bit of charm, this large crochet flower is the perfect finishing touch. Attach it off-center or to the side for a cute, modern accent.
Try coordinating the flower color with your coat or contrasting for a bold pop! The applique can also be used as a detachable clip if you prefer versatility.
Perfect For…
Gifting: Fast, beautiful, and one-size-fits-most — ideal for birthdays and holidays.
Craft fairs: Uses minimal yarn and sells well as a handmade winter accessory.
Donations: Great for charity drives or handmade winter wear programs.
Stash-busting: Perfect for using up partial skeins of worsted weight yarn.
How to Get the Classic Cables Earwarmer Crochet Pattern

Classic Cables Earwarmer Crochet Pattern
Option 1: Continue scrolling for free pattern instructions on this site
Option 2: Purchase the ad-free PDF that includes tutorial photos from one of my shops
About the Materials
The Classic Cables Earwarmer was made with Worsted Weight Yarn. For the original orange version I used Lion Brand Vanna’s Choice in Terracotta; For the updated versions I used Loops & Threads Impeccable.
Other great yarn options are KnitPicks Brava, Knit Picks Wool of the Andes, and Lion Brand Heartland.
You will also need an H/8/5.00mm crochet hook, needles with a big enough eye for your yarn, and scissors.
The Crochet Pattern
Keep reading for a list of what you need to make the Classic Cables Earwarmer, including the stitch pattern instructions!


Now you have a Classic Cables Earwarmer!

Don’t forget to share!
If you make the Classic Cables Earwarmer, I’d love to see it! Tag me on Instagram at @blackstone_designs or use the hashtag #ClassicCables so I can share your makes with the community.
Join our crochet community group!
Come on over and join the Blackstone Designs Crochet Community on Facebook for fun CALs and giveaways, plus exclusive sales, pattern support, and so much more!

Happy Crocheting!

Written pattern and photographs © 2025 Sonya Blackstone of Blackstone Designs. Do not sell, share, or modify this pattern, but instead share the link to where the pattern can be found. You may sell items you make with this pattern. This pattern, as with all Blackstone Designs/Sonya Blackstone patterns, are not for educational use without written permission from the designer. All rights reserved.
Sonya Blackstone is a participant in the Amazon Services LLC Associates Program, an affiliate advertising program designed to provide a means for us to earn fees by linking to Amazon.com and affiliated sites.