How to Make the Stuffed Rustic Tree Decor – Free Crochet Pattern
I have been seeing these cute little stuffed rustic tree decor items around in stores! From fake floral to felt, there are several variations, so I knew I had to make them in crochet!
This post contains affiliate links. At no extra cost to you, I may receive a small commission from purchases made through affiliate links, which helps me to keep bringing awesome free content!
These trees are so easy to put together. Aside from the thick wooden chunk for the base, I had all the materials already on hand.
Actually, I had a piece of trunk from an old Christmas tree from years ago. When my husband trimmed it off I told him I was saving it for a project. I’m sure he rolled his eyes, because I say that a lot, but this time I really did use it… even if it was 3 or 4 years later!
Of course you can always just buy something similar premade, but creating your own crocheted stuffed tree decor adds a personalized, unique touch to your holiday decorations that simply can’t be replicated with the premade options. Here’s why making one might be the perfect choice:
- Creative Customization: When you crochet your own decor, you can customize everything—from color and size to the yarn texture. You’ll get to choose the exact look and feel that matches your holiday theme, whether it’s traditional, modern, or farmhouse rustic.
- Heirloom Quality: Handmade crochet items tend to be more durable, with craftsmanship that can last years and even become a cherished family keepsake. Each stitch is a part of you, adding meaning and sentiment to your holiday decor.
- Eco-Friendly and Sustainable: Making your own decor lets you choose sustainable yarns or upcycle materials, making your holiday decor more environmentally friendly than mass-produced options.
- Learning Opportunity: Crochet projects, especially small decorative ones, are a fantastic way to refine skills or learn new techniques like shaping, stuffing, or even amigurumi. Plus, it’s a relaxing, creative outlet that’s perfect for cozy winter evenings.
- Budget-Friendly: Crafting your own crochet decor is often less expensive than buying artisanal or boutique holiday decorations, especially if you already have leftover yarn or materials.
Crocheting a tree ornament lets you fill your home with meaningful, handmade touches that resonate with you—and add a little bit of holiday magic with every stitch!

Stuffed Rustic Tree Decor Crochet Pattern
Option 1: Continue scrolling for free pattern instructions on this site
Option 2: Purchase the ad-free PDF that includes tutorial photos from one of my shops
Option 3: Purchase the Vol. 1 “15 Christmas Crochet Patterns” eBook.
What materials do I need?
To make the Stuffed Rustic Tree Decor you can use any yarn and hook size! This is a fully customizable pattern, so you could even choose to use a jumbo weight yarn and make it into a pillow. For these particular trees I used worsted weight yarn an H/8/5.00mm crochet hook.
The Crochet Pattern
Keep reading for a list of what you need to crochet the Stuffed Rustic Tree Decor, including the stitch pattern instructions!

Materials
Worsted Weight Yarn (#4)
- Any Color [30yds]
H/8/5.00mm Hook
Jute Twine
Mini Pom Poms
Fiberfill
Wooden Dowels (3/16” – ¼” thick)
Tree Chunk (3”diameter x 1” thick)
Hot Glue Gun/Sticks
Drill (with drill bit to match dowel size)
Yarn Needle
Scissors
Gauge
Not Critical For This Project
Finished Measurements
Trees: Approx. 5.75”
Finished Piece: Approx. 11”
(Will vary by maker)
Stitch Guide
arnd = around
ch = chain
sc = single crochet
sk = skip
sl st(s) = slip stitch(es)
st(s) = stitch(es)
Skill Level
Easy – Intermediate
Written in U.S. Terms


Notes
- Beginning ch-1 does not count as a stitch.
- Any yarn can be used, but note that the finished size of the trees will change (thinner yarn = smaller tree, thicker yarn = larger tree)
- Tutorial photos are at the end of the pattern.
Instructions
Tree Panel (Make 2)
R1. Ch 17, sc in back bump of 2nd ch and in each ch across, turn (16)
R2. Ch 1, sc across, turn (16)
R3. Ch 1, sc, skip 1, sc x 12, skip 1, sc, turn (14)
R4. Ch 1, sc, skip 1, sc x 10, skip 1, sc, turn (12)
R5. Ch 1, sc, skip 1, sc x 8, skip 1, sc, turn (10)
R6. Ch 1, sc, skip 1, sc x 6, skip 1, sc, turn (8); break yarn, turn project over
R7: Ch 2 (leave chains on hook), insert hook in first stitch on R6, sc in that space and in each sc across, ch 3, turn (8 sc, 5 ch)
R8: Ch 1, sc in 2nd ch and in next ch, sc in scs, sc in remaining 2 chs, turn (12)
R9: Ch 1, sc, skip 1, sc x 8, skip 1, sc, turn (10)
R10: Ch 1, sc, skip 1, sc x 6, skip 1, sc, turn (8)
R11: Ch 1, sc, skip 1, sc x 4, skip 1, sc, turn (6); break yarn, turn project over
R12: Ch 2 (leave chains on hook), insert hook in first stitch on R11, sc in that space and in each sc across, ch 3, turn (6 sc, 5 ch)
R13: Ch 1, sc in 2nd ch and in next ch, sc in scs, sc in remaining 2 chs, turn (10)
R14: Ch 1, sc, skip 1, sc x 6, skip 1, sc, turn (8)
R15: Ch 1, sc, skip 1, sc x 4, skip 1, sc, turn (6)
R16: Ch 1, sc, skip 1, sc x 2, skip 1, sc, turn (4)
R17: Ch 1, sc dec x 2, turn (2)
R18: Ch 1, sc dec; Fasten. (1)
Hold the two panels wrong sides together; find the two center stitches on the bottom, move one stitch to the left, insert hook in that stitch, sc in same space, then sc around the outside of the trees (working through both layers). Once you get back to the bottom, leave approx. 6 stitches unworked and stuff the tree, then sc until you reach the two center stitches (leave the center stitches unworked).

Finishing
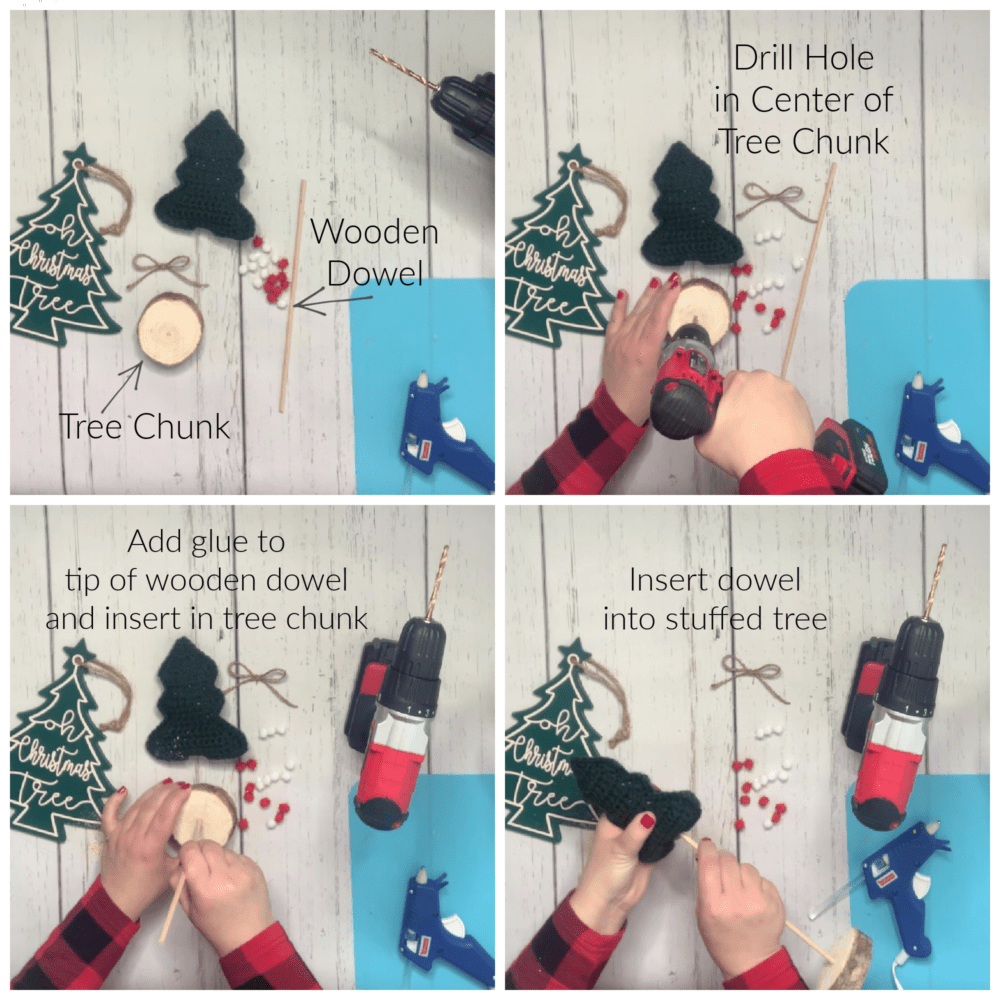
- Drill hole in center of tree chunk (base) using a drill bit that matches the width of your dowel. My dowels are 3/16”. You may need to bore the hole a little.
- Put hot glue on one tip of the dowel and insert dowel into the base, then insert the the other end of the dowel into the tree. Glue the bottom of the tree closed around the dowel.
- Cut a 6” piece of jute, tie into a bow of desired size and trim as needed. Glue bow to the bottom center of the tree (where opening was).
- Glue pom poms (or other appliques) to the front as desired.
- Hide all strings.
And now you have your own Stuffed Rustic Tree Decor!

Looking for items similar to the Stuffed Rustic Tree Decor?
You may also like:
Little Tree Coasters
Christmas Tree Treat Bag
Rustic Mug Rugs
Happy Crocheting!

Written pattern and photographs © 2021 Sonya Blackstone of Blackstone Designs. Please do not sell, share, or modify this pattern, but instead share the link to where the pattern can be found. You may sell items you make with this pattern. This pattern, as with all Blackstone Designs/Sonya Blackstone patterns, are not for educational use without written permission from the designer.
Sonya Blackstone is a participant in the Amazon Services LLC Associates Program, an affiliate advertising program designed to provide a means for us to earn fees by linking to Amazon.com and affiliated sites.