
How to Make Christmas Dollar Store Jar Hats – Free Crochet Pattern
These Christmas Dollar Store Jar Hats are really quick to make and are adorable gifts for friends and family! Especially if you’re looking for something last minute!
This post contains affiliate links. At no extra cost to you, I may receive a small commission from purchases made through affiliate links, which helps me to keep bringing awesome free content!
If you follow me on Instagram or TikTok, then you’ve probably seen these jar hats already.
I got these jars from the Dollar Tree, but you can find similar jars in other stores as well. The jar lids measure 10.5″ around (circumference) and they are just about 4″ tall.
My original intent was to just make the cute little snowmen with winter hats, but as I started crocheting the first hat, my mind jumped right to making a Grinch Jar with an adorable Santa hat!
And of course not long after that the Frosty the Snowman top hat idea came to me!
Since I really like to do everything in life in threes, I was trying so hard to think of other popular Christmas cartoon characters that wear hats, but I just couldn’t come up with anything that felt like it fit. Let me know if you have suggestions!
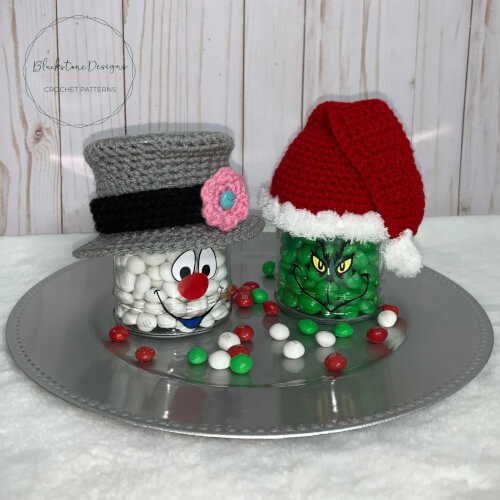
Christmas Jar Hats
Crochet Pattern
Option 1: Continue scrolling for free pattern instructions on this site
Option 2: Purchase the ad-free PDF that includes tutorial photos from one of my shops
Option 3: Purchase the Vol. 2 “15 Christmas Crochet Patterns” eBook
Get the Ad-Free PDF from your favorite pattern shop below!




Want to make your own jar Christmas hats?
Let’s get started!

Materials
Worsted Weight Yarn (#4)
- Red [50yds+]
- Gray [50yds+]
- Black [50yds+]
- Pink [25yds+]
- Light Blue [25yds+]
G/6/4.00mm Hook
Yarn Needle
Glass Jar (Approx. 10.5” circumference)
Cutting Machine & Vinyl or Paint Markers
Optional Materials:
¼” Button (Flower Center)
Plastic Canvas (for top hat)
Stuffing
2 ½” (65mm) Pom Pom Maker
Gauge
8 sc x 10 rows = 2”
(I kept a tight tension)
Finished Measurements
When laid flat: 4.75” wide
Height varies by hat
Stitch Guide
arnd = around
BLO = back loop only
ch = chain
dec = single crochet decrease
FLO = front loop only
inv dec = invisible sc decrease
sc = single crochet
sl st(s) = slip stitch(es)
st(s) = stitch(es)
Skill Level
Easy – Intermediate
Written in U.S. Terms


Notes
- Beginning ch-1 does not count as a stitch unless otherwise indicated.
- Where asterisks appear, repeat the instructions between them.
- For the Winter Hat, the instructions are written for a striped hat, but you can skip the color changes if you prefer a solid color.
- The jars used in these samples are from the Dollar Tree store.
- No worries if you don’t have a vinyl cutting machine, you can always draw the faces on with paint markers!
- I purchased the Snowman Face SVG files for my jars on Etsy.
Special Stitches
Invisible Decrease (inv dec) = pick up the front loops only of the two stitches you will be decreasing in, yarn over, and pull through both front loops, joining them together.
Instructions
WINTER HAT
Brim
With Main Color,
R1. Ch 9, sc in back bump of 2nd ch and in each ch across, turn (8)
R2-42. Ch 1, BLO sc across, turn (8)
R43. Hold short ends together and sl st across, working through both layers, to form a band; Ch 1, sc in the end of each row arnd the top, sl st to join; keep a working loop and continue to base instructions (42)
Base
With Accent Color,
R1-2. Ch 1, sc arnd, sl st to join (42)
With Main Color,
R3. Ch 1, sc arnd, sl st to join (42)
With Accent Color,
R4. Ch 1, sc arnd, sl st to join (42)
R5. Ch 1, *inv dec, sc x 5* arnd, sl st to join (36)
With Main Color,
R6. Ch 1, *inv dec, sc x 4* arnd, sl st to join (30)
With Accent Color,
R7. Ch 1, *inv dec, sc x 3* arnd, sl st to join (24)
R8. Ch 1, *inv dec, sc x 2* arnd, sl st to join (18)
R9. Ch 1, *inv dec, sc* arnd, sl st to join (12)
R10. Ch 1, inv dec arnd, sl st to join (6);
Cut yarn, weave tail through remaining stitches, pull tight to close; Fasten.
SANTA HAT
With Red,
R1. Ch 42, join to form a ring (do not twist), Ch 1, sc in the back bump only arnd (42)
R2-4. sc arnd (42)
R5. *inv dec, sc x 5* arnd (36)
R6. sc arnd (36)
R7. *inv dec, sc x 4* arnd (30)
R8. sc arnd (30)
R9. *inv dec, sc x 3* arnd (24)
R10. sc arnd (24)
R11. *inv dec, sc x 2* arnd (18)
R12-13. sc arnd (18)
R14. *inv dec, sc* arnd (12)
R15. Flatten opening (at R14), ch 1, turn, sc across flattened opening, working through both layers, turn (6)
R16. Ch 1, BLO sc across, turn (6)
R17-21. Ch 1, sc across, turn (6)
R22. Ch 1, dec, sc x 4, turn (5)
R23. Ch 1, sc across, turn (5)
R24. Ch 1, sc x 3, dec, turn (4)
R25-28. Ch 1, sc across, turn (4)
R29. Ch 1, dec, sc x 2, turn (3)
R30-31. Ch 1, sc across, turn (3)
R32. Ch 1, sc, dec, turn (2)
R33. dec; Fasten. (1)
R34. Attach yarn to top of hat tip (edge of R15) with right side facing up, sc arnd the outside edge; Fasten.
With “Fur” Yarn,
R1. Attach to R1 of base, sc in every other stitch around, making sure the loop on your hook is a bit loose, so it doesn’t pull tight and cinch the hat. (21)
R2. sc in each stitch arnd; Fasten. (21)
Pom Pom
With “Fur” Yarn,
R1. Make a magic ring, ch 1, 6 sc in ring (6)
R2. sc arnd (6)
R3. dec arnd (3);
Cut yarn, weave tail through remaining stitches, pull tight to close; Fasten.
TOP HAT
With Black (or Gray) Yarn,
R1. Make magic ring, ch 1, 6 sc in ring (6)
R2. 2 sc arnd (12)
R3. *2 sc, sc* arnd (18)
R4. *2 sc, sc x 2* arnd (24)
R5. *2 sc, sc x 3* arnd (30)
R6. *2 sc, sc x 4* arnd (36)
R7. *2 sc, sc x 5* arnd (42)
R8. *2 sc, sc x 6* arnd (48)
R9. BLO: sc arnd (48)
R10. *inv dec, sc x 6* arnd (42)
R11. *inv dec, sc x 5* arnd (36)
R12-13. sc arnd (36)
R14. *2 sc, sc x 5* arnd (42)
R15-17. sc arnd (42)
R18. FLO: *2 sc, sc x 6* arnd (48)
R19. *2 sc, sc x 7* arnd (54)
R20. *2 sc, sc x 8* arnd, sl st x 2 to join; Fasten. (60)
Hat Band
With Red (or Black) Yarn,
R1. Ch 42, join to form a ring (do not twist), ch 1, sc in each ch arnd, sl st to join (42)
R2-3. Ch 1, sc arnd, sl st to join; Fasten at the end of R3. (42)
Flower
With Preferred Flower Color Yarn,
R1. Make a magic ring, ch 1, 6 sc in the ring, sl st to join in 1st sc (6)
R2. Ch 1, 2 sc arnd, sl st to join in 1st sc (12)
R3. Ch 1, *sl st, 2 sc* arnd, sl st to join in 1st sl st; Fasten (6 petals)
Flower Center
With Preferred Flower Center Color Yarn (or use a ¼” button),
Make a magic ring, ch 1, 4 sc in the ring; Fasten. (4)

Finishing
- Winter Hat:
- Roll up brim of hat (halfway). You can sew or glue it in place as desired.
- Make a pom pom using a 2 ½” pom pom maker tool or following my
Messy Pom Pom Tutorial and attach it to the top of the hat.
- Santa Hat: Attach pom pom to center of hat tip (R33).
- Top Hat:
- Attach band to base of hat above brim.
- Attach flower over the seam of the band.
- Attach “flower center” to the middle of the flower.
- Optional, but I find it helpful: Add a circle of plastic canvas (or thick cardstock) to the inside top of the hat to keep it stiff.
- Hide all strings.
- Cut faces on permanent vinyl using a die cutting machine or draw them on with paint markers!
- I used these SVGs: Snowmen; The Grinch; Frosty the Snowman
- Optional: Stuff hat before putting it on the jar to help it keep its shape.
- Optional: Hot Glue hat down to the lid of the jar!
And that’s how you make the Dollar Store Jar Christmas Hats!

Happy Crocheting!

Written pattern and photographs © 2021 Sonya Blackstone of Blackstone Designs. Please do not sell, share, or modify this pattern, but instead share the link to where the pattern can be found. You may sell items you make with this pattern. This pattern, as with all Blackstone Designs/Sonya Blackstone patterns, are not for educational use without written permission from the designer.
Sonya Blackstone is a participant in the Amazon Services LLC Associates Program, an affiliate advertising program designed to provide a means for us to earn fees by linking to Amazon.com and affiliated sites.


These are cute. How about an ELF hat?
I’m also thinking these would be sweet hats for Preemie babies.
Hi Christine!
An elf hat would be fantastic! I didn’t think of that! Maybe I’ll do an add-on to this pattern!
Thanks for the suggestion!
-Sonya