
On the Double Beanie Crochet Pattern
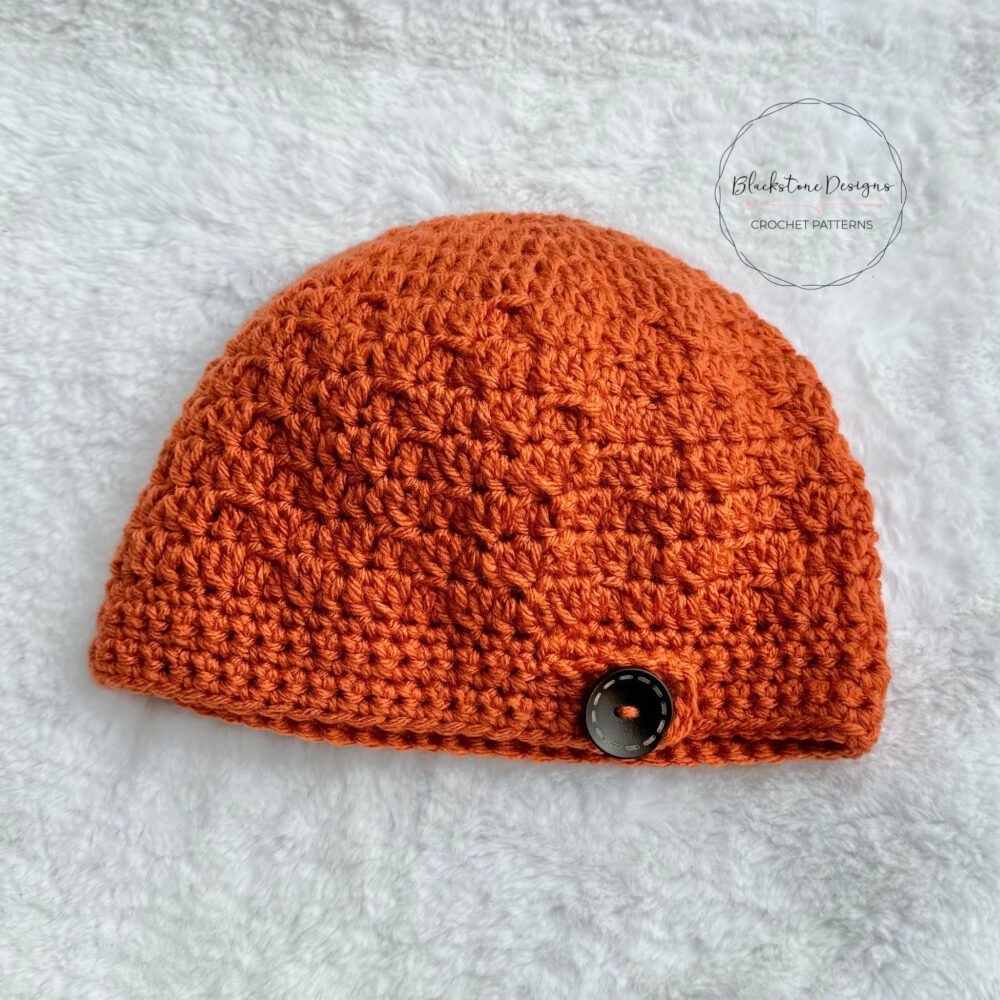
This On the Double Beanie crochet pattern got it’s dual purpose name from how quickly it can be worked up and the double crochet stitches it uses!
This post contains affiliate links. At no extra cost to you, I may receive a small commission from purchases made through affiliate links, which helps me to keep bringing awesome free content!
Creating a crochet beanie using a pattern that features double crochet stitches, combined with alternating front loop only and back loop only techniques, is a delightful way to add texture and depth to your project.
The use of double crochet allows for quick progress while also creating a cozy and warm fabric, perfect for chilly days. As you continue introducing the front loop only and back loop only techniques it will create a beautiful fluffy effect.
By alternating these stitches, you not only add visual interest, but also enhance the beanie’s stretch and fit. This unique combination of techniques results in a stylish accessory that is both functional and fashionable, making it an ideal project for both confident beginners and experienced crocheters looking to expand their skills.
Benefits of crocheting your own hats
Crocheting your own hat offers numerous benefits that go beyond simply creating a cozy accessory. Here are a few key advantages:
Gift-Making: Handmade hats make thoughtful gifts for friends and family. Personalizing a hat for someone shows you care, making it a meaningful present that’s often cherished more than something mass-produced.
Customization: When you crochet your own hat, you have complete control over the design, color, and size. You can tailor it to fit your unique style or the preferences of someone you’re gifting it to, ensuring a perfect match.
Skill Development: Crocheting a hat allows you to practice and refine your crochet techniques. It’s a great opportunity to experiment with different stitches and patterns, helping you grow as a crocheter.
Personal Satisfaction: There’s a special joy in creating something with your own hands. Completing a crochet project can boost your confidence and provide a sense of accomplishment, especially when you wear or gift the finished product.
Quality Control: By crocheting your own hat, you can choose high-quality yarns that suit your comfort and style preferences. This ensures that the final product is not only beautiful but also durable and warm.
Cost-Effective: While there’s an initial investment in materials, crocheting your own hats can save money in the long run compared to buying high-quality, handmade items. Plus, you can create multiple hats for the price of one store-bought version.

On the Double Beanie Crochet Pattern
Option 1: Continue scrolling for free pattern instructions on this site
Option 2: Purchase the ad-free PDF that includes tutorial photos from one of my shops
What materials do I need?
To make the On the Double Beanie you will need worsted weight yarn in any fiber (as long as it meets gauge), and a H/8/5.00mm crochet hook. I used a 100% acrylic yarn.
The Pattern
Keep reading for a list of what you need to crochet the On the Double Beanie, including the stitch pattern instructions!

Gauge
16 dc x 7.5 rows = 4”
Sizes
Baby (16” Head)
Toddler (18” Head)
Child (20” Head)
Small Adult (22” Head)
Stitch Guide
arnd = around
BLO = back loop only
ch = chain
dc = double crochet
dc2tog = See Special Stitches
sc = single crochet
sl st(s) = slip stitch(es)
st(s) = stitch(es)
Skill Level
Easy
Written in U.S. Terms


Pattern Notes
- Beginning chains do not count as stitches
- 1st stitches always start in the same space as beginning chain.
- This hat is worked from the top-down
- I do not suggest adding real buttons to hats given to small babies. For baby sizes use crochet buttons or 3D fabric paint in place of real buttons. Crocheted buttons can be sewn on and completely fastened, making them a safer choice.
Special Stitches
double crochet two together (dc2tog) = aka dc decrease (worked over 2 sts): YO, insert hook in st indicated and draw up a loop, YO, pull through 2 loops, YO, insert hook in next st and draw up a loop, YO, pull through 2 loops, YO, pull through last 3.
Instructions
BABY
R1. Make a magic ring, ch 2, 10 dc in ring, sl st to join in 1st dc (10)
R2. Ch 2, 2 dc in each st arnd, sl st to join in 1st dc (20)
R3. Ch 2, *dc, 2 dc* arnd, sl st to join in 1st dc (30)
R4. Ch 2, *2 dc, dc x 2* arnd, sl st to join in 1st dc (40)
R5. Ch 2, *dc2tog, 2 dc in BLO, dc2tog, 2 dc in FLO* arnd, sl st to join in 1st dc2tog (40)
R6. Ch 2, 2 dc in FLO in same space as ch, *dc2tog, 2 dc in BLO, dc2tog, 2 dc in FLO, dc2tog* arnd (40)
R7. Repeat 6, with the 1st st starting in the same sp as beginning ch
R8. Repeat 7
R9. Repeat 6
R10. Ch 1, sc in each st arnd, do not join, ch 6, turn (40 sc, 6 ch)
R11. sc in 2nd ch from hook and in each ch across, sc in each st around brim, ch 1, turn (45)
R12-13. sc in each st arnd, ch 1, turn (45); Fasten at the end of R13.
TODDLER
R1. Make a magic ring, ch 2, 10 dc in ring, sl st to join in 1st dc (10)
R2. Ch 2, 2 dc in each st arnd, sl st to join in 1st dc (20)
R3. Ch 2, *dc, 2 dc* arnd, sl st to join in 1st dc (30)
R4. Ch 2, *2 dc, dc x 2* arnd, sl st to join in 1st dc (40)
R5. Ch 2, *dc x 3, 2 dc* arnd, put 3 dc’s in the last st (instead of just 2) (51)
R6. Ch 2, *dc2tog, 2 dc in BLO, dc2tog, 2 dc in FLO* arnd, sl st to join in 1st dc2tog (51)
R7. Ch 2, 2 dc in FLO in same space as ch, *dc2tog, 2 dc in BLO, dc2tog, 2 dc in FLO, dc2tog* arnd (51)
R8. Repeat 6, with the 1st st starting in the same sp as beginning ch
R9. Repeat 7
R10. Repeat 6
R11. Ch 1, sc in each st arnd, do not join, ch 6, turn (51 sc, 6 ch)
R12. sc in 2nd ch from hook and in each ch across, sc in each st around brim, ch 1, turn (56)
R13-15. sc in each st arnd, ch 1, turn (56); Fasten at the end of R14.
CHILD
R1. Make a magic ring, ch 2, 10 dc in ring, sl st to join in 1st dc (10)
R2. Ch 2, 2 dc in each st arnd, sl st to join in 1st dc (20)
R3. Ch 2, *dc, 2 dc* arnd, sl st to join in 1st dc (30)
R4. Ch 2, *2 dc, dc x 2* arnd, sl st to join in 1st dc (40)
R5. Ch 2, *dc x 3, 2 dc* arnd, sl st to join in 1st dc (50)
R6. Ch 2, *2 dc, dc x 4* arnd, sl st to join in 1st dc (60)
R7. Ch 2, *dc2tog, 2 dc in BLO, dc2tog, 2 dc in FLO* arnd, sl st to join in 1st dc2tog (60)
R8. Ch 2, 2 dc in FLO in same space as ch, *dc2tog, 2 dc in BLO, dc2tog, 2 dc in FLO, dc2tog* arnd (60)
R9. Repeat 7, with the 1st st starting in the same sp as beginning ch
R10. Repeat 8
R11-13. Repeat 7 & 8
R14. Ch 1, sc in each st arnd, do not join, ch 6, turn (60 sc, 6 ch)
R15. sc in 2nd ch from hook and in each ch across, sc in each st around brim, ch 1, turn (65)
R16-18. sc in each st arnd, ch 1, turn (66); Fasten at the end of R18.
ADULT
R1. Make a magic ring, ch 2, 10 dc in ring, sl st to join in 1st dc (10)
R2. Ch 2, 2 dc in each st arnd, sl st to join in 1st dc (20)
R3. Ch 2, *dc, 2 dc* arnd, sl st to join in 1st dc (30)
R4. Ch 2, *2 dc, dc x 2* arnd, sl st to join in 1st dc (40)
R5. Ch 2, *dc x 3, 2 dc* arnd, sl st to join in 1st dc (50)
R6. Ch 2, *2 dc, dc x 4* arnd, sl st to join in 1st dc (60)
R7. Ch 2, *dc x 4, 2 dc* arnd, sl st to join in 1st dc (72)
R8. Ch 2, *dc2tog, 2 dc in BLO, dc2tog, 2 dc in FLO* arnd, sl st to join in 1st dc2tog (72)
R9. Ch 2, 2 dc in FLO in same space as ch, *dc2tog, 2 dc in BLO, dc2tog, 2 dc in FLO, dc2tog* arnd (72)
R10. Repeat 7, with the 1st st starting in the same sp as beginning ch
R11. Repeat 8
R12-15. Repeat 7 & 8
R16. Ch 1, sc in each st arnd, do not join, ch 6, turn (72 sc, 6 ch)
R17. sc in 2nd ch from hook and in each ch across, sc in each st around brim, ch 1, turn (77)
R18-20. sc in each st arnd, ch 1, turn (77); Fasten at the end of R18.
CROCHET BUTTON
Use a contrasting color, Magic Ring, Ch 1, 8 sc in ring. Fasten.
Finishing
- Fold “flap” over the other side of brim and sew into place. This is just for looks and is not a functional band.
- Add crocheted button to center of flap.
- Hide all strings.
And that’s the On the Double Beanie Crochet Pattern!
Join our crochet community group!
Come on over and join the Blackstone Designs Crochet Community on Facebook for fun CALs and giveaways, plus exclusive sales, pattern support, and so much more!
Don’t forget to share!
Tag me on Instagram at @blackstone_designs or use the hashtag #BlackstoneDesignsCrochet so I can share your makes with the community!
Happy Crocheting!
Written pattern and photographs © 2024 Sonya Blackstone of Blackstone Designs. Do not sell, share, or modify this pattern, but instead share the link to where the pattern can be found. You may sell items you make with this pattern. This pattern, as with all Blackstone Designs/Sonya Blackstone patterns, are not for educational use without written permission from the designer. All rights reserved.
Sonya Blackstone is a participant in the Amazon Services LLC Associates Program, an affiliate advertising program designed to provide a means for us to earn fees by linking to Amazon.com and affiliated sites.


