
Buffalo Check Plaid Blanket – Free Crochet Pattern
Don’t mind me, I’m just over here still obsessing over Buffalo Check Plaid! I can’t get enough, can you? And that’s how we got the Buffalo Check Plaid Blanket!
This post contains affiliate links. At no extra cost to you, I may receive a small commission from purchases made through affiliate links, which helps me to keep bringing awesome free content!
Originally, I was going to make a simple afghan square, but then I decided I needed to see the squares in action!
This pattern is chock full of instructions! There are 4 different square styles, info on how to get different color plaids, handy charts & graphics to size this up to as big as a king size, plus samples of different “fur” yarns to use as square edging!
How to Create Buffalo Plaid
Before starting, you may want to check out this post on How to Create Buffalo Plaid for Crafting Projects so you can properly choose your afghan colors.

The instructions list 4 different squares, this is because the smaller squares within the blocks are arranged differently to keep the plaid pattern flowing.
You can choose to skip this and just make all of your squares using one layout, but it will have a slightly different look than my finished blanket.
Choosing Colors
Simply put: You will need black, a bright color, and a dark shade of that color as well. For example, for my blanket I used Black, Bright Red, and Dark Red.
Check out my post on How to Create Plaid to get a more in-depth explanation of choosing colors and how plaid is created in general.


How to get the Buffalo Check Plaid Blanket Crochet Pattern

Buffalo Check Plaid Blanket Crochet Pattern
Option 1: Continue scrolling for free pattern instructions on this site
Option 2: Purchase the ad-free PDF that includes tutorial photos from one of my shops
Materials
Worsted Weight Yarn (#4)
- Dark Red (A) [8oz(225g) / 487yds(445m)]
{I used Bernat Super Value Burgundy} - Bright Red (B) [5oz(141g) / 304yds(278m)]
{I used Bernat Super Value Berry} - Black (C) [5oz(141g) / 304yds(278m)]
{I used Bernat Super Value Black}
Fur Yarn[4oz(115g)/116yds(105m)]
{I used Bernat Pipsqueak in Whitey White}
I/9/5.50mm Crochet Hook {I highly suggest Clover Amour Hooks}
Yarn Needle
Scissors
Optional: Fabric for blanket backing {I adore Minky Fabric!}
Gauge
14 sc x 14.5 rows = 4″
Finished Measurements
36″ W x 36″ L
Stitch Guide
ch = chain
sc = single crochet
st(s) = stitch(es)
Skill Level
Easy
Written in U.S. Crochet Terms
>>Looking for more plaid patterns? You might like some of these: Plaid Pajama Pants Gift Basket, Plaid Pajamas Doll Set, Rustic Mug Rugs, Plaid Santa Mug Wrap, Plaid Santa Bottle Bag, Plaid Santa Christmas Stocking, Moose Slippers, or Mack the Moose.
Notes
- Yarn amounts listed above are based on a 9-square blanket. This means I used approximately .9oz(25g)/55yds(50m) of Dark Red, .55oz(16g)/34yds(31g) of Red & Black, and .45oz(13g)/13yds(12m) of Fur Yarn per square. I used an additional 1oz of Fur Yarn to border the assembled blanket.
- Beginning chains do not count as stitches.
- Where asterisks appear, repeat the instructions between them.
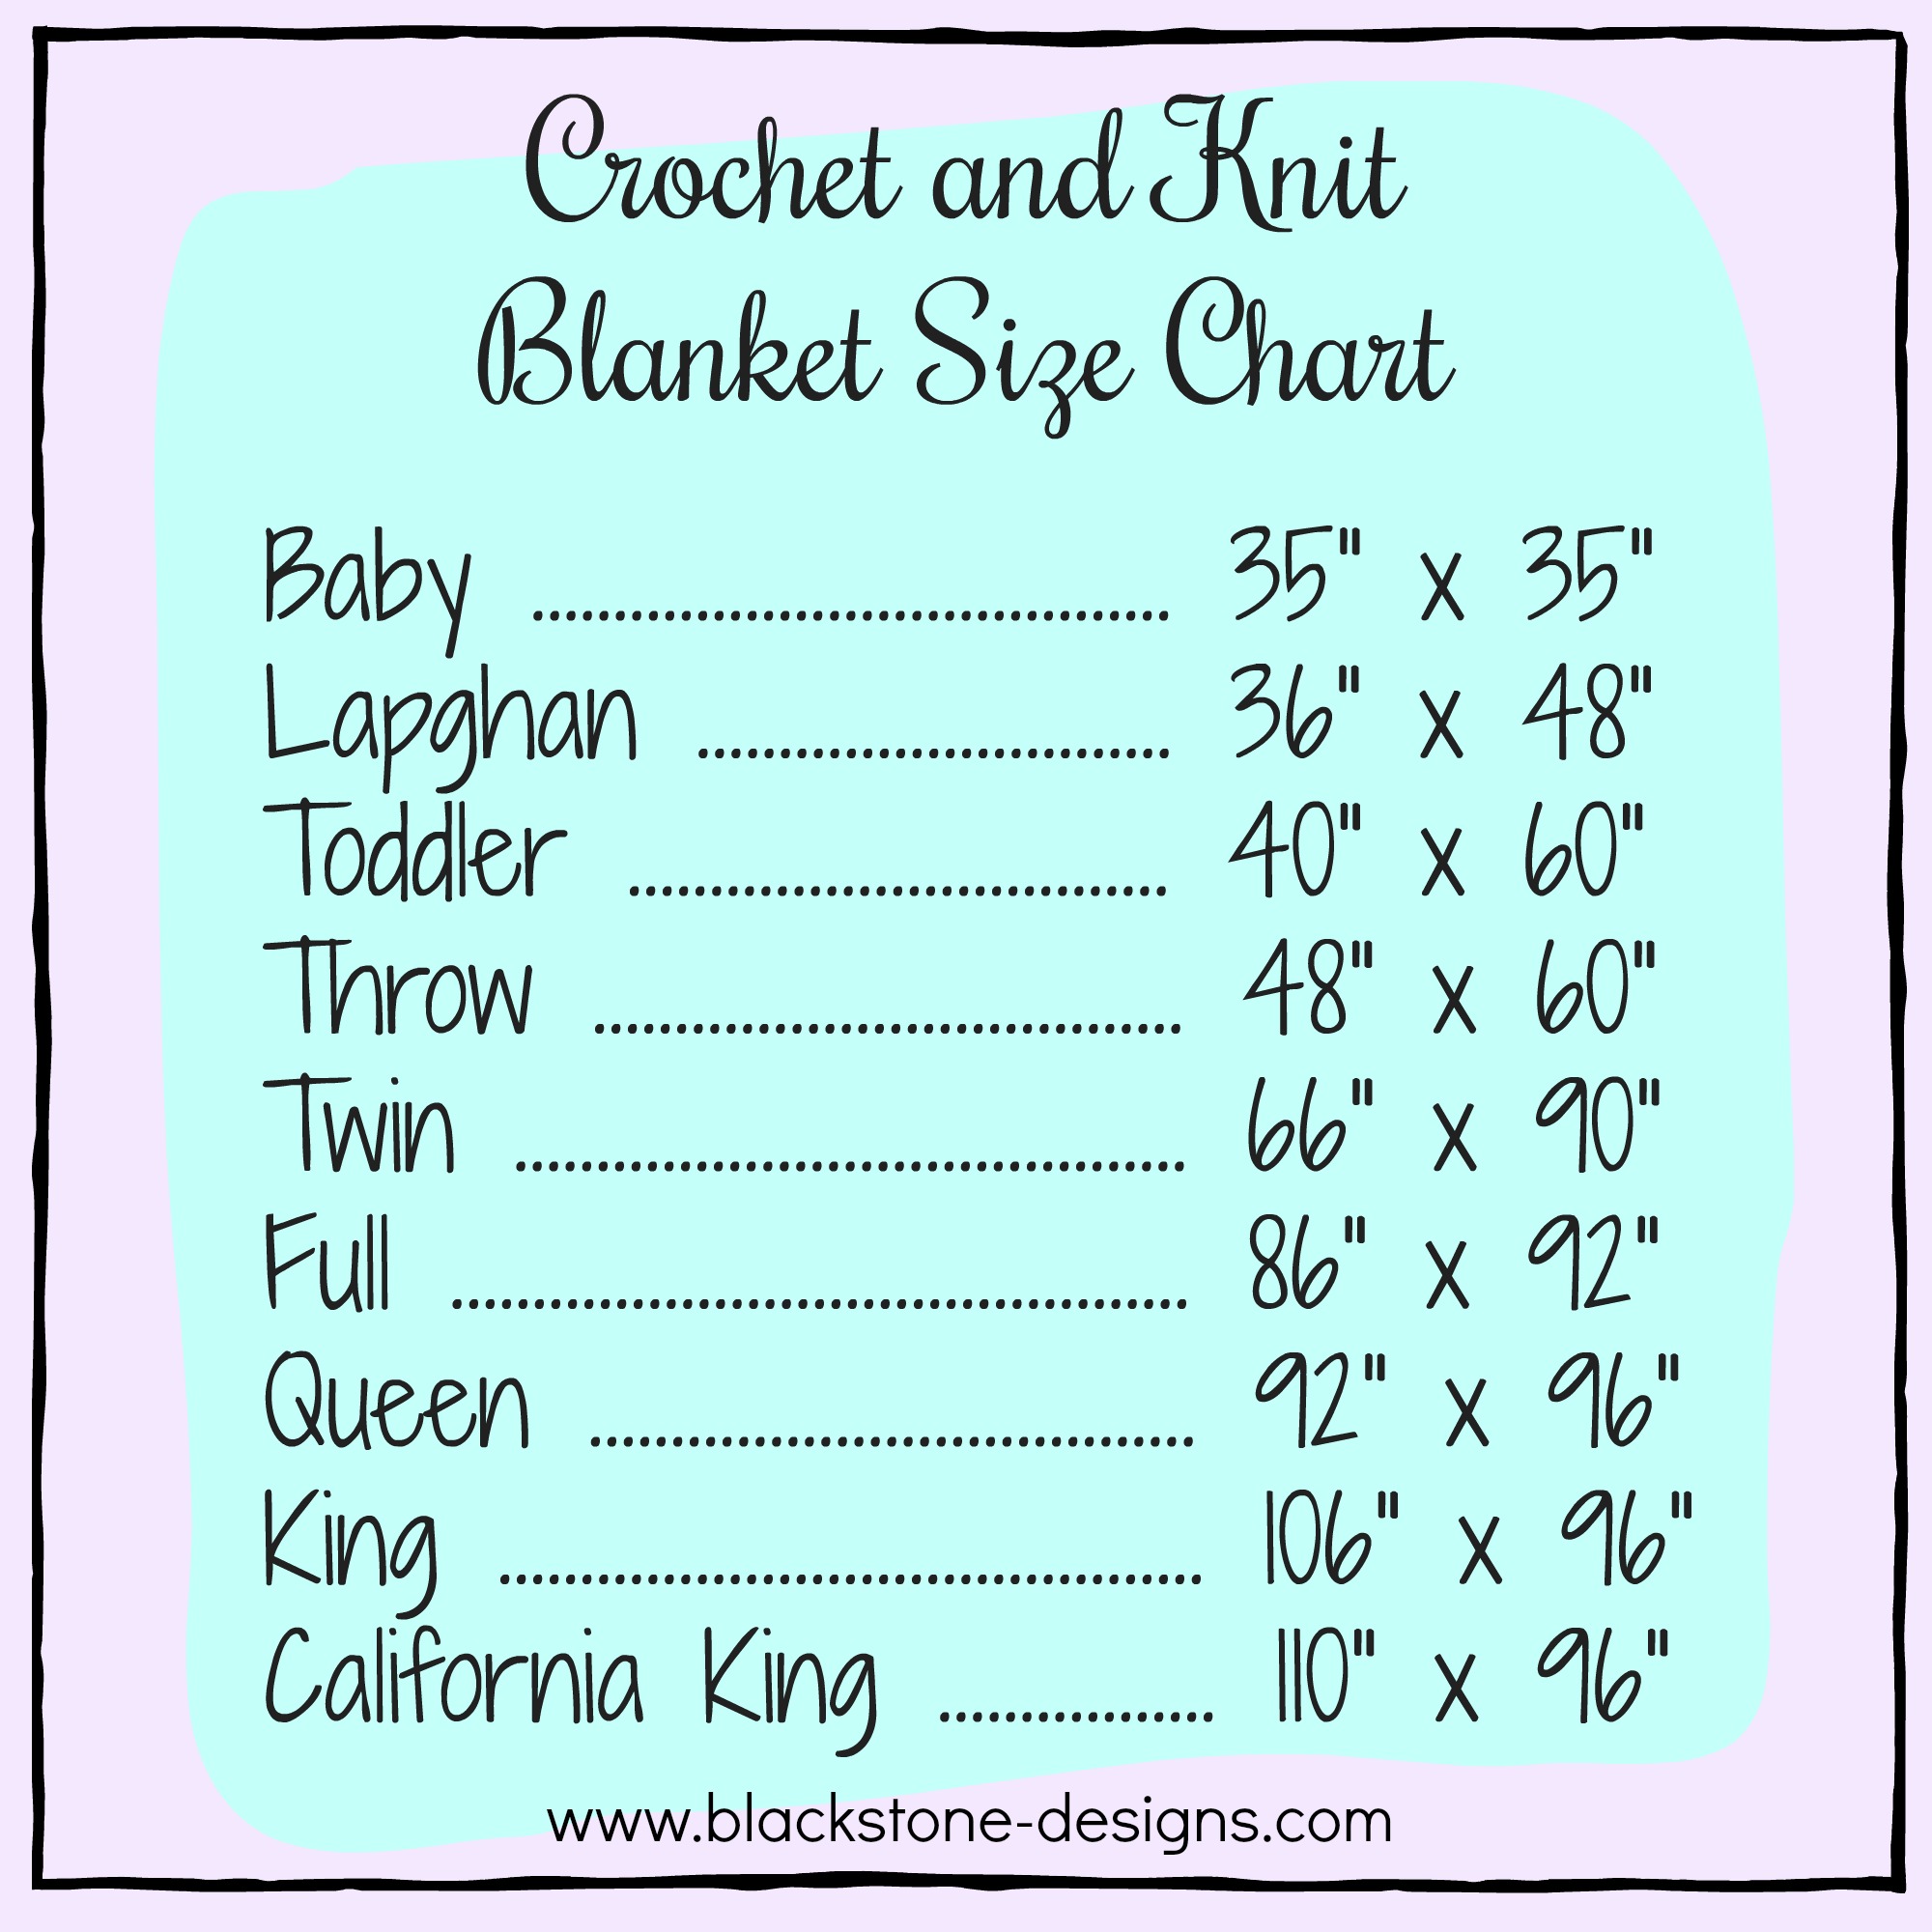
- See chart below for approximate afghan sizes.
- My finished squares measured at 11.5″ x 11″ approximately using an I/9/5.50mm crochet hook and I blocked to about 11.5″ x 11.5″ . This is before the fur border is added. The fur border adds approximately 3/4″ to the width and height.
- Yarn thickness varies by brand/line. Although you may choose a Worsted Weight Yarn in the Medium-4 category, your gauge may be off slightly from mine, which will change the size of your finished squares.
- Square placement graphic is based off of a 12″ x 12″ square (with border).
- There are photos below showing you samples of different fur border ideas.
Color Changes
Before we start the blanket, here is a quick color change tutorial to make it easier to follow along with the instructions.
When changing colors, finish off the last stitch by pulling the new color through the last two loops on hook. We are using single crochets for this, so you would work it this way (for example): with Color B, insert hook in stitch indicated, yarn over, draw up a loop, drop Color B, pull Color A through those two loops created by Color B.


Now you will create your single crochets with Color A by stitching over the Color B strand. Lay Color B strand across the top of the other stitches, and then work your Color A single crochet stitches as normal. Whatever color you are not using at the time will be crocheted over. This helps create a denser warmer fabric as well as saving time on weaving in ends later.


However, I know some don’t like to “waste the yarn”, but in this instance, I don’t believe you will save much yarn by cutting and weaving later. The finished square sizes would also be smaller than mine and the blanket will be thinner.
Instructions
BLOCK A

R1. With Color A: Ch 41, sc in the 2nd ch from hook and in the next 7 sts, *with Color B: sc x 8, with Color A: sc x 8* 2X, turn (40)
R2. With Color A: ch 1, sc x 8, *with Color B: sc x 8, with Color A: sc x 8* 2X, turn (40)
R3-8. Repeat R2
R9. With Color C: ch 1, sc x 8, *with Color A: sc x 8, with Color C: sc x 8* 2X, turn (40)
R10-16. Repeat R9
R17-24. Repeat R2
R25-32. Repeat R9
R33-40. Repeat R2; Fasten at the end of R40.
BLOCK B

R1. With Color B: Ch 41, sc in the 2nd ch from hook and in the next 7 sts, *with Color A: sc x 8, with Color B: sc x 8* 2X, turn (40)
R2. With Color B: ch 1, sc x 8, *with Color A: sc x 8, with Color B: sc x 8* 2X, turn (40)
R3-8. Repeat R2
R9. With Color A: ch 1, sc x 8, *with Color C: sc x 8, with Color A: sc x 8* 2X, turn (40)
R10-16. Repeat R9
R17-24. Repeat R2
R25-32. Repeat R9
R33-40. Repeat R2; Fasten at the end of R40.
BLOCK C

R1. With Color C: Ch 41, sc in the 2nd ch from hook and in the next 7 sts, *with Color A: sc x 8, with Color C: sc x 8* 2X, turn (40)
R2. With Color C: ch 1, sc x 8, *with Color A: sc x 8, with Color C: sc x 8* 2X, turn (40)
R3-8. Repeat R2
R9. With Color A: ch 1, sc x 8, *with Color B: sc x 8, with Color A: sc x 8* 2X, turn (40)
R10-16. Repeat R9
R17-24. Repeat R2
R25-32. Repeat R9
R33-40. Repeat R2; Fasten at the end of R40.
BLOCK D

R1. With Color A: Ch 41, sc in the 2nd ch from hook and in the next 7 sts, *with Color C: sc x 8, with Color A: sc x 8* 2X, turn (40)
R2. With Color A: ch 1, sc x 8, *with Color C: sc x 8, with Color A: sc x 8* 2X, turn (40)
R3-8. Repeat R2
R9. With Color B: ch 1, sc x 8, *with Color A: sc x 8, with Color B: sc x 8* 2X, turn (40)
R10-16. Repeat R9
R17-24. Repeat R2
R25-32. Repeat R9
R33-40. Repeat R2; Fasten at the end of R40.
BORDER
With Fur Yarn,
Turn squares over so back side/wrong side is facing up: Attach yarn to any stitch, ch 1, sc in the end of each row and in each st around; Fasten. (160)

I used Bernat Pipsqueak for my blanket and it is my favorite “fur-esque” yarn to use, especially for wintery projects, but I also tried Lion Brand Go For Faux, Bernat Velvet, and Red Heart Hygge just to see what some of the other popular yarns would look like.


I LOVE the look of the Lion Brand Go For Faux on this blanket. It gives it that perfect cozy rustic or farmhouse feel! I can see someone cuddled up next to a fire place in a cabin with that fur on this blanket!
The Bernat Velvet and Red Heart Hygge are gorgeous and dreamy soft, but they didn’t have the same finished look I was wanting, because they didn’t really look like fur.
Actually, I wouldn’t suggest Red Heart Hygge at all for this project as the yarn is so dense that it distorts the finished shape, although the Red Heart Hygge Fur may have worked well.
How Many Blocks Do You Need?
I made a 9-block blanket, which is a Baby size blanket (36″ x 36″).
To make your blanket bigger, first add squares to the length before width. For example, if you’re wanting to go up from a baby size to a lapghan size, you would want the blanket to be longer, but not wider.
A 12-block blanket would be approximately 36″ x 48″, which would be Lapghan size.
A 20-block blanket would be approximately 48″ x 60″, which would be a Throw size. Here is a good example of changing your hook size, because we have now skipped over a toddler size blanket. The current square measurements are too big when attaching them, so a smaller hook could be helpful in getting the measurements to be more accurate. {See Chart Above}
A 35-block blanket would measure approximately 60″ x 84″. The finished measurement comes in a bit smaller than a standard Twin. To combat this, you could use a thicker yarn and a bit bigger hook (Like Caron One Pound and a J/10/6.00mm hook) to make your individual blocks larger.
A 56-block blanket would measure approximately 84″ x 96″, which would be a Full size.
A 64-block blanket would measure approximately 96″ x 96″, which would be roughly a Queen size.
A 72-block blanket would measure approximately 108″ x 96″, which would be in between a King & California King size.

With an additional row of fur border, the blanket will have another 3/4 -1″ of width and height.
This can be easily become a “grow-with-me” blanket too, because you just keep adding squares as your kids grow! You could add more squares every year.
Finishing
- Blocks will be attached as listed:
Row 1: Square A to Square B to Square A to Square B… etc.
Row 2: Square C to Square D to Square C to Square D… etc.
Repeat making rows of 1 & 2 to get desired length, then attach the rows together in order (1 over 2, 2 over 1, 1 over 2…etc) <See Image Above> - Thread a needle with fur yarn, match up your rows, so blocks are evenly side by side (back sides together) and plaid rows are perfectly lined up, then sew together with any stitch you like. You could also single crochet across if you prefer that to sewing. It won’t matter how you join the squares if using a fur yarn because it will hide the stitch definition.
- Optional: Add a row of border around the outside when all squares are attached.
- Hide all strings.
And now you have a Buffalo Check Plaid Blanket!

Come on over and join the Blackstone Designs Crochet Community on Facebook for fun CALs and Giveaways, plus exclusive sales, pattern support, and so much more!
You can also tag me on Instagram with your finished Blackstone Designs patterns for a chance to be shared on my stories!
Hope to see you there!

Written pattern and photographs ©2019 Sonya Blackstone of Blackstone Designs. Please do not sell, share, or modify this pattern, but instead share the link to where the pattern can be found. You may sell items you make with this pattern. This pattern, as with all Blackstone Designs/Sonya Blackstone patterns, are not for educational use without written permission from the designer.
Sonya Blackstone is a participant in the Amazon Services LLC Associates Program, an affiliate advertising program designed to provide a means for us to earn fees by linking to Amazon.com and affiliated sites.



LOVE your creations !!!
Thank you! <3
I have signed up for grow me and still can’t get the pattern what am I doing wrong… I created the account got on but there was nothing to click on
Hi Kathy!
Grow is an email newsletter subscription that most crochet designers are using now. This gives you access to free patterns on the designer website and you will also receive weekly updates about website posts and new patterns. If you’re wanting the PDF instead of the free pattern on this website, you can find them on:
Ravelry: https://www.ravelry.com/patterns/library/buffalo-check-plaid-blanket
Etsy: https://www.etsy.com/listing/762608531/crochet-pattern-buffalo-check-plaid
-Sonya
Hi,this was so well explained,you answered everything i had question on.thank you so much.
I was wondering if you could help me tho,what type of tension should i keep,loose or normal?i wasn’t sure when carrying yarn,if looser worked better with the carried yarn or if keeping the carried yarn just slightly tighter.
Thanks so. Much
Hi Jen!
I kept my normal tension, but I would advise to watch that you don’t over-tighten when changing colors, because that will cause it to cinch.
-Sonya
My daughters mother-in-law favorite color is lime green, what do you suggest or could you suggest what other two colors I could use for this blanket? Any advice would be fantastic.
Hi Donna!
You could use lime green and an emerald green with a dark gray instead of black! Black would still work, but I think the gray will go better with the lime green.
This is beautiful! How do you attach the minky Fabric for blanket backing?
Hi I’ve come over from Niki’s site. This is gorgeous and looks so cosy!, just what I need for winter here in Ireland, brrrr. Thank you for sharing your pattern for free, Sharon xx
Wow!
This project is so gorgeous, I love it and can’t wait to make one! Thank you.
This looks like such an exciting project! So affordable to do. Wonderful idea for Baby Blankets and Lapfgans!
I just made my first square using light blue, medium blue and charcoal. Thinking about using a gray faux fur for the trim…It is a beauty, thank you for the easy to follow directions.
Oooo, that sounds gorgeous! I’d love to see it when you have it done! You can tag me on Instagram (@ blackstone _ designs) or join the Blackstone Designs Crochet Community on Facebook. 🙂
I’m assuming that the yarn amounts for the 9 squares were 1 of each color? I want to make a twin size and to have enough, would it be 4 of each (for the 35 squares)?
Hi Bonnie!
The actual figures of yarn per square is in the notes section.
-Sonya
Gorgeous! How many skiens of the Go for Faux yarn did you use for the baby sized blanket?
Hi Kayla!
I didn’t use Go For Faux for my blanket, but I imagine it doesn’t take much more than it took with Pipsqueak. I would think 2, maybe 3 balls.
Would you run both of the colors into the stich? In your example you only mention running one color into the stich but with three colors I want to make sure I understand! Thanks You!
Hi Melissa!
I cut the 3rd color when I’m done using it. You can keep it running though. This will make your squares a but thicker than mine & your finished measurement will be slightly bigger as well.
What kind of tension do you use when crocheting this beautiful blanket? And do you need to block?
When laying yarn over to carry,is it ok if it shows thru some on some rows? What level yarns do you reccomend, a 3 or 4 level? (Thinner or thicker yarn?)
TX so much for a really beautiful pattern and great instructions.
Hi Jen!
I pull a little tight on a project like this, but still try to maintain an average tension. It’s ok for the other colors to show through because it adds to the plaid effect.
I did not block mine, but you certainly can!
This was made with a Worsted Weight #4 yarn, but you could use a #3, it would just turn out smaller.
-Sonya
Hi Sonya.
So I started my first squares (I used happy sunshine colors of bright yellow, carrot and white for a little baby girl blanket) and, besides the beautiful pattern, I really love the thickness that keeping the yarn running through each stitch adds of this work!
I was reading through, and I realized that you added a 2 line comment about a minky backing – I just purchased micro fleece for this. I was wondering however how do you attach this backing to the work? I’d appreciate extra details in regards to this particular point even if it’s not crochet per say. Thanks!
Hi Suzanne!
You would need to sew the backing on. You can use a needle and yarn or you can sew it with a sewing machine.
-Sonya
I want to make a large throw, buffalo plaid, in blue. What colors would you suggest. Im thinking light blue, darker blue and maybe a gray, but need yspecific color names please. Either I love tbis yarn or red heart super saver.
Hi Beverly!
I would suggest Red Heart Super Saver in Black (or Charcoal would be ok), Royal, and Navy.
-Sonya
I am new to this and have to order yarn online, so wanting to make sure I don’t mess up. I am looking at worsted weight yarn in 8oz balls (450 yards). Am I correct that I would only need 1 ball in each color to make a baby blanket?
Hi Lexi!
Yes, you would need 8oz skeins for the baby size blanket.
-Sonya
Is it possible to add sherpa to the blanket when it finished instead of the fluffy border ?
Hi Angela!
If you know how to sew then you could easily add a sherpa backing to this blanket! You could add it on the individual squares as well, but you would need to be able to sew.
There is a sherpa yarn you could also use in place of the pipsqueak.
-Sonya
Do you have the pattern in a downloadable format? I find all the graphics distracting but would love to make this afghan for my adult son’s friend who has cancer and is always dealing with chills. The warmth and masculinity of the project would be perfect. Thanks
Hello!
There is a downloadable PDF!
Ravelry: https://www.ravelry.com/patterns/library/buffalo-check-plaid-blanket
Etsy: https://www.etsy.com/listing/762608531/buffalo-check-plaid-blanket-pdf-crochet
Ribblr: https://ribblr.com/pattern/buffalo-check-plaid-blanket-crochet
LoveCrafts: https://www.lovecrafts.com/en-gb/p/buffalo-check-plaid-blanket-crochet-pattern-by-sonya-blackstone
-Sonya
I am loving this blanket. My dad always wore plaid in reds and black. I just have one question. Would you recommend carrying the yarn all the way from the beginning of the rows to the end? I just started my first square I haven’t done that and the end sections seem so much thinner.
Hi Miriam!
I did carry my yarn across!
-Sonya