
How to Make a Crochet Turtle Amigurumi – Free Pattern
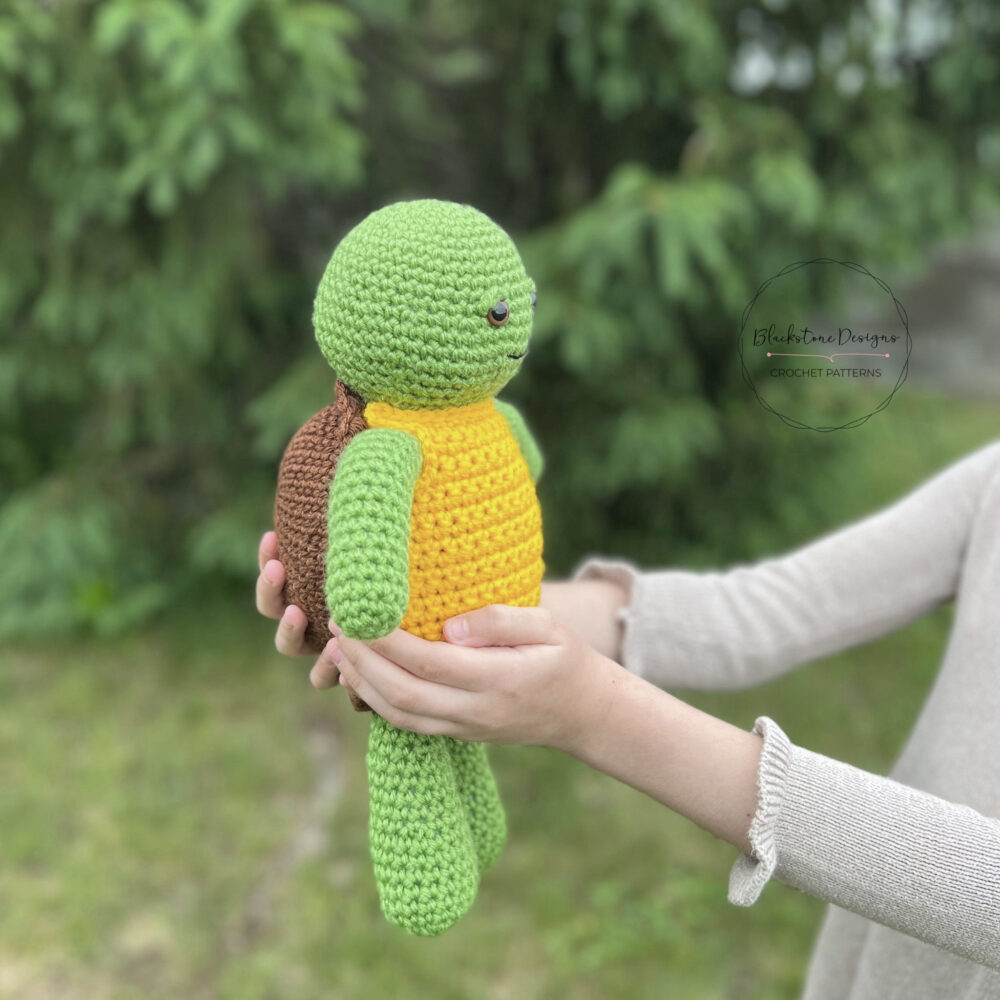
Tully the Turtle is a cute crochet turtle amigurumi beginner friendly crochet pattern. This crochet turtle stuffed animal is fun to make and great to gift!
This post contains affiliate links. At no extra cost to you, I may receive a small commission from purchases made through affiliate links, which helps me to keep bringing awesome free content!
If you liked crocheting Bruno the Bear or Mack the Moose, then you’re sure to like making Tully the Turtle! He’s another quick and easy amigurumi pattern!
The main body parts feature beginner crochet stitch work; what you would use to crochet any stuffed animal.
The shell and the belly patch may be a little tricky, but they are still easy level, as long as you understand basic shaping!
And I have to be honest, this one was pretty much designed by my 10 year old. I started making the turtle and instantly she had to have it when it was done. But she has quite a few critiques along the way.
First, the shell was not big enough, she made me adjust it twice (and I’m still not sure she is completely satisfied).
Then, came the belly patch. We has to adjust that several times, because it didn’t meet up with the shell on the sides and it just wasn’t accurate enough for her liking.
And lastly, it needed a black mouth (I originally just used the green yarn).
But, I did finally crochet a turtle and she’s in love. I guess that’s all that matters!

Materials
Worsted Weight Yarn (Medium #4)
- Green – 3oz [190yds]/90g [175m]
- Yellow – 2oz [142yds]/ 130m [63m]
- Brown – 3oz [190yds]/90g [175m]
H/8/5.00mm Hook
2 – 12mm Safety Eyes
Black embroidery floss
Fiberfill
Yarn Needle
Gauge
Not important for this project
Finished Measurements
Approximately 13” tall.
Stitch Guide
arnd = around
ch(s) = chain(s)
dec = decrease
puff = See Special Stitches
rnd = round
sc = single crochet
sk = skip
sl st = slip stitch
st(s) = stitch(es)
YO = Yarn Over
Skill Level
Easy
Written in U.S. Terms


Notes
- This pattern is worked in continuous rounds, with no joins or chains, unless otherwise indicated.
- Beginning chains do not count as stitches.
- Where asterisks appear, repeat the instructions between them.
- Stuff pieces, so they are slightly firm. Do not over-stuff or the stitches will stretch and the stuffing will show through.
- Turtle shown was made using Loops & Threads Impeccable in Guacamole, Sunny Day, and Chocolate.
Special Stitches
Puff Stitch (Puff) = Yarn over, insert hook in indicated stitch and draw up a loop, [yarn over, insert hook in same stitch and draw up a loop] 2 more times, yarn over and draw through 6 loops on hook.

Instructions
Head
With Green,
R1. Make magic ring, ch 1, 6 sc in ring (6)
R2. 2 sc in each st arnd (12)
R3. *2 sc, sc* arnd (18)
R4. *2 sc, sc x 2* arnd (24)
R5. *2 sc, sc x 3* arnd (30)
R6. sc arnd (30)
R7. *2 sc, sc x 4* arnd (36)
R8-11. sc arnd (36)
R12. *2 sc, sc x 2* arnd (48)
R13-15. sc arnd (48)
R16. *dec, sc x 6* arnd (42)
R17. *dec, sc x 5* arnd (36)
R18. sc arnd (36)
R19. *dec, sc x 4* arnd (30)
R20. *dec, sc x 3* arnd (24)
R21. *dec, sc x 2* arnd (18)
Insert eyes between rounds 11 & 12, so they are 2 sts apart.
Stuff Head.
22. *dec, sc* arnd (12)
Finish stuffing.
23. dec arnd (6).
Cut strand (leaving long), weave tail through remaining sts, and pull tight to close. Do not trim, but keep tail long for sewing.
Body
With Green,
R1. Make magic ring, ch 1, 6 sc in ring (6)
R2. 2 sc in each st arnd (12)
R3. *2 sc, sc* arnd (18)
R4. *2 sc, sc x 2* arnd (24)
R5. *2 sc, sc x 3* arnd (30)
R6. *2 sc, sc x 4* arnd (36)
R7. *2 sc, sc x 5* arnd (42)
R8. sc arnd (42)
R9. *2 sc, sc x 6* arnd (48)
R10-14. sc arnd (48)
R15. *dec, sc x 6* arnd (42)
R16-18. sc arnd (42)
R19. *dec, sc x 5* arnd (36)
R20-21. sc arnd (36)
R22. *dec, sc x 4* arnd (30)
R23. sc arnd (30)
R24. *dec, sc x 3* arnd. Fasten; Leave long tail for sewing. (24) Stuff Body.
Arms (Make 2)
With Green,
R1. Make magic ring, ch 1, 6 sc in ring (6)
R2. 2 sc in each st arnd (12)
R3-16. sc arnd (12)
R17. *dec, sc* arnd. Fasten; Leave long tail for sewing. (8) Stuff Arms.
Legs (Make 2)
With Green,
R1. Make magic ring, ch 1, 6 sc in ring (6)
R2. 2 sc in each st arnd (12)
R3. *2 sc, sc* arnd (18)
R4-9. sc arnd (18)
R10. *dec, sc x 4* arnd (15)
R11-14. sc arnd
R15. *dec, sc x 3* arnd (12)
R16-18. sc arnd; Fasten at the end of rnd 18; Leave long tail for sewing. (12) Stuff Legs.
Shell
With Brown,
R1. Make magic ring, ch 1, 6 sc in ring (6)
R2. 2 sc in each st arnd (12)
R3. *2 sc, sc x 4* 2X (16)
R4. *2 sc x 4, sc x 4* 2X (24)
R5. sc x 3, 2 sc x 2, sc x 10, 2 sc x 2, sc x 7 (28)
R6. sc x 2, 2 sc x 2, 2 sc x 2, sc x 8, 2 sc x 2, sc x 2, 2 sc x 2, sc x 6 (36)
R7. *2 sc x 2, sc x 10, 2 sc x 2, sc x 4* 2X (44)
R8-9. sc arnd (44)
R10. sc x 19, 2 sc x 2, sc x 20, 2 sc x 2, sc x 1 (48)
R11. sc arnd (48)
R12. *2 sc, sc x 7* arnd (54)
R13. sc arnd (54)
R14. *2 sc, sc x 8* arnd (60)
R15-16. sc arnd (60)
R17. *(puff, ch 1) sc* arnd, sl st to join; Fasten.
Belly
With Yellow,
Working top-down,
R1. Ch 19, sc in 2nd ch from hook and across, turn; Fasten. (18)
R2. Skip 3 sts, attach yarn in the 4th st, sc in same space as join and in next 11 sts, leave remaining 3 stitch unworked, turn (12)
R3-4. Ch 1, sc across, turn; Fasten after you turn at the end of R4.
R5. Ch 4, keep chains on hook, sc across R4, ch 5, turn (12 sc, 9 chs)
R6. sc in 2nd ch from hook and in the next 2 chs, sc in each sc, sc in each of the remaining chs, turn (20)
R7-17. Ch 1, sc across, turn (20)
R18. Ch 1, dec, sc x 16, dec, turn (18)
R19. Ch 1, dec, sc x 14, dec, turn (16)
R20. Ch 1, dec x 2, sc x 10, dec x 2, turn (12)
R21. dec x 2, sc x 6, dec x 2, turn (8)
R22. LOOSELY sl st around the outside of the belly patch, working in the ends of each row and in each stitch around; Fasten.

Eye Lids
With Green,
Ch 3. Fasten.
Finishing
- Attach head to body, so round 24 of the body is attached to round 20 of the head.
- Flatten openings of arms and attach to round 21.
- Attach legs to bottom of body, leaving them open, and attaching over rounds 1-4, one stitch apart.
- Attach shell to back of body, so the sides of the shell wrap approximately halfway around.
- Attach belly to front of body, so the top lies just above the arms and the sides meet the shell.
- Attach eyelids so they are resting on the tops of the eyes.
- Stitch on mouth approximately two rows below the eyes.
And that’s how you make the Tully the Turtle crochet amigurumi!

Keep up to date with my designs by joining the Blackstone Designs Crochet Community! Hope to see you there!!

Written pattern and photographs © 2023 Sonya Blackstone of Blackstone Designs. Please do not sell, share, or modify this pattern, but instead share the link to where the pattern can be found. You may sell items you make with this pattern. This pattern, as with all Blackstone Designs/Sonya Blackstone patterns, are not for educational use without written permission from the designer. All rights reserved.
Sonya Blackstone is a participant in the Amazon Services LLC Associates Program, an affiliate advertising program designed to provide a means for us to earn fees by linking to Amazon.com and affiliated sites.




When I go to download the free pattern for the adorable turtle, it brings up a plant hanger pattern to download. How can I get the turtle pattern please?
Hi Sharon!
Try refreshing the download page before clicking the photo!
-Sonya
Adorable. Thanks for sharing.
Assuming the mouthgoes ~ 2 rows below the eyes….not mouth.
Hi Diane!
Thank you for pointing that out! I have made the correction!
-Sonya