
How to Make a Witch Head Candy Dish Free Crochet Pattern
Witches are easily my favorite Halloween character, so this crochet Witch Head Candy Dish steals my heart and makes the perfect crochet Halloween decor piece!
This post contains affiliate links. At no extra cost to you, I may receive a small commission from purchases made through affiliate links, which helps me to keep bringing awesome free content!
Since I really don’t like to spend time making projects that have no actual use, I had to add the functional element to to it: candy dish. Or ya know, whatever else you might need to put away, like keys, money…etc.
I can see her on a desk with treats you’re hiding from your co-workers, on the dining room table with treats you’re sharing with your houseguests, or even on the counter top to just for fun!
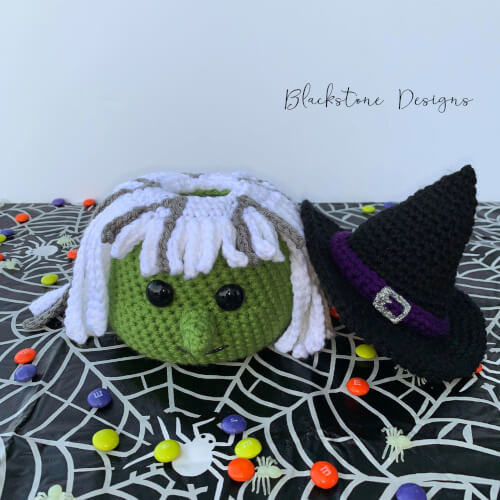
Just like the Crystal Ball Candy Dish, I wanted there to be a hidden feature to this project. It was a little obvious with this Pumpkin Candy Dish that the top comes off, but with the witch, there is a secret hiding place!
Plus, there are so many ways you can make this witch. I struggled to decide hair color and hat color. I originally wanted black hair, but then I didn’t want black hair with a black hat, so then I thought I would do red hair, but then I liked red hair with a natural skin tone. Wart or no wart? Oh, the decisions. Oh, the possibilities.
Witch Head Candy Dish Crochet Pattern
Option 1: Continue scrolling for free pattern instructions on this site
Option 2: Purchase the ad-free PDF that includes tutorial photos from one of my shops
Option 3: Purchase the “13 Halloween Crochet Patterns” eBook.
Materials
Worsted Weight Yarn (#4)
- Skin Tone – 75yds/1.5oz
- Hat Color – 50 yds/1oz
- Hair Color – 25yds/.5oz
- Gray – 25 yds/.5 oz
- Hat Band Color – 10 yds/.25oz
G/6/4.00mm Crochet Hook
18mm Black Animal Eyes
Black 3D Fabric Paint
Silver 3D Fabric Paint or Felt
2” Diameter Glass Craft Rock
Poly-Fil Ultra Plush
Yarn Needle
Gauge
Not important for this project
Finished Measurements
17.5″D x 9″H
Stitch Guide
arnd = around
ch = chain
BLO = back loop only
ch = chain
dec = single crochet decrease
sc = single crochet
sl st(s) = slip stitch(es)
Skill Level
Intermediate
Written in U.S. Terms

Notes
- Beginning chain-1 does not count as a stitch.
- Worked in the round with no joins or turns.
- When asterisks appear, repeat the instructions between them as indicated.
- Wrong side/inside is the outside for this project (back side of the scs will be the outside).
- For witch hair: I added gray streaks, but this is optional. For solid hair color, just skip color change instructions and continue working with chosen color.
- Tutorial Photos are on the last page.
- Joann Brand Big Twist Yarns were used for this project.
Instructions
WITCH HEAD
With Skin Tone,
R1. Make adjustable ring, ch 1, 6 sc in ring (6)
R2. 2 sc arnd (12)
R3. *2 sc, sc* arnd (18)
R4. *2 sc, sc x 2* arnd (24)
R5. *2 sc, sc x 3* arnd (30)
R6. *2 sc, sc x 4* arnd (36)
R7. *2 sc, sc x 5* arnd (42)
R8. *2 sc, sc x 6* arnd (48)
R9. *2 sc, sc x 7* arnd (54)
R10. *2 sc, sc x 8* arnd (60)
R11-18. sc arnd (60)
R19. *dec, sc x10* arnd (55)
R20. *dec, sc x 9* arnd (50)
R21-27. sc arnd (50)
R28. *dec, sc x 8* arnd (45)
R29. *dec, sc x 7* arnd (40)
R30. *dec, dc x 6* arnd (35)
R31. *dec, sc x 5* arnd (30)
R32. *dec, sc x 4* arnd; Fasten. (25)
LINER
With Skin Tone,
R1. Make adjustable ring, ch 1, 5 sc in ring (5)
R2. 2 sc arnd (10)
R3. *2 sc, sc* arnd (15)
R4. *2 sc, sc x 2* arnd (20)
R5. *2 sc, sc x 3* arnd (25)
R6. BLO sc arnd (25)
R7-17. sc arnd; Fasten at the end of R17 (25)
NOSE
With Skin Tone,
R1. Make adjustable ring, ch 1, 3 sc in ring (3)
R2. sc arnd (3)
R3. 2 sc arnd (6)
R4-5. sc arnd; Fasten at the end of R5. (6)
HAIR
R1. [With Hair Color] Ch 25, join to form a ring (be careful not to twist), sc arnd (25)
R2. *[With Gray] 2 sc, [With Hair Color] sc x 4* arnd (30)
R3. *[With Gray] sc, 2 sc, [With Hair Color] sc x 4* arnd (35)
R4. *[With Gray] sc, [With Hair Color] 2 sc, [With Gray] sc, [With Hair Color] sc x 4* arnd (40)
R5. [With Gray] ch 6, sc in 2nd ch from hook and back across, sl st in same space ch started in (6)
[With Hair Color] Repeat 2X, [With Gray] Repeat 1X, [With Hair Color] Repeat 4X, [With Gray] Repeat 1X, [With Hair Color] Repeat 2X, [With Gray] Repeat 1X
[With White] ch 19, sc in 2nd ch from hook and back across, sl st in same space ch started in (18)
[With Hair Color] Repeat 3X, *[With Gray] Repeat 1X, [With Hair Color] Repeat 2X, [With Gray] Repeat 1X, [With Hair Color] Repeat 4X* 3X, sl st to beginning ch of first hair strand.

WITCH HAT BRIM
BRIM BOTTOM
With Hat Color,
R1. Make adjustable ring, ch 1, 5 sc in ring (5)
R2. 2 sc arnd (10)
R3. *2 sc, sc* arnd (15)
R4. *2 sc, sc x 2* arnd (20)
R5. BLO sc arnd (20)
R6. sc arnd; Fasten (20)
BRIM TOP
With Hat Color,
R1. Make adjustable ring, ch 1, 5 sc in ring (5)
R2. 2 sc arnd (10)
R3. *2 sc, sc* arnd (15)
R4. *2 sc, sc x 2* arnd; keep a working loop (20)
R5. **Make sure the brim top is facing right side up, while working the remainder of the lid, so the stitches will be facing the correct direction:
Place brim bottom under the brim top, line the stitches up, and working through both layers *2 sc, sc x 3* 3X, insert the craft rock, add stuffing underneath the rock to make it firm, then *2 sc, sc x 3* 2X to finish joining the lid bottom and top together (25)
R6. *2 sc, sc x 4* arnd (30)
R7. *2 sc, sc x 4* arnd (36)
R8. *2 sc, sc x 5* arnd (42)
R9. *2 sc, sc x 6* arnd (48)
R10. *2 sc, sc x 7* arnd (54)
R11. *2 sc, sc x 8* arnd (60)
R12. *2 sc, sc x 9* arnd (66)
R13. *2 sc, sc x 10* arnd (72)
R14. *2 sc, sc x 11* arnd; Fasten. (78)
WITCH HAT CROWN (POINT)
With Hat Color,
R1. Ch 36, join to form a ring (be careful not to twist the ch), sc arnd (36)
R2-3. sc arnd (36)
R4. *dec, sc x 4* arnd (30)
R5-6. sc arnd (30)
R7. *dec, sc x 3* arnd (24)
R8-9. sc arnd (24)
R10. *dec, sc x 2* arnd (18)
R11-12. sc arnd (18)
R13. *dec, sc* arnd (12)
R14-15. sc arnd (12)
R16. dec arnd (6)
R17. dec arnd, weave tail through remaining stitches and pull tight to closel; Fasten. (3)
HAT BAND
With Any Color,
R1. Ch 41, sc in 2nd ch from hook and across, turn (40)
R2. Ch 1, sc across; Fasten. (40)
Finishing
- Insert 18mm craft eyes between rows 21 & 22, leaving 4 stitches between them.
- Stuff head, leaving space in the middle for the liner.
- Insert the liner into the head, then slip stitch around the opening, working through both the liner and head layers to join them together.
- Attach hair over top of head, lining up the opening and making sure the bangs are centered over the eyes.
- Attach nose to center of face (between eyes), over rows 16-19.
- Stuff the hat crown and attach it to the hat brim.
- 3D paint a buckle on the hat band; allow to dry completely.
- Slip hat band over hat crown all the way down to the base.
- With fabric paint: draw mouth over rows 14 -15. The mouth can also be stitched on with a needle and thread or yarn.
- Hide All Strings.
And that’s how you make the Witch Head Candy Dish!

Can’t wait to see your projects!

Written pattern and photographs © 2021 Sonya Blackstone of Blackstone Designs. Please do not sell, share, or modify this pattern, but instead share the link to where the pattern can be found. You may sell items you make with this pattern. This pattern, as with all Blackstone Designs/Sonya Blackstone patterns, are not for educational use without written permission from the designer.
Sonya Blackstone is a participant in the Amazon Services LLC Associates Program, an affiliate advertising program designed to provide a means for us to earn fees by linking to Amazon.com and affiliated sites.



This is so fun! A great decor place when it’s hiding the candy.