Crochet Turkey Bottle Cozy Pattern
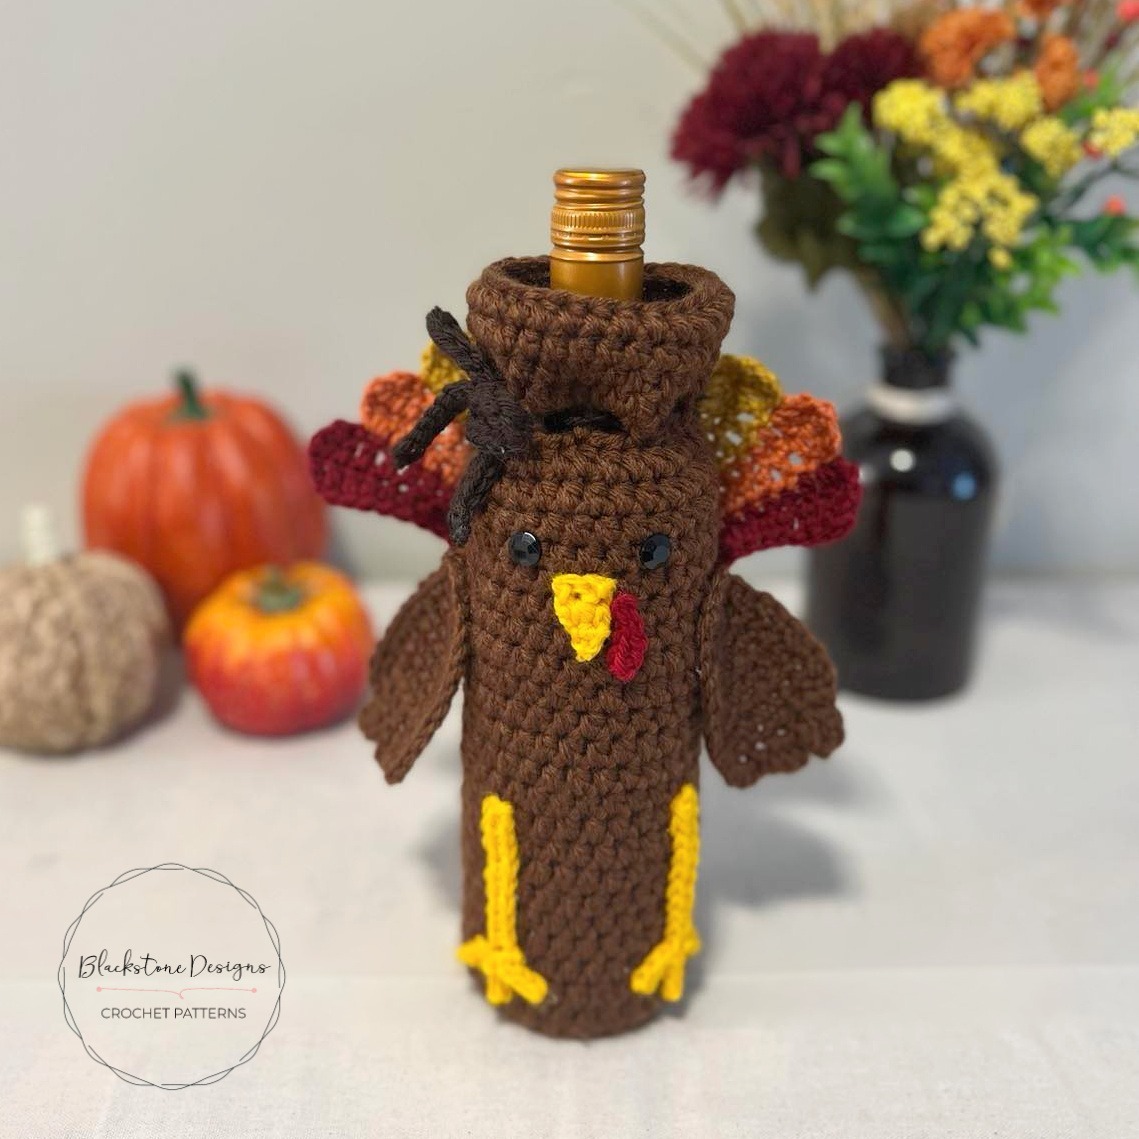
Bring that hostess gift in style with this Turkey Bottle Cozy! It could also be used as a centerpiece at your adult drink table too!
This post contains affiliate links. At no extra cost to you, I may receive a small commission from purchases made through affiliate links, which helps me to keep bringing awesome free content!
What is a Turkey Bottle Cozy?
The crochet turkey bottle cozy is a decorative cover, shaped like a turkey, designed to fit snugly around bottles of wine or similar sized bottles. These cozies keep beverages at the desired temperature while adding a festive element to your drink presentation. Turkey bottle cozies are especially popular during Thanksgiving and the fall season, making them a great gift or decor item for holiday gatherings.
Why Choose a Turkey Bottle Cozy?
- Festive Fun: The whimsical turkey design adds a playful touch to any holiday table or bar setup.
- Functionality: These cozies aren’t just for show – they also help keep your drinks insulated, whether it’s a bottle of wine, beer, or soda.
- Conversation Starter: A turkey bottle cozy is a guaranteed conversation piece that will delight guests and bring smiles to the faces of everyone at your gathering.
Alternative Uses for Your Turkey Bottle Cozy
While a turkey bottle cozy is perfect for wrapping around your favorite drinks during holiday celebrations, there are plenty of other creative ways to use this festive item throughout the year. Here are some imaginative ideas:
1. Decorative Vase Cover
Transform your turkey bottle cozy into a unique vase cover. Slide the cozy over a slender vase, and you’ve instantly added a seasonal touch to your floral arrangements. This is a great way to upcycle the cozy for use as a fall or Thanksgiving-themed centerpiece, bringing warmth and character to your dining or coffee table.
2. Holiday Utensil Holder
Repurpose your turkey bottle cozy into a utensil holder for your holiday table. Simply slip it over a jar or container, and place your utensils inside. This adds a fun twist to your table setting, while also keeping utensils organized and within easy reach.
3. Wine Gift Wrap
If you’re planning to bring a bottle of wine to a holiday gathering, use your turkey bottle cozy as a gift wrap. Slide it over the bottle, and you’ve instantly transformed a simple gift into something festive and thoughtful. The recipient will not only appreciate the wine but will also have a reusable cozy for their future bottles.
4. Holiday-Themed Candle Holder
For a cozy and whimsical touch, use your turkey bottle cozy to wrap around a pillar candle. Just make sure the candle is in a glass jar or container to keep things safe. This transforms the cozy into a charming candle holder that can be placed on your mantle, dinner table, or any surface that could use a little festive flair.
How to Style Your Turkey Bottle Cozy
Styling your turkey bottle cozy for different occasions can be a fun and creative process. Here are a few tips on how to make the most of your cozy in both traditional and alternative ways:
- Add Accents: Enhance the cozy’s look by adding small seasonal accents like mini leaves, berries, or a tiny bow to the turkey’s beak. This can make it even more festive, whether it’s sitting on a bottle or being used in a different way.
- Mix and Match: If you have multiple cozies in different designs or colors, try mixing and matching them on your table for a playful and cohesive holiday theme. Pair turkey cozies with fall-themed napkins, table runners, and centerpieces.
- Personalization: Customize your turkey bottle cozy by adding a monogram or embroidery. This can make it a personal and thoughtful gift, especially if you plan to give it along with a bottle of wine or as part of a holiday hostess gift.
Turkey Bottle Bag
Crochet Pattern
Option 1: Continue scrolling for free pattern instructions on this site
Option 2: Purchase the ad-free PDF that includes tutorial photos from one of my shops
What materials do I need?
To make the crochet Turkey Bread Basket you will need worsted weight yarn, an H/8/5.00mm crochet hook, a yarn needle, scissors, and 12mm black gems or buttons for eyes. Safety eyes cannot be used for this project, because the shanks will poke through to the inside and push against the bottle. This will make it so the eyes don’t lay flat.
The Pattern
Keep reading for a list of what you need to make the braided crochet pumpkin, including the stitch pattern instructions!
Materials
Worsted Weight Yarn (#4)
- Brown [3oz/190yds]
- Red [.75ozs/48yds]
- Yellow [.75ozs/48yds]
- Orange [.5oz/32yds]
- Green [.5oz/32yds]
- Dark Brown [Scraps]
H/8/5.50mm Hook
12mm Black Gems
Yarn Needle
Scissors
Gauge
11hdc x 10 rows = 4”
Gauge is not critical for this project
Finished Measurements
2.5”D (across bottom)
10.75”H (tall)
Stitch Guide
Adc = See Special Stitches
arnd = around
ch = chain
dc = double crochet
hdc = half double crochet
sc = single crochet
sl st(s) = slip stitch(es)
st(s) = stitch(es)
Skill Level
Easy
Written in U.S. Terms


Pattern Notes
- Beginning chains do not count as stitches.
- Where asterisks appear, repeat the instructions between them.
- Where parenthesis appear, work those stitches all into the same space.
- The base is worked with double strands, all appliques are worked with a single strand.
Special Stitches
Alternate Double Crochet (Adc): Without chaining, work sc in first stitch, insert hook in middle of sc, yo, draw up a loop, yo, draw through both loops.
Instructions
COZY (Double Strand)
With Brown,
R1. Magic Ring, ch 1, 6 sc in ring (6)
R2. Ch 1, sc arnd (12)
R3. Ch 1, *2 sc, sc* in each st arnd (18)
R4. Ch 1, *2 sc, sc x 2* in each st arnd (24)
R5. Ch 1, *2 sc, sc x 2* in each st arnd; sl st x 2 (30)
R6-28. Ch 1, hdc arnd, sl st to join (30)
R29. Ch 1, *hdc, ch 2, skip 2* arnd, sl st to join in 1st hdc (10 hdc, 10 ch spaces)
R30. Ch 1, hdc in each hdc, 2 hdc in each ch-2 space arnd, sl st to join in 1st hdc (30)
R31-33. Ch 1, hdc arnd, sl st to join; Fasten. (30)
TAILFEATHER (Single Strand)
With Red,
R1. Ch 13, sc x 4, hdc x 4, dc x 4, turn
R2. Ch 1, Adc in 1st st, dc x 3, hdc x 4, sc x 4, turn
With Orange,
R3. Ch 1, sc x 4, hdc x 4, dc x 1, 3 dc in next st, leave last 2 sts unworked, turn
R4. Ch 1, Adc in 1st st, dc x 3, hdc x 4, sc x 4, turn
With Yellow,
R5-6. Repeat R3&4
With Green,
R7-8. Repeat R3&4
With Red,
R9-10. Repeat R3&4
With Green,
R11-12. Repeat R3&4
With Yellow,
R13-14. Repeat R3&4
With Orange,
R15-16. Repeat R3&4
With Red,
R17-18. Repeat R3&4; Fasten at the end of R18.
WINGS (Make 2) (Single Strand)
With Brown,
R1. Ch 4, sc in 2nd ch from hook and across, turn (3)
R2. Ch 1, sc across, turn (3)
R3. Ch 1, 2 sc, sc, 2 sc, turn (5)
R4. Ch 1, sc across, turn (5)
R5. Ch 1, 2 sc, sc x 3, 2 sc, turn (7)
R6-10. Ch 1, sc across, turn (7)
R11. Ch 1, sc, skip 1, sc x 3, skip 1, sc, turn (5)
R12. Ch 3, 2 trc in same space as ch, sl st x 2, (ch 2, 2 dc) in same space as last sl st, sl st x 2, (ch 1, 2 sc) in same space as last sl st; turn project slightly and sc in the end of each row and in each st arnd the wing (do not work back across top); Fasten.
LEGS (Make 2) (Single Strand)
With Yellow,
Ch 9, sc in 2nd ch from hook and across, *(ch 4, sl st in 2nd ch from hook and in next 2 ch), sl st in end of ch 9* 3X; Fasten.
BEAK (Single Strand)
With Yellow,
R1. Ch 3, sc in 2nd ch from hook and in last, turn (2)
R2. Ch 1, sc across, turn (2)
R3. Ch 1, dec (1); turn slightly and sc in the end of each row and in each st arnd; Fasten.
SNOOD (Single Strand)
With Red,
Ch 4, sl st in 2nd ch from hook and in next ch, skip 1 ch, hdc in last; Fasten
TIE STRING (Single Strand)
With Dark Brown,
Ch 65, sc in back bump of 2nd chain and in each ch across; Fasten.
Finishing
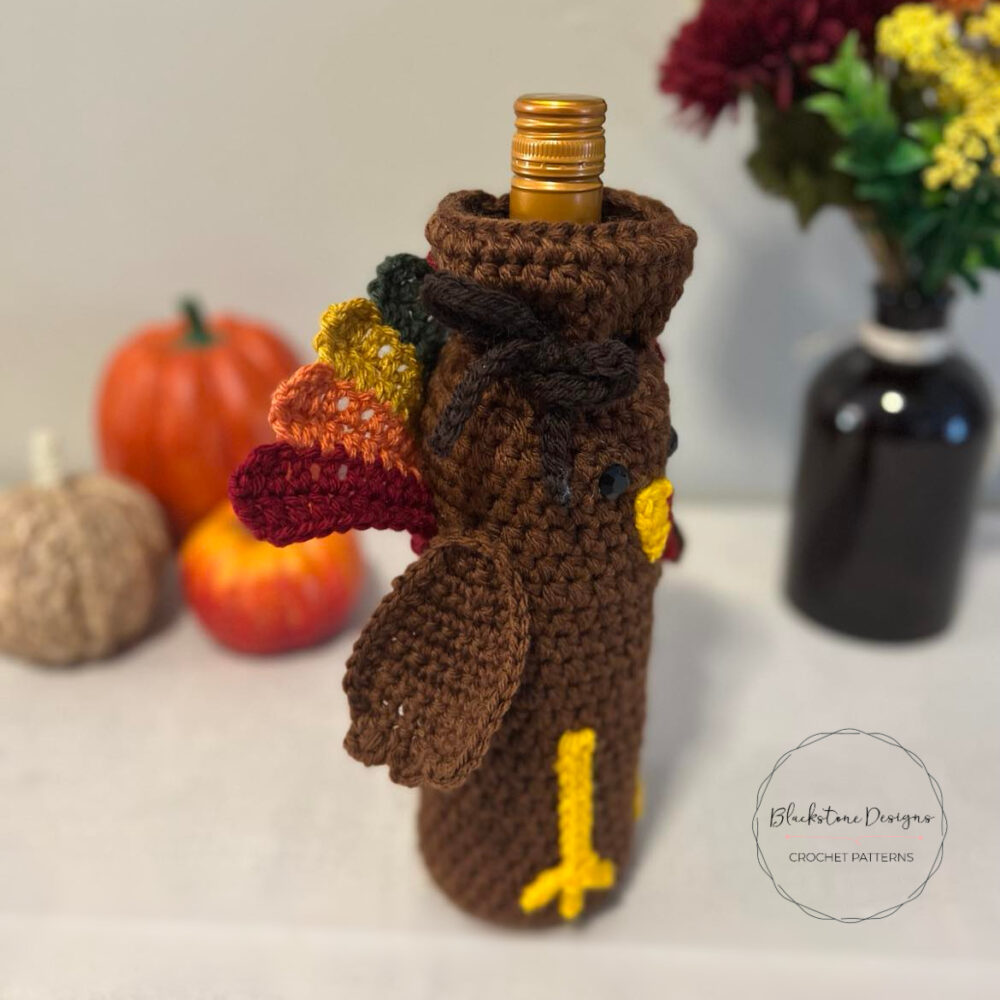
- Locate 2 ch-2 spaces on the side: insert tie string through the ch-2 space on the right and weave in and out of all ch sps, so it exits at the left ch-2 space on the side.
- Attach beak to front of cozy (opposite seam), so R1 of beak is lined up between R24&25.
- Attach snood to, so the 1st stitch of the snood is right below the corner of R1 of beak.
- Attach black gems to head slightly above and to the side of the beak corners.
- Attach legs/feet to front, so the top of the leg is across R15 of the cozy. Leave approx. 6 sts between them and make sure the beak is centered between them.
- Attach wings to the sides, so R1 of the wing is attached to R23 of the cozy; attach only the first 3 rows. Leave approx. 4 sts between the wings and the beak.
- Attach tailfeather to the back center, centered over the seam, so the bottom of the tailfeather is across R22. I attached across the bottom of all feathers, then half of the center 3 feathers, leaving the other feathers loose.
- Hide all strings.
And that’s the Crochet Turkey Bread Basket Pattern!

Join our crochet community group!
Come on over and join the Blackstone Designs Crochet Community on Facebook for fun CALs and giveaways, plus exclusive sales, pattern support, and so much more!
Don’t forget to share!
Tag me on Instagram at @blackstone_designs or use the hashtag #BlackstoneDesignsCrochet so I can share your makes with the community!
Happy Crocheting!

Written pattern and photographs © 2023 Sonya Blackstone of Blackstone Designs. Please do not sell, share, or modify this pattern, but instead share the link to where the pattern can be found. You may sell items you make with this pattern. This pattern, as with all Blackstone Designs/Sonya Blackstone patterns, are not for educational use without written permission from the designer. All rights reserved.
Sonya Blackstone is a participant in the Amazon Services LLC Associates Program, an affiliate advertising program designed to provide a means for us to earn fees by linking to Amazon.com and affiliated sites.