
Crochet Forked Cluster Towel Hangers – Free Pattern
Today I’m super excited to share with you all how to make one of my favorite little kitchen helpers: the forked cluster towel hanger! They deliver all the charm and none of the stretch, especially when made in sturdy cotton yarn.
This post contains affiliate links. At no extra cost to you, I may receive a small commission from purchases made through affiliate links, which helps me to keep bringing awesome free content!
The crochet forked cluster towel hangers help keep towels neatly organized and easily accessible. Hanging towels on hangers can save valuable space, especially in smaller bathrooms or kitchens where floor or counter space is limited. Vertical storage maximizes available space and keeps countertops clear.
Let’s chat about why you need one, how to customize the size, and how the forked cluster crochet stitch brings texture and personality to a humble towel.
All About the Forked Cluster Stitch
The crochet Forked Cluster stitch is fun to learn; it’s like taking two half double crochet stitches and making them into one! — though they’re technically clusters split in the middle, creating a “forked” appearance. Totally brings the towel hanger from “that’s useful” to “ooh, what’s that?”
It’s a reversible stitch, so both sides are pretty and there’s no need to worry about which side is facing forward. Also worth noting: this is a yarn eater, so it yields a thick fabric, which helps keep towel hangers extra sturdy. And the Forked Cluster crochet stitch can be worked in solids or stripes, which gives us so many possibilities for finished looks!
Why You’ll Love Crochet Towel Hangers
You’ve probably seen those cute towel hangers that loop a hand towel onto your oven handle, fridge, or cabinet knob—but what if you could crochet your own, pick your yarn, color it any way you like, and actually make something that works and looks adorable? That’s where this DIY crochet project comes in.
- Cotton yarn for structure: Acrylic can stretch and sag. I’ve been there—started beautiful, drooped over time. Cotton or a cotton blend keeps that nice shape and the stitches stay neat.
- Moderate length: At about 8 inches, it’s long enough to securely wrap around most handles, yet short enough to lie prettily.
- Easy to adjust: Want shorter? Just rip out a row or two. Longer? Add ‘em right in.
- Fun texture: The forked cluster stitch isn’t just there for looks. Its raised, layered vibe gives dimension and that little bit of flair that’ll spice up your kitchen or bathroom.
Crochet towel hangers allow towels to air dry efficiently, which helps prevent musty odors and prolongs the life of the towels by reducing moisture retention. Proper drying also promotes better hygiene.
Want your kids to practice better hygiene? Just slip a towel into one of these crochet towel hangers and tell them it’s the “decorative towel only”—you’ll be amazed how often they’ll start using it. Ha! It’s a fun little trick that could work for adults too, because who can resist reaching for something that looks this pretty? Plus, keeping a towel off the counter (and out of the sink splash zone) means it stays clean, dry, and ready for the next hand wash or quick kitchen cleanup.
The beauty of these crochet towel hangers is that they can be made in just about any yarn weight, fiber, and color combination you can dream up. This opens up endless style possibilities—go neutral and minimal for a modern farmhouse look, bold and bright for a pop of color, or soft pastels for a cottagecore vibe. They’re not just functional; they act as small but mighty decorative accents that instantly enhance your kitchen or bathroom’s overall aesthetic. With the textured forked cluster stitch adding both grip and visual interest, they’re a perfect marriage of form and function.
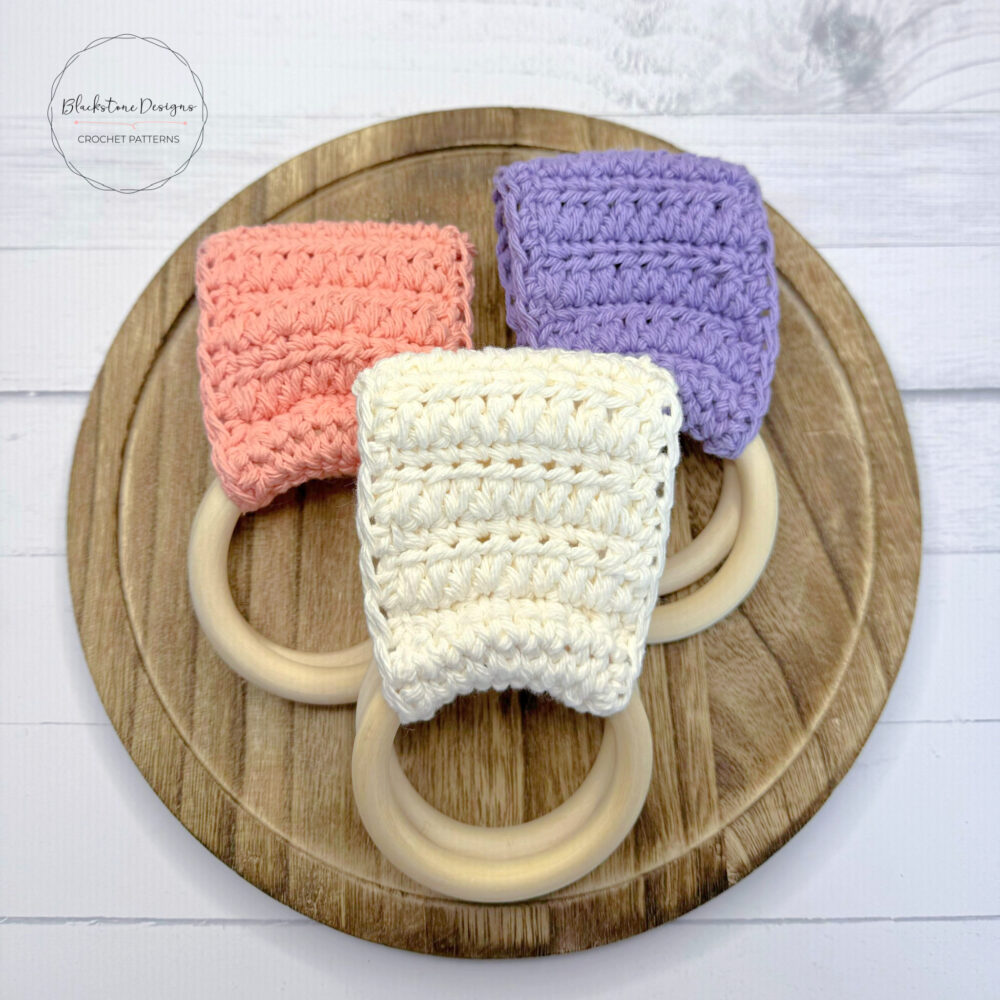
Right now, I’m fully in a Spring mood, so I made mine in cheerful floral shades that remind me of blooming gardens and sunny afternoons. But that’s the magic of these towel hangers—they can match any season. Work them up in warm, earthy tones for Fall, rich reds and greens for Christmas, or even patriotic colors for summer holidays. A quick change of yarn and you’ve got a fresh, seasonal accent without redecorating your whole space.
Overall, crochet towel hangers offer a practical and aesthetically pleasing solution for organizing towels, maximizing space, promoting drying, and enhancing the visual appeal of bathrooms, kitchens, and other areas where towels are commonly used.

Forked Clusters Towel Hangers Crochet Pattern
Option 1: Continue scrolling for free pattern instructions on this site
Option 2: Purchase the ad-free PDF that includes tutorial photos from one of my shops
About the Materials
The Forked Cluster Crochet Towel Hangers were made with 100% Cotton Worsted Weight Yarn. Good options are Knit Picks Dishie, Paintbox Cotton Aran, and Lily Sugar ‘n Cream. Of course they can be made in any fiber of your choosing, but cotton adds structure and sturdiness, where other yarns may stretch.
The Crochet Pattern
Keep reading to get the free crochet pattern instructions for the Forked Clusters Towel Hangers!

Gauge
No critical for this project
Finished Measurements
Approximately 7.5”L (without rings) x 3.25”W
Stitch Guide
ch = chain
dc = double crochet
FC = See Special Stitches
sc = single crochet
sl st(s) = slip stitch(es)
YO = Yarn Over
Skill Level
Easy
Written in U.S. Terms

Notes
- Beginning chains do not count as stitches.
- Any type of ring can be used for these towel hangers; metal, plastic, wood…etc. They can also be smaller rings, as long as the towel fits!
Special Stitches
Forked Cluster (FC) = YO, insert hook in first stitch indicated, YO, draw up a loop (3 loops on hook), YO, insert hook in next stitch, YO, draw up a loop (5 loops on hook), YO, draw through first 3 loops on hook, YO, draw through last 3 loops on hook.
For subsequent FC: YO, insert hook in the last stitch from the previous FC, YO, draw up a loop (3 loops on hook), YO, insert hook in next stitch, YO, draw up a loop (5 loops on hook), YO, draw through first 3 loops on hook, YO, draw through last 3 loops on hook.
Instructions
R1. Ch 10, sc in 2nd ch from hook and in each st across, turn (9)
R2-5. Ch 1, sc across, turn (9)
R6. (WS) Ch 2 (does not count as a stitch), FC over 1st + 2nd st, FC over 2nd + 3rd st… etc. to last stitch, dc in last stitch (after last FC is complete), turn (8 FC + 1 dc)
R7. (RS) Ch 1, sc in each st across, do not sc in ch-2, turn (9)
R8-18. Repeat R6&7; leave off on an R6 repeat
R19-22. Ch 1, sc across, turn (9)
R23. Ch 1, sc across, do not turn; continue to R24
R24. Ch 1, sc in the end of each row and in each st arnd; Fasten.
Finishing
- Sew R24 to R5, working over the wooden ring (beginning end sewn over one ring).
- Sew R24 to R19, working over the wooden ring (ending end sewn over one ring).
- Hide all strings.
And that’s how you make the Crochet Forked Cluster Towel Hangers

Join our crochet community group!
Come on over and join the Blackstone Designs Crochet Community on Facebook for fun CALs and giveaways, plus exclusive sales, pattern support, and so much more!
Don’t forget to share!
Tag me on Instagram at @blackstone_designs or use the hashtag #BlackstoneDesignsCrochet so I can share your makes with the community!
Happy Crocheting!

Written pattern and photographs © 2024 Sonya Blackstone of Blackstone Designs. Do not sell, share, or modify this pattern, but instead share the link to where the pattern can be found. You may sell items you make with this pattern. This pattern, as with all Blackstone Designs/Sonya Blackstone patterns, are not for educational use without written permission from the designer. All rights reserved.
Sonya Blackstone is a participant in the Amazon Services LLC Associates Program, an affiliate advertising program designed to provide a means for us to earn fees by linking to Amazon.com and affiliated sites.


Would you please check the instructions for attaching the rings? I think one end will be attached to End 1. I have not worked this pattern, just reading through it before starting. Thank you and happy new year.
Hi Cindi!
There is an edging added on to the finished strip, so you will attach that edging to R5 (R5 so there is enough space for the ring in the fold).
-Sonya