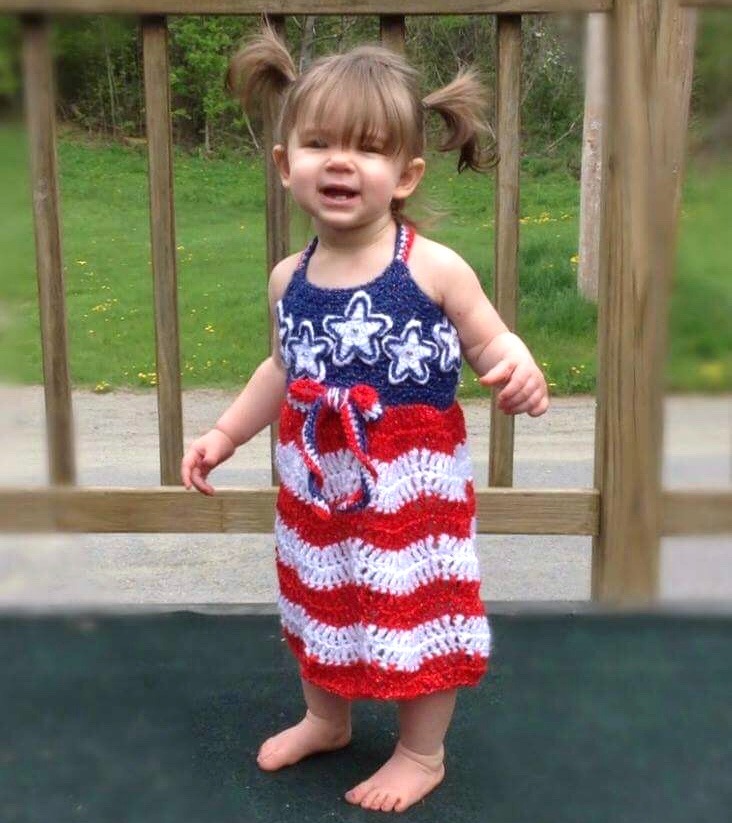
Sunshine and Lace Tank Top Crochet Pattern for Kids
The Sunshine and Lace Tank Top crochet pattern for kids yields a light weight open lace top featuring easy stitchwork and minimal sewing!
This post contains affiliate links. At no extra cost to you, I may receive a small commission from purchases made through affiliate links, which helps me to keep bringing awesome free content!
Crochet tops are a fun addition to any wardrobe! Whether you’re planning a day at the beach, attending a carnival, or just heading to the playground on a warm day, the Sunshine and Lace crochet tank top will make a great choice!
Why You’ll Love the Sunshine and Lace Tank
If you love crocheting garments, the Sunshine and Lace Tank will quickly become one of your go-to patterns. With its easy-to-follow instructions and lovely open lace texture, this pattern offers the perfect balance of relaxing stitches and eye-catching detail. It’s designed to be beginner-friendly for those with some garment experience, and the simple shaping makes it a stress-free project from start to finish.
How to Wear it
One of the best things about this crochet tank is how versatile it is. You can wear it as a breezy summer shell, layer it over a tank top or T-shirt, or even toss it on as a cute swim cover-up. The open lace stitch makes it breathable and ideal for hot days, while the fit is loose and comfy without being bulky. Whether you’re heading to the beach, the park, or just relaxing at home, this piece works with everything from shorts to skirts to denim.
About the Sizes
This version of the Sunshine and Lace Tank is written specifically for children and comes in sizes 2T through 12Y, so you can make a perfectly fitting top for your little one. It’s great for summer adventures, family vacations, or just playing outside in style. Plus, it’s a project that works up quickly, which is a big bonus when crafting for fast-growing kids! Also available in adult sizes!

Sunshine and Lace Tank Top Crochet Pattern
Option 1: Continue scrolling for free pattern instructions on this site
Option 2: Purchase the ad-free PDF that includes tutorial photos from one of my shops
What Crochet Stitches do I need to know?
The Sunshine and Lace Tank features Open Shells, Picots, and Foundation Double Crochet, which are made up of basic stitches like single crochet and chains.
What is an Open Shell stitch?
A shell stitch is when multiple double crochets are worked all in the same space, which creates a solid stitch. An open shell is when chain spaces are added to make it a lacy stitch. With the open shell stitch you work a double crochet, then a chain 1, another double crochet, another chain 1, and then finish with a double crochet in the space indicated in the pattern.
What is a Picot stitch?
Picot is defined as “a small loop or series of small loops of twisted thread in lace or embroidery, typically decorating the border of a fabric”. Crochet Picots can be worked in a few ways, all which create a small loop or point to use as either it’s own stitch or a decorative accent. In this case, the Picot will be worked by placing a single crochet, then a chain 3, then single crochet again all in the same space as indicated in the pattern.
About the Yarn
This crochet tank top is worked using a lighter worsted weight cotton yarn, specifically Red Heart Creme de la Creme. Unfortunately this yarn is now discontinued, but you can find other options, such as Lion Brand Pima Cotton, on Yarn Sub.
The Sunshine and Lace Tank Pattern
Keep reading for a list of what you need to make this stitch, including the stitch pattern instructions!

Materials
Light Worsted Weight (#4)
- Grey (A) (1,1,1.5,2,2.5,3)oz
- White (B) (1,1,1.5,2,2.5,3)oz
- Blue (C)(2,2.5,2.5,3,4,4)oz
Gauge
14 Fdc = 4”
4 main stitch rows = 2”
Sizes
Child’s (Chest):
2T (21”)[53cm]
4T (23”)[58.5cm]
6Y (25”)[63.5cm]
8Y (26 ½”)[67cm]
10Y (28”)[71cm]
12Y (30”)[76cm]
Stitch Guide
ch = chain
dc = double crochet
Fdc = Foundation double crochet
Open Shell = See Special Stitches
Picot = See Special Stitches
sc = single crochet
sk = skip
sl st = slip stitch
trc = treble crochet
YO = yarn over
Skill Level
Easy – Intermediate
Written in U.S. Terms


Notes
- This top is worked from the bottom – up.
- The instructions are for size 2T with changes for larger sizes in parenthesis.
- Row number does not mark how many total rows the tank has, except for sizes 10 & 12.
- Beginning chains do not count as stitches unless otherwise indicated.
- Where asterisks appear, repeat the instructions between them.
- Instructions are color coded by size.
- There are three finishing options with tutorial photos at the end of the pattern.
- Top shown was made using Red Heart Crème de la Crème in #0001 White, #0400 Grey, and #0887 Royal Blue.
Special Stitches
Open Shell = (dc, *ch 1, dc* 2X) in space indicated
Picot = (sc, ch 3, sc) in space indicated
Instructions
With A,
Row 1: Fdc 63(70,77,84,91,98)
With B,
Row 2: Ch 1, sc in 1st st, sk 2, open shell, sk 2, *sc, ch 3, sc, sk 2, open shell, sk 2* across, sc in last st, turn
Row 3: Ch 5, picot in middle dc of open shell, ch 3, *dc in next ch-3 sp, ch 3, picot in middle dc of open shell, ch 3* across, trc in last st, turn
Row 4: Ch 1, sc in trc, open shell in ch sp of picot, *picot in top of dc, open shell in ch sp of picot* across, sc in 3rd st of ch-5, turn
Row 5: Ch 5, picot in middle dc of open shell, ch 3, *dc in ch sp of picot, ch 3, picot in middle dc of open shell, ch 3* across, trc in last st, turn
With A,
Rows 6-9: Repeat rows 4 & 5
With B,
Rows 10-13: Repeat rows 4 & 5; at the end of row 13, sl st to the other side to join panels, turn
SIZES 2, 4, & 6: MOVE TO ROW 22; SIZES 8-12: CONTINUE
With A,
Rows 14-17: Repeat rows 4 & 5; at the end of row 17, sl st to the other side to join panels, turn
SIZE 8 & 10: MOVE TO ROW 22; SIZE 12: CONTINUE
With B,
Rows 18-21: Repeat rows 4 & 5; at the end of row 21, sl st to the other side to join panels, turn
With C,
Row 22: Ch 1, sc in trc, open shell in ch sp of picot, *picot in top of dc, open shell in ch sp of picot* across, sc in 3rd st of ch-5, sl st to join, turn
Row 23: Ch 5, picot in middle dc of open shell, ch 3, *dc in ch sp of picot, ch 3, picot in middle dc of open shell, ch 3* across, trc in last st, sl st to join, turn
FOR SIZES 6Y & 10Y ONLY:
ROWS 24 -25: Repeat 22 & 23
**This top is measured for average height; to meet at the waist. To make the shirt slightly longer, repeat rows 22-23 as needed/desired.
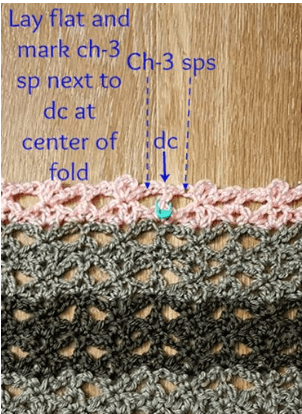
Lay shirt flat, so the slit is on one side; mark the middle st (ch-3 of picot OR dc) on opposite side (as show in photos below) & continue to front panel instructions:

FRONT PANEL
Row 1 (SIZES 2, 6, & 10 ONLY): Ch 1, sc in trc, *picot in top of dc, open shell in ch sp of picot, * across to marked picot; sc in 1st sc of picot (do not work in chain sp), turn
Row 1 (SIZES 4, 8, & 12 ONLY): Ch 1, sc in trc, *open shell in ch sp of picot, picot in top of dc* across to marked dc in ch sp; sc in ch-3 space before dc (do not work in dc), turn
Row 2 (SIZES 2, 6, & 10 ONLY): Ch 5, dc in ch sp of picot, ch 3, *picot in middle dc of open shell, ch 3, dc in ch sp of picot, ch 3* across, trc in last st, turn
Row 2 (SIZES 4, 8, & 12 ONLY): Ch 5, picot in middle dc of open shell, ch 3, *dc in ch space of picot, ch 3, picot in middle dc of open shell, ch 3* across, trc in last st, turn
Row 3 (SIZES 2, 6, & 10 ONLY): Ch 1, sc in trc, picot in top of dc, *open shell in ch sp of picot, picot in top of dc * across, sc in the 3rd ch of ch-5, turn
Row 3 (SIZES 4, 8, & 10 ONLY): Ch 1, sc in trc, *picot in top of dc, open shell in ch sp of picot* across, sc in the 3rd ch of ch-5, turn
Rows 4-7(9,9,9,11,11): Repeat rows 2 & 3; Last row will be a row 3 repeat
Row 8(10,10,10,12,12): Ch 6, *dc in ch sp of picot, ch 4, sc in middle dc of open shell, ch 4* across, trc in last st. Fasten.
BACK PANEL
With C,
Row 1 (SIZES 2, 6, & 10 ONLY): Attach yarn to unworked sc of marked picot (do not work in ch sp), sc in same sp, *picot in top of dc, open shell in ch sp of picot* across, sc in 3rd st of ch-5, turn
Row 1 (SIZES 4, 8, & 12 ONLY): Attach yarn to unworked ch sp on the side of the dc (do not work in the dc), sc in same sp, *open shell in ch sp of picot, picot in top of dc* across, sc in 3rd st of ch-5, turn
Row 2 (SIZES 2, 6, & 10 ONLY): Ch 5, *picot in middle dc of open shell, ch 3, dc in ch sp of picot, ch 3* across, trc in last st, turn
Row 2 (SIZES 4, 8, & 12 ONLY): Ch 5, *dc in ch sp of picot, ch 3, picot in middle dc of open shell, ch 3* across, trc in last st, turn
Row 3 (SIZES 2, 6, & 10 ONLY): Ch 1, sc in trc, *picot in top of dc, open shell in ch sp of picot* across, sc in 3rd st of ch-5, turn
Row 3 (SIZES 4, 8, & 12 ONLY): Ch 1, sc in trc, *open shell in ch sp of picot, picot in top of dc* across, sc in 3rd st of ch-5, turn
Rows 4-7(9,9,9,11,11): Repeat rows 2 & 3; Last row will be a row 3 repeat
Row 8(10,10,10,12,12): Ch 6, *dc in ch sp of picot, ch 4, sc in middle dc of open shell, ch 4* across, trc in last st. Fasten.
TIE
Ch 125(125,130,135,140,145). Fasten.
Finishing
- Sew shoulder together, starting from the arm side and working 2”(2”,2”,2.5”,2.5”,3”) over. Repeat on other side.
- Hide all strings.
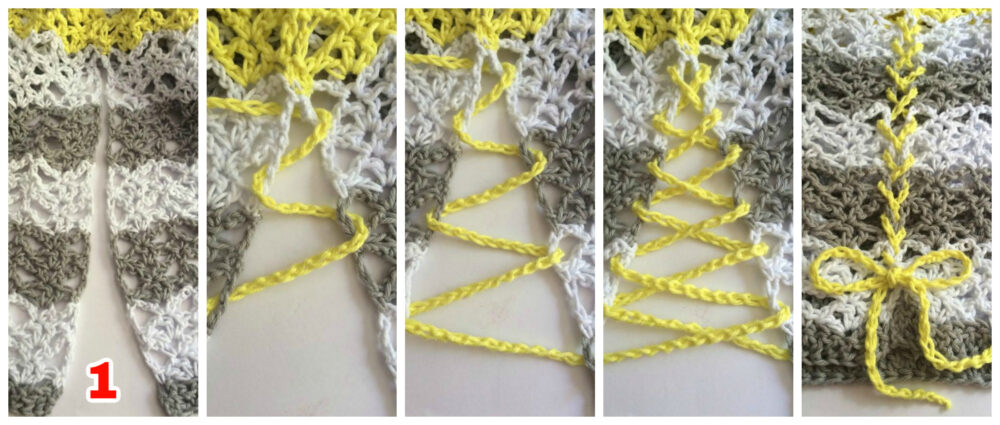
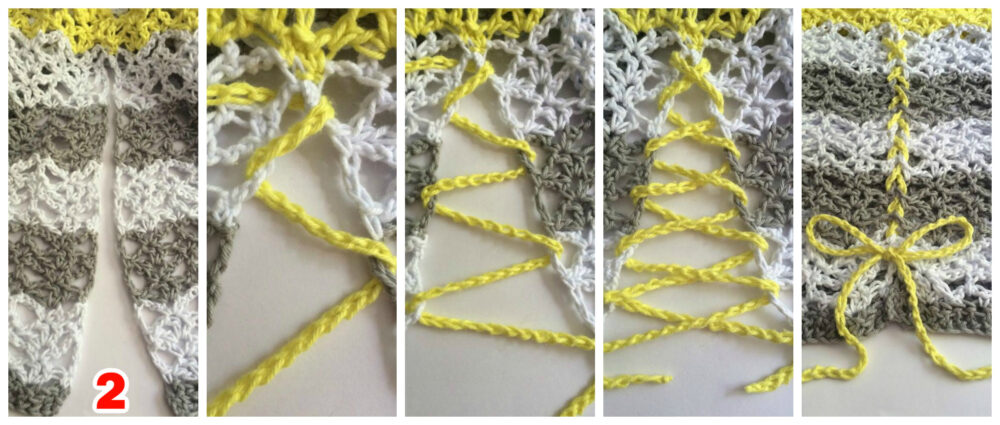
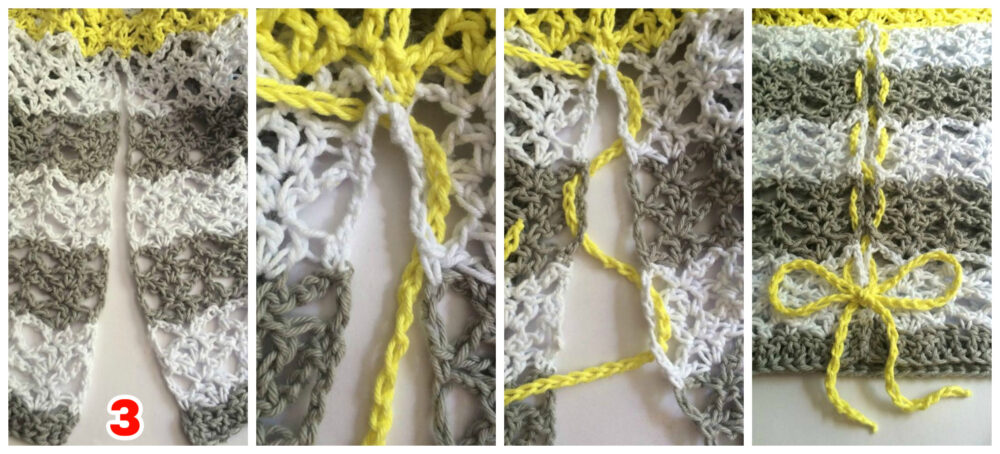
- Weave tie through ch 5 sps ONLY of side slit, like lacing a shoe. See photos below for options.
Option 1 (Down Arrow):
Starting at the top of the slit, thread the tie through two adjacent ch-5 sps; make sure tails are even length.
*Bring one tail diagonally down to opposite side and thread through from the back side.
*Continue weaving the tail through to the bottom and then repeat with other tail.
*Tie into a bow at the bottom.
Option 2 (Up Arrow):
Starting at the top of the slit, thread the tie through two adjacent ch-5 sps; make sure tails are even length.
*Bring one tail diagonally down to opposite side and thread through from the front side.
*Continue weaving the tail through to the bottom and weave the tail from the back side through the last ch space and then repeat with other tail. Repeat with other tail.
*Tie into a bow at the bottom
Option 3 (Wave):
Starting at top of slit, thread the tie through two adjacent ch-5 sps; make sure tails are even length. Bring one tail straight down and thread through from the ch-5 sp below it.
* Cross over diagonally and thread through the top ch-5 sp, through the back side of next stripe. Bring tail straight down and thread through the ch-5 sp below it.
* Continuing weaving tail through to the bottom and then repeat with other tail.
* Tie in a bow at the bottom.
And that’s how you make the Sunshine and Lace Tank Top for kids!
Join our crochet community group!
Come on over and join the Blackstone Designs Crochet Community on Facebook for fun CALs and giveaways, plus exclusive sales, pattern support, and so much more!
Don’t forget to share!
Tag me on Instagram at @blackstone_designs or use the hashtag #BlackstoneDesignsCrochet so I can share your makes with the community!
Happy Crocheting!

Written pattern and photographs © 2016 Sonya Blackstone of Blackstone Designs. Do not sell, share, or modify this pattern, but instead share the link to where the pattern can be found. You may sell items you make with this pattern. This pattern, as with all Blackstone Designs/Sonya Blackstone patterns, are not for educational use without written permission from the designer. All rights reserved.
Sonya Blackstone is a participant in the Amazon Services LLC Associates Program, an affiliate advertising program designed to provide a means for us to earn fees by linking to Amazon.com and affiliated sites.