How to Make Mock-rame Hangers – Free Crochet Pattern
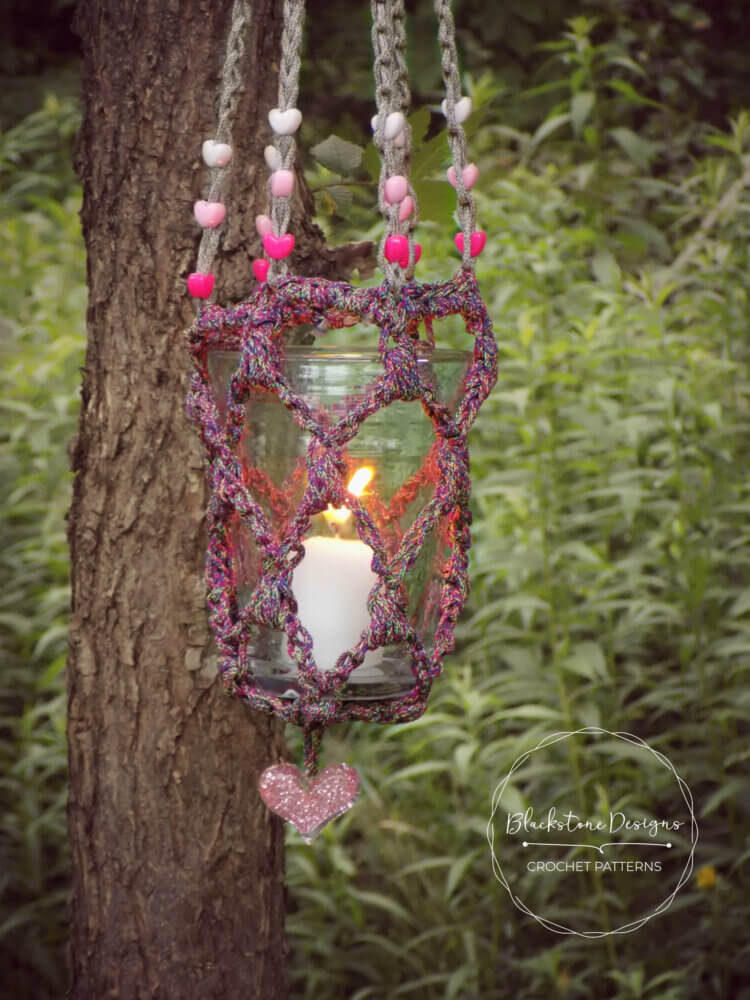
I’ve always been a fan of the macramé plant hangers, so I knew I had to make something like it. Seeing that I crochet, my only option was to make these Mock-rame Hangers.
This post contains affiliate links. At no extra cost to you, I may receive a small commission from purchases made through affiliate links, which helps me to keep bringing awesome free content!
I made them with the idea of camping or outdoor gatherings. They would even be great decorations for an outdoor wedding. Of course they can also be hung inside too and the candle holders can be replaced with potted plants.

These hangers were originally made using Red Heart Cordial yarn, which is now discontinued, but you could use any macrame cord.
Get the ad-free version from one of the shops below

Let’s make the Mock-rame Hangers!

Materials
Red Heart Cordial bulky weight yarn (3.5 oz/62 yds): 1 skein of any colorway
M/N/9.00mm Crochet Hook
40+ Pony Beads
Dritz 1 ½” plastic ring
Yarn Needle
Scissors
Optional Materials: Large Charm (for the bottom)

Gauge
Not critical for this project
Size
Holds up to a 6” jar or pot
Stitch Guide
ch(s) = chain(s)
dc = double crochet
puff = puff stitch
sc = single crochet
sl st = slip stitch
st(s) = stitch(es)
Skill Level
Easy
Written in U.S. Terms


Notes
- Puff sts are worked in chain spaces and chain space are worked skipping over puff sts.
- Where asterisks appear, repeat the instructions between them.
SAFETY NOTE: If using these as candle hangers, make sure to use a container that is twice the height of the candle so the flame does not reach the yarn or any trees around it. Do not leave unattended.
Special Stitches
Puff St = *YO, insert hook in st, draw up a loop* 3X in same stitch, YO, draw through all loops on hook.
Instructions
BASKET BASE
R1. Ch 4, join with a sl st to form ring, ch 1, 6 sc in ring, sl st to join in the 1st sc (6 sc)
R2. Ch 3, dc in same space as ch, ch 1, *2 dc, ch 1* in each st arnd, sl st to join in top of beginning ch 3 (12 dc, 6 ch-1 spaces)
R3. Ch 1, puff st in last ch-1 space of round 2, Ch 6, *puff st in ch-1 space, ch 6* arnd, sl st to join in top of beginning puff st (6 puff, 6 ch-6 spaces)
R4. *Ch 6, puff st in ch-6 space* arnd, ch 3, sl st to join in 3rd ch of beginning ch-6 space (6 puff, 6 ch-6 spaces)
R5. Ch 1, puff st in same space as ch, ch 6, sk 1st ch-6 space and puff st, *puff st ch-6 space, ch 6* arnd, sl st to join in top of beginning puff st (6 puff, 6 ch-6 spaces)
R6. Repeat round 4 (6 puff, 6 ch-6 spaces)
R7. Ch 1 (counts as 1st sc), 2 sc in 1st ch-6 space, sc in puff, *4 sc in ch-6 sp, sc in puff* arnd, 2 sc in ch-3 so, sl st to join in beginning ch 1. Fasten. (31 sc)
BASKET HANGERS
R1. Attach yarn to round 7 in a stitch that lines up with a puff st from round 6; Ch 1, making loop approx. ¾” long, pull hook out of loop, slide pony bead over loop, reinsert hook in loop, *make another ¾” chain, pull out hook, slide pony bead over loop, reinsert hook* 2X, ch 30 regular length chains. Fasten. Leave 15” tail.
R2-6. Repeat step 1
RING
sc around ring so entire ring is cover. Fasten. Hide string.
Finishing
- Pair up the basket hangers so you have 3 groups. *Tie them two-by-two at the top of the chains, slide 6 pony beads over 2 joined long tails and tie a knot at the top to secure* 3X. Trim tails to same length and tie the 3 basket hangers to the ring.
- Optional: Weave 3 strands of yarn through the bottom between rounds 1 & 2, for a total of 6 tails. *Slide 2 beads over 2 adjacent tails and tie a knot to secure* 3X. Tie all tails together in one big knot and trim to same length.
- Optional: Slide a charm over one strand, weave the strand through the bottom between rounds 1 & 2 so each tail goes through to the inside of the hanger on opposite sides. Tie the tails together on the inside.
That’s how you make Mock-rame Hangers!

Looking for more home decor patterns?
You might like these:
Kitty Cat Pot Holder
Stuffed Rustic Tree Decor
Astrology Afghan
I hope you like this pattern as much as I do! Don’t forget to add it to your Ravelry favorites so you can always find it!
Come join the fun in the Blackstone Designs Crochet Community on Facebook!

Written pattern © 2014 Sonya Blackstone of Blackstone Designs. Please do not sell, share, or modify this pattern, but instead share the link to where the pattern can be found. You may sell items you make with this pattern. This pattern, as with all Blackstone Designs/Sonya Blackstone patterns, are not for educational use without written permission from the designer.