
Giant Whale Shark Amigurumi – Free Crochet Pattern
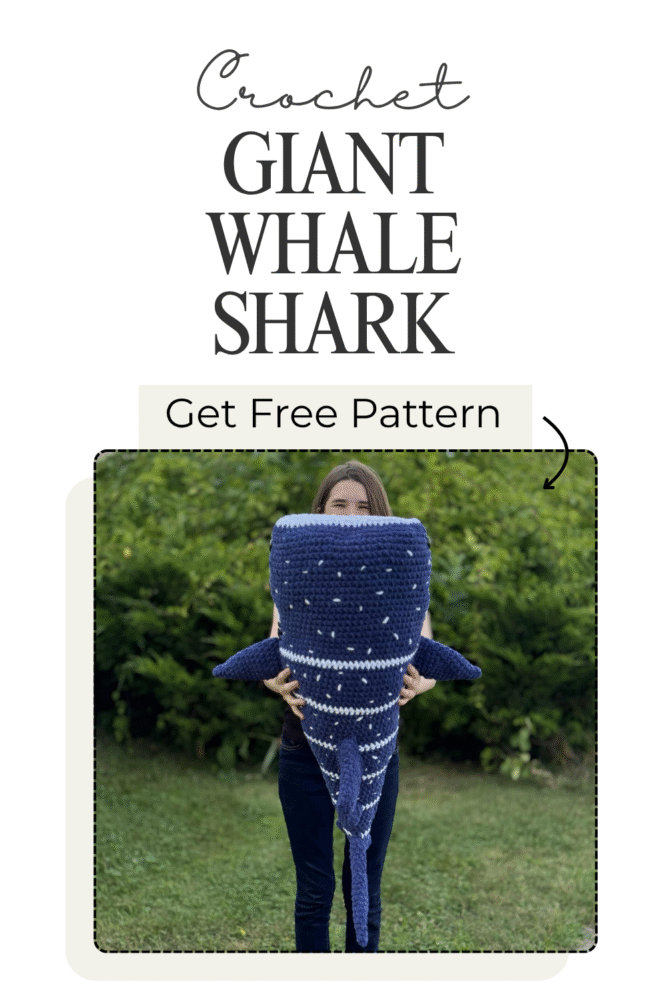
If you’re a fan of big plushies, ocean creatures, or just love fun crochet projects that make people smile, then you’re going to fall head-over-fins for the Giant Whale Shark Amigurumi crochet pattern! This oversized, squishy sea creature is packed with charm, from its dotted skin to its adorable tail, and it’s sure to become your next favorite crochet project.
This post contains affiliate links. At no extra cost to you, I may receive a small commission from purchases made through affiliate links, which helps me to keep bringing awesome free content!
Whether you’re crafting a gift for a marine-loving kid, decorating a nautical-themed room, or just want to add something wildly unique to your plush collection, this gentle giant is ready to make waves. Let’s dive into all the fun details!
What is a Whale Shark?
First things first — despite the name, a whale shark isn’t a whale at all. It’s the world’s largest species of shark (and fish, for that matter). These gentle giants can grow up to 40 feet long and are known for their wide mouths and distinctive white spots. Don’t worry though — they’re filter feeders and completely harmless to humans!
Whale sharks are slow-moving, majestic creatures that glide through the ocean like living submarines. Their unique coloring and calm personalities make them a favorite among divers and marine biologists — and now they can be your favorite amigurumi too!
Meet the Crochet Whale Shark Amigurumi
Now let’s talk yarn. This Giant Whale Shark Amigurumi is a cuddly take on the real thing. Measuring in at a whopping 2.5+ feet long, this plush pal is big enough to be a pillow, a huggable toy, or a jaw-dropping showpiece.
Crocheted using super bulky chenille yarn, it works up faster than you’d expect for such a large project. Plus, the thick yarn gives it a cozy, velvety texture that makes it impossible not to squeeze!

Why You’ll Love the Giant Whale Shark Amigurumi
This crochet whale shark is everything you want in a project — big, bold, and full of personality! Here are just a few reasons makers are loving this one:
Great for Shark Week & Ocean-Themed Gifts: This is a must-make for Shark Week enthusiasts, aquarium fans, and ocean lovers.
Size Matters: It’s giant. It makes a statement. Whether on a bed, couch, or gift table — it stands out!
Beginner-Friendly Construction: While the finished result looks intricate, the pattern uses basic stitches and techniques, making it ideal for advanced beginners and up.
Fast Finish: The use of bulky yarn means you’ll finish this massive plush much quicker than you’d think.
Customizable: Want a pink whale shark? Go for it! Make a rainbow one or stick to ocean-inspired blues — the possibilities are endless.
Tips for Making Your Giant Whale Shark Amigurumi
Here are a few quick tips to help your whale shark amigurumi crochet journey go swimmingly:
1. Use stitch markers liberally. When working in continuous rounds, it’s easy to lose track. Mark the first stitch of each round so you always know where you’re at.
2. Stuff firmly — but not too tight. You want your shark to be nice and squishy, not overstuffed. Distribute the filling evenly to avoid lumps.
3. Use sewing pins. When attaching fins, shifting happens, but using sewing pins helps hold pieces in place.
4. Use hot glue. Add a thin layer of hot glue to the pieces before attaching them to keep them extra secure. I also like to add hot glue to the eyes before adding the backings.
Customization Ideas
The basic pattern gives you the classic whale shark shape, but the fun really begins when you start customizing. Here are a few fun ideas:
Personalize It: Use embroidery to add a name, initials, or even a smile.
Color Variations: Try mint green and pink for a kawaii aesthetic, or ombre blues for an underwater gradient effect.
Add a Pocket: Make the mouth deeper or leave the belly patch unattached at the top to create a pocket for storing treasures or turning it into a pajama pal!
Holiday Themes: Red, white, and blue for Fourth of July; spooky black with orange eyes for Halloween; red and green with a Santa hat for Christmas.
Pair with Friends: Make a mini fish to go with it, or a crochet scuba diver to ride on its back!
How to Care for Your Giant Whale Shark Amigurumi
Like most plush toys made with chunky chenille yarn, you’ll want to keep your whale shark looking fresh. Here’s how:
- Spot clean with a damp cloth and mild soap
- Avoid machine washing unless the yarn label states otherwise.
- Do not wring or twist
- Let air dry fully before using or displaying again
If gifting to small children, consider embroidering the eyes instead of using safety eyes to avoid any choking hazard.
How to Get the Crochet Whale Shark Pattern:

Giant Crochet Whale Shark Amigurumi Pattern
Option 1: Continue scrolling for free pattern instructions on this site
Option 2: Purchase the ad-free PDF that includes tutorial photos from one of my shops
About the Materials
The Giant Whale Shark Amigurumi was made with super bulky chenille yarn, AKA “blanket yarn”. I specifically used the color Twilight!
Other super bulky yarns can be used in place of blanket yarn and you could even follow this pattern with a smaller yarn and hook combo for a small shark!
The Crochet Pattern
Keep reading for a list of what you need to make the Giant Whale Shark Amigurumi, including the stitch pattern instructions!

Materials
100% Polyester “Chenille” Super Bulky Yarn (#6)
- Blue [21oz/440yds]
- White [10oz/210yds]
- Black [Scraps]
Gauge
8 sc x 8 rows = 4”
Gauge is not critical for this project
Finished Measurements
33”Long; 34.5” Circumference
Stitch Guide
arnd = around
ch = chain
dec = single crochet decrease
sc = single crochet
sl st(s) = slip stitch(es)
Skill Level
Easy
Pattern Written in U.S. Terms

Notes
- Beginning chains do not count as stitches.
- Where asterisks appear, repeat the instructions between them.
- Whale Shark body is worked from head to tail.
- Leave long tails at the ends of fins for attaching.
- Stuff the body generously, but be careful not to overstuff and stretch the stitch, because it will leave gaps and stuffing will pop through.
- Chenille yarn = 100% Polyester and is also known as “blanket yarn”.
- Optional: Use sewing pins to hold pieces in place while you attach them.
Pro Tip: I use hot glue to tack my pieces in place! - Tutorial photos are at the end of the pattern.
Instructions
BODY
With Blue,
R1. Ch 60, join to form a ring sc in ring, sc in each ch arnd (60)
R2. *2 sc, sc x 9* arnd (66)
R3. *2 sc, sc x 10* arnd (72)
R4-22. sc arnd (72)
Insert eyes between R4&5, one on each side, leaving approximately 33 stitches between them.
With White,
R23. sc arnd (72)
With Blue,
R24-26. sc arnd (72)
R27. *dec, sc x 22* 3X (69)
R28. sc arnd (69)
R29. *dec, sc x 21* 3X (66)
R30. sc arnd (66)
With White,
R31. *dec, sc x 20* 3X (63)
With Blue,
R32. sc arnd (63)
R33. *dec, sc x 19* 3X (60)
R34. sc arnd (60)
R35. *dec, sc x 18* 3X (57)
R36. sc arnd (57)
R37. *dec, sc x 17* 3X (54)
R38. sc arnd (54)
With White,
R39. *dec, sc x 16* 3X (51)
With Blue,
R40. sc arnd (51)
R41. *dec, sc x 15* 3X (48)
R42. sc arnd (48)
R43. *dec, sc x 14* 3X (45)
R44. sc arnd (45)
R45. *dec, sc x 13* 3X (42)
R46. sc arnd (42)
With White,
R47. *dec, sc x 12* 3X (39)
With Blue,
R48. sc arnd (39)
R49. *dec, sc x 11* 3X (36)
R50. sc arnd (36)
R51. *dec, sc x 10* 3X (33)
R52. sc arnd (33)
R53. *dec, sc x 9* 3X (30)
R54. sc arnd (30)
With White,
R55. *dec, sc x 8* 3X (27)
With Blue,
R56. sc arnd (27)
R57. *dec, sc x 7* 3X (24)
R58. sc arnd (24)
R59. *dec, sc x 6* 3X (21)
R60. sc arnd (21)
R61. *dec, sc x 5* 3X (18)
R62. sc arnd (18)
With White,
R63. *dec, sc x 4* 3X (15)
With Blue,
R64. sc arnd (15)
R65. *dec, sc x 3* 3X (12)
R66. sc arnd (12)
R67. *dec, sc x 2* 3X (9)
R68. sc arnd (9)
R69. *dec, sc* 3X (6)
R70. dec arnd; weave tail through remaining sts; Fasten. (3)
MOUTH
With White,
R1. Ch 31, sc in 2nd ch from hook and across, turn and work down opposite side of the ch: sc across (60)
R2-4. sc arnd; Fasten at the end of R4. (60) [Note: To make it more of a pocket, continue working rounds until the desired depth is achieved]
BELLY PATCH
With White,
R1. Ch 31, sc in 2nd ch from hook and across, turn (30)
R2-24. Ch 1, sc across, turn (30)
R25. Ch 1, sc, skip 1, sc x 26, skip 1, sc, turn (28)
R26. Ch 1, sc across, turn (28)
R27. Ch 1, sc, skip 1, sc x 24, skip 1, sc, turn (26)
R28. Repeat R26 (26)
R29. Ch 1, sc, skip 1, sc x 22, skip 1, sc, turn (24)
R30. Repeat R26 (24)
R31. Ch 1, sc, skip 1, sc x 20, skip 1, sc, turn (22)
R32. Repeat R26 (22)
R33. Ch 1, sc, skip 1, sc x 18, skip 1, sc, turn (20)
R34. Repeat R26 (20)
R35. Ch 1, sc, skip 1, sc x 16, skip 1, sc, turn (18)
R36. Repeat R26 (18)
R37. Ch 1, sc, skip 1, sc x 14, skip 1, sc, turn (16)
R38. Repeat R26 (16)
R39. Ch 1, sc, skip 1, sc x 12, skip 1, sc, turn (14)
R40. Repeat R26 (14)
R41. Ch 1, sc, skip 1, sc x 10, skip 1, sc, turn (12)
R42. Repeat R26 (12)
R43. Ch 1, sc, skip 1, sc x 8, skip 1, sc, turn (10)
R44. Repeat R26 (10)
R45. Ch 1, sc, skip 1, sc x 6, skip 1, sc, turn (8)
R46. Repeat R26 (8)
R47. Ch 1, sc, skip 1, sc x 4, skip 1, sc, turn (6)
R48. Repeat R26 (6)
R49. Ch 1, sc, skip 1, sc x 2, skip 1, sc, turn (4)
R50. Repeat R26 (4)
R51. Ch 1, dec x 2, turn (2)
R52. Repeat R26 (2)
R53. Ch 1, dec, do not turn
R54. Ch 1, sc in the end of each row and in each st arnd the outside; Fasten.
PECTORAL FIN (Make 2)
With Blue,
R1. Magic Ring, ch 1, 4 sc in ring (4)
R2. sc arnd (4)
R3. *2 sc, sc* 2X (6)
R4. *2 sc, sc x 2* 2X (8)
R5. *2 sc, sc x 3* 2X (10)
R6. *2 sc, sc x 4* 2X (12)
R7. *2 sc, sc x 5* 2X (14)
R8. sc arnd (14)
R9. *2 sc, sc x 6* 2X (16)
R10. sc arnd (16)
R11. *2 sc, sc x 7* 2X (18)
R12. sc arnd (18)
R13. *2 sc, sc x 8* 2X (20)
R14. sc arnd (20)
R15. *2 sc, sc x 9* 2X (22)
R16. sc arnd; Fasten. (22)
1ST DORSAL FIN (FRONT)
With Blue,
R1. Magic Ring, ch 1, 6 sc in ring (6)
R2. 2 sc arnd (12)
R3. 2 sc x 2, sc x 10 (14)
R4. sc arnd (14)
R5. sc, 2 sc x 2, sc x 11 (16)
R6. sc arnd (16)
R7. sc x 2, 2 sc x 2, sc x 12 (18)
R8. sc arnd (18)
R9. sc x 3, 2 sc x 2, sc x 13 (20)
R10. sc x 4, 2 sc x 2, sc x 14 (22)
R11. sc x 5, 2 sc x 2, sc x 15 (24)
R12. sc x 6, 2 sc x 2, sc x 16; Fasten. (26)
2ND DORSAL FIN (REAR)
With Blue,
R1. Magic Ring, ch 1, 4 sc in ring (4)
R2. *2 sc, sc* 2X (6)
R3. *2 sc, sc x 2* 2X (8)
R4. *2 sc, sc x 3* 2X; Fasten. (10)
UPPER CAUDAL FIN
With Blue,
R1. Magic Ring, ch 1, 4 sc in ring (4)
R2. *2 sc, sc* 2X (6)
R3. sc arnd (6)
R4. *2 sc, sc x 2* 2X (8)
R5. *2 sc, sc x 3* 2X (10)
R6. sc arnd (10)
R7. *2 sc, sc x 4* 2X (12)
R8-9. sc arnd (12)
R10. *2 sc, sc x 5* 2X (14)
R11-12. sc arnd (14)
R13. *2 sc, sc x 6* 2X (16)
R14-15. sc arnd (16)
R16. *2 sc, sc x 7* 2X (18)
R17-18. sc arnd (18)
R19. *2 sc, sc x 8* 2X; Fasten. (20)
LOWER CAUDAL FIN
With Blue,
R1. Magic Ring, ch 1, 4 sc in ring (4)
R2. *2 sc, sc* 2X (6)
R3. sc arnd (6)
R4. *2 sc, sc x 2* 2X (8)
R5. sc arnd (8)
R6. *2 sc, sc x 3* 2X (10)
R7. *2 sc, sc x 4* 2X (12)
R8. *2 sc, sc x 5* 2X (14)
R9. sc arnd (14)
R10. *2 sc, sc x 6* 2X (16)
R11-12. sc arnd (16)
R13. *2 sc, sc x 7* 2X (18)
R14-15. sc arnd; Fasten. (18)
Finishing
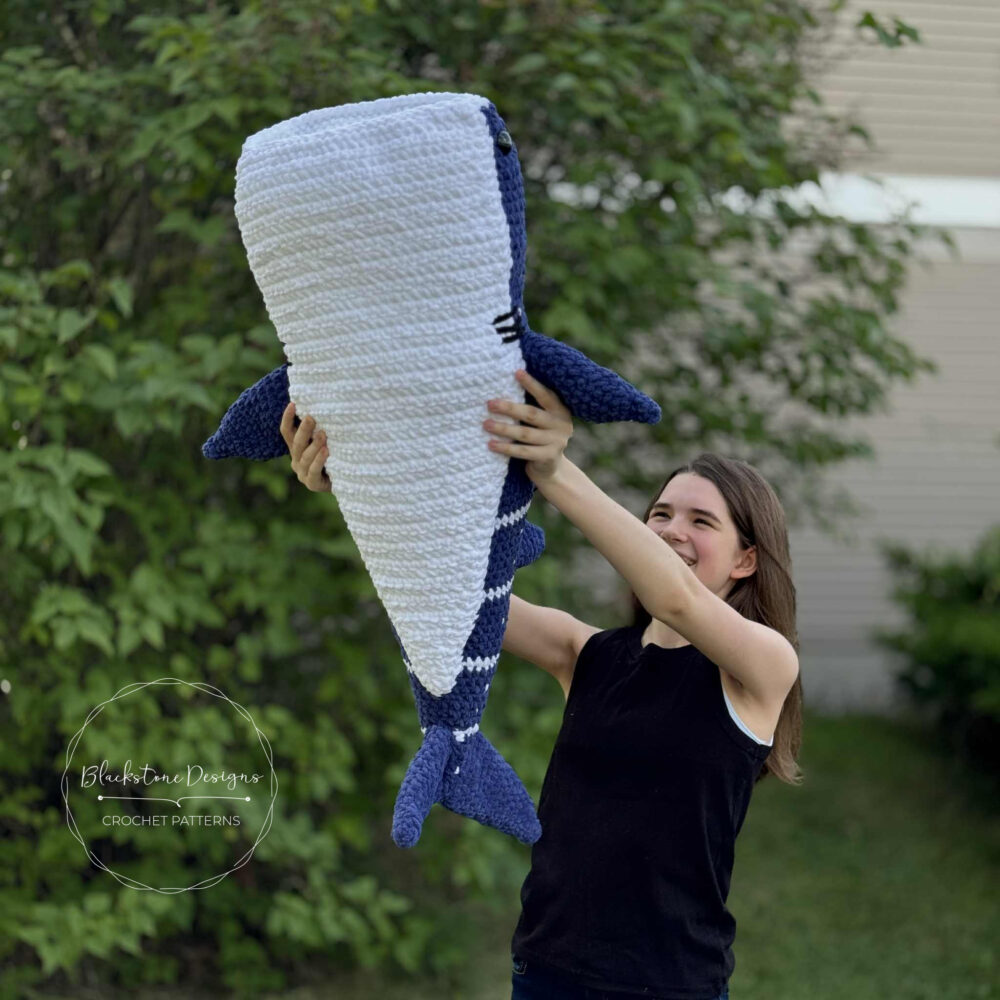
- With White, stitch spots onto top of body from tail to head.
- Stuff Body firm (do not overstretch).
- Insert mouth into head, matching up stitches from both pieces, and single crochet around the outside to join them together. TIP: Before working the last few stitches, shape stuffing around the top and bottom of mouth on the inside.
- Attach Belly Patch centered on bottom of body, so R1 of belly goes across R1 of body and R54 of belly attaches to R57 approximately.
- Flatten Pectoral Fin and attach to the side of the body of R22-30, so it sits on top of the belly patch. Repeat with the other side.
- Flatten 1st Dorsal Fin and attach to top of body centered over R36-47.
- Flatten 2nd Dorsal Fin and attach to top of body centered over R53-58.
- Flatten Upper Caudal Fin and attach to the top of the tail centered over R63 to the end, leaving a small piece hanging loose off the end.
- Flatten Lower Caudal Fin and attach to opposite side of Upper Caudal Fin, over R63 to the end, leaving a small piece hanging loose off the end; stitch the loose ends of the Upper and Lower Caudal Fins together to join.
- With Black, stitch gills onto body sides working half over the the white belly and half over the blue body; 1st Gill: between R21-22, 2nd Gill: between R22-23, 3rd Gill: between R23-24. Repeat on the other side.
- Hide all strings.
That’s the Giant Whale Shark Amigurumi Crochet Pattern!
Don’t forget to share!
If you make your own Giant Whale Shark, we’d love to see it! Tag your creations with #WhaleSharkAmigurumi and #BlackstoneDesigns on Instagram and Facebook so we can admire your fin-tastic work!
Join our crochet community group!
Come on over and join the Blackstone Designs Crochet Community on Facebook for fun CALs and giveaways, plus exclusive sales, pattern support, and so much more!
Happy Crocheting!

Written pattern and photographs © 2025 Sonya Blackstone of Blackstone Designs. Do not sell, share, or modify this pattern, but instead share the link to where the pattern can be found. You may sell items you make with this pattern. This pattern, as with all Blackstone Designs/Sonya Blackstone patterns, are not for educational use without written permission from the designer. All rights reserved.
Sonya Blackstone is a participant in the Amazon Services LLC Associates Program, an affiliate advertising program designed to provide a means for us to earn fees by linking to Amazon.com and affiliated sites.


Thank you once again for another jaw-some week of patterns.
My son has loved sharks since he was a little boy and is impressed with the patterns. He can’t wait to see how they come out.
Im so confused on the belly patch pattern! How do I skip two stitches in Total for round 25 and then do that again for the next round and end up with 28 stitches for both the rounds?
Hello!
I broke down the steps a bit more to make it make better sense! You won’t decrease again, but you will single crochet across, keeping the same stitch count.
-Sonya