
How to Crochet the Easy Boho Plant Hanger – Free Pattern
This Easy Boho Plant Hanger is perfect for displaying plant babies and their cute pots, plus it makes it easy to access plants for watering and maintenance!
This post contains affiliate links. At no extra cost to you, I may receive a small commission from purchases made through affiliate links, which helps me to keep bringing awesome free content!
This plant hanger can be used as a plant shelf or you can remove the tray and use it as a plant hammock.

Or you can even add a basket to the bottom and use it for fruit or storage decor!
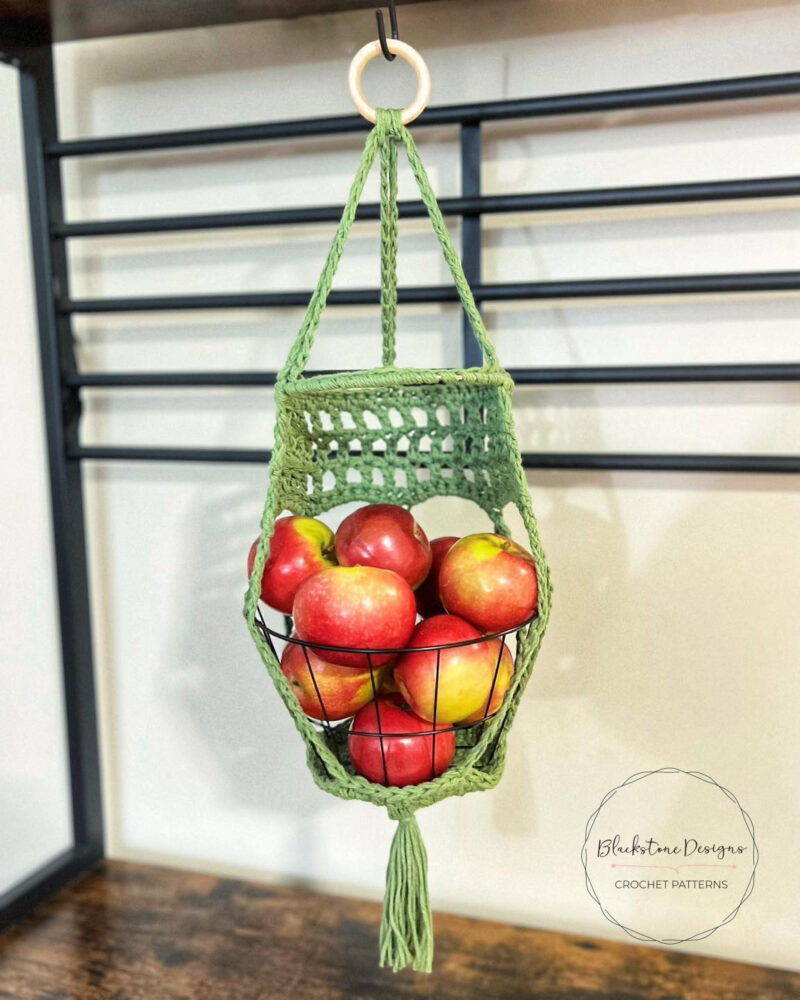
Unlike the Mockrame Hangers I designed years ago, this plant hanger is open in the front, making plants easily accessible!
The timing of this design is perfect! For Mother’s Day I received a personalized plant pot from my Grandson and his Mom and I needed a great way to display it without it covering the image on the pot!

This convertible hammock or shelf plant hanger is perfect for gifting as it is so versatile! it can be displayed in two ways, plus is can hold many items from being a plant hanger to a fruit basket holder to an amigurumi display piece… and more!
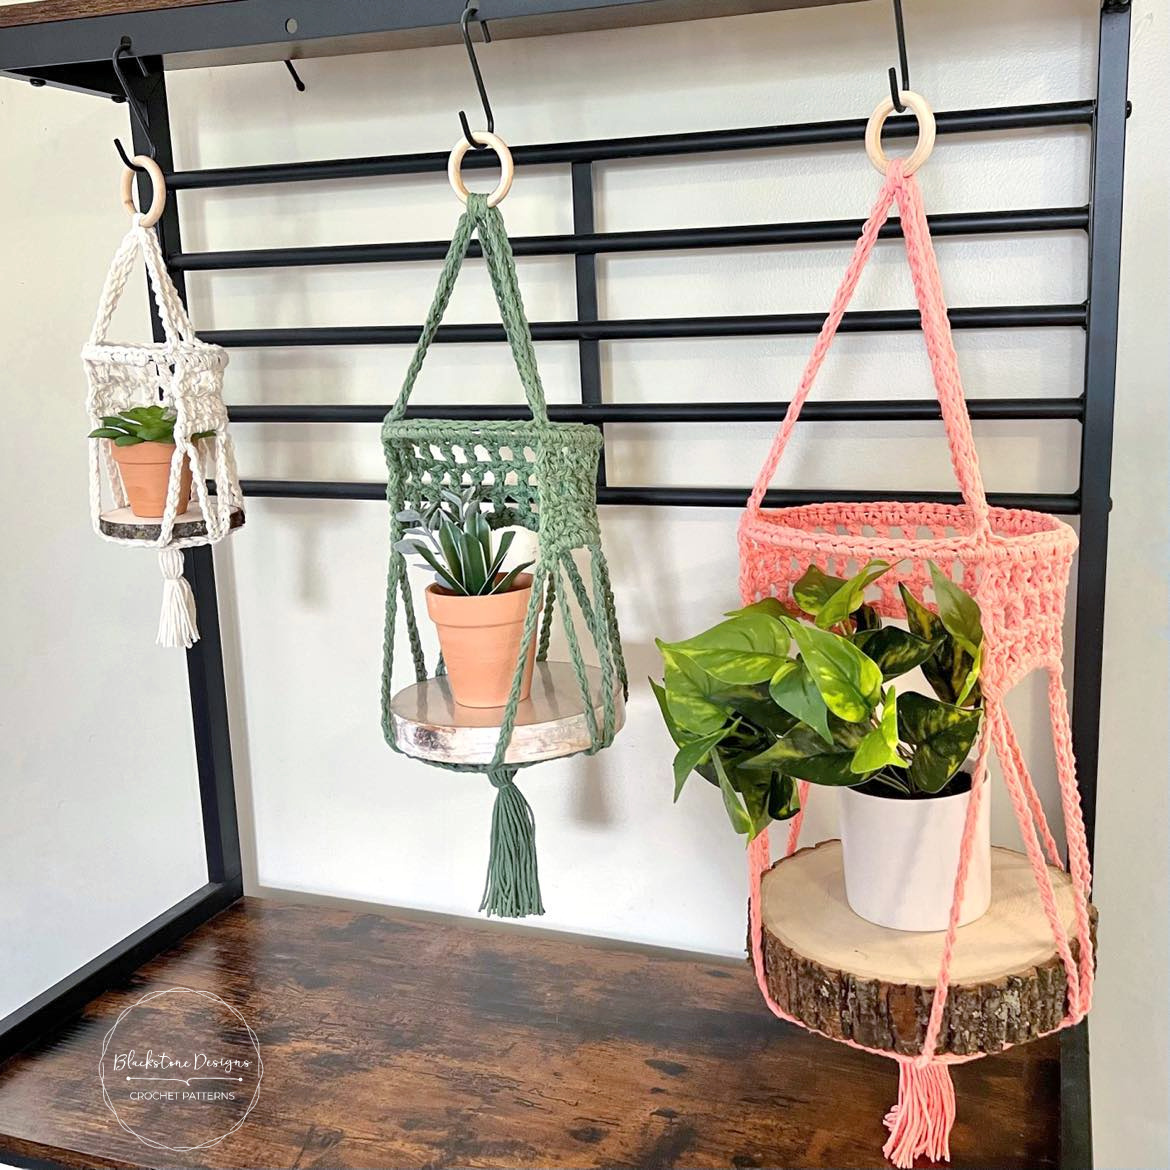
Easy Boho Plant Hanger Crochet Pattern
Option 1: Continue scrolling for free pattern instructions on this site
Option 2: Purchase the ad-free PDF that includes tutorial photos from one of my shops
Option 3: Purchase the “10 Spring Crochet Patterns” eBook
Materials
100% Cotton Worsted Weight Yarn (#4)
- 1 oz / 48yds (Small)
- 2.5 oz / 120yds (Medium)
- 4 oz / 192 yds (Large)
K/10.5/6.50mm Hook
4/6/8” Metal Ring
Yarn Needle
Scissors
Optional Materials:
Wood Round (See Measurements)
2” Wooden Ring
Tassel Maker
Gauge
Not important for this project
Finished Measurements
Small: 9”H / 3-4” shelf
Medium: 13.5”H / 5-7” shelf
Large: 18.5”H / 8-10” shelf
Stitch Guide
arnd = around
ch = chain
dc = double crochet
sc = single crochet
sl st(s) = slip stitch(es)
st(s) = stitch(es)
Skill Level
Easy
Written in U.S. Terms


Notes
- This pattern uses double strands: two strands of yarn held together and used as if it were one strand.
- Beginning ch-1 does not count as a stitch.
- Where asterisks appear, repeat the instructions between them as directed.
- A shelf is optional for this pattern, it can be used as a plant hammock if preferred.
- A wooden ring is optional, as it can be hung without one.
Instructions
SMALL
R1. Make a magic ring, ch 1, 6 sc in ring (6)
R2. 2 sc arnd (12)
R3. *2 sc, sc* arnd (18)
R4. *2 sc, sc x 2* arnd (24)
R5. *2 sc, sc x 3* arnd (30)
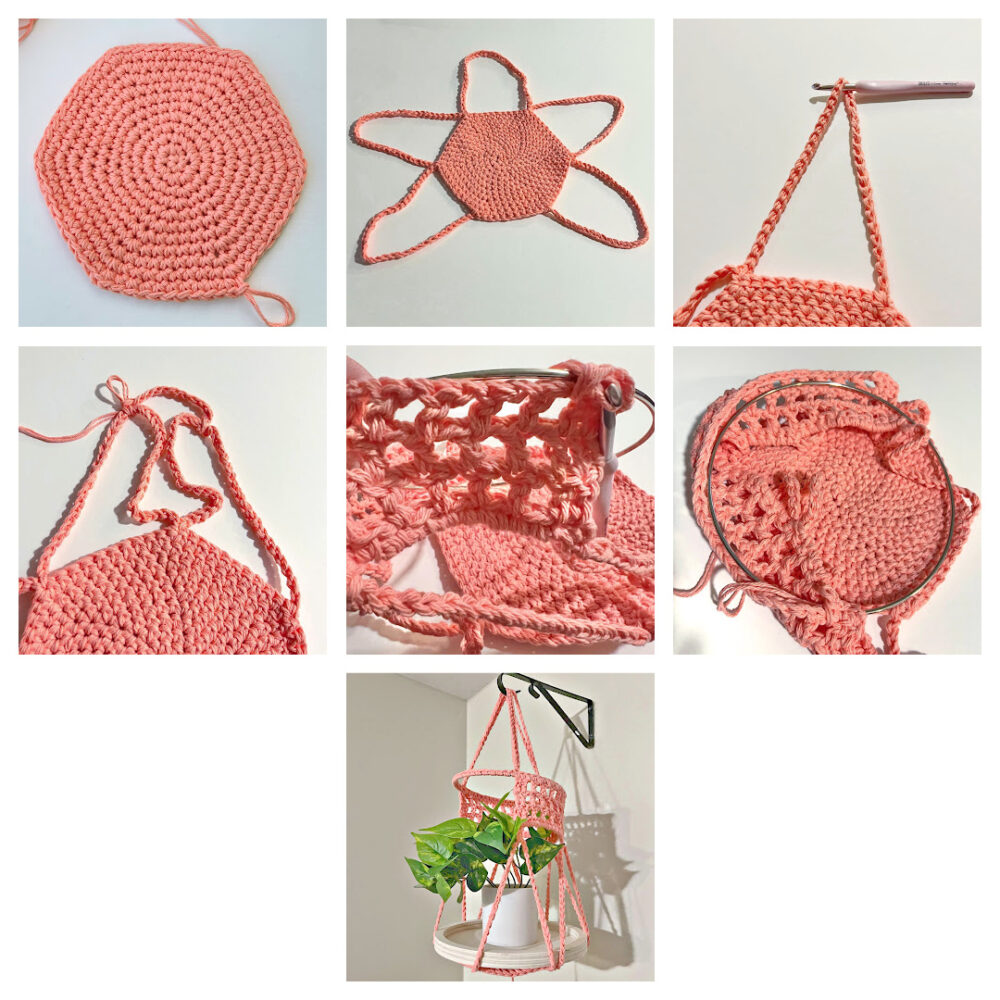
R6. Ch 18, skip 4, sl st in next* 5X; leave remaining 4 sts unworked; fasten off. (5 ch-18 spaces)
R7. Attach yarn to center of 1st ch-18 space, sc in same space, *ch 4, sc in center of next ch-18 space* 4X, turn (5 sc, 4 ch-4)
R8. Ch 1, 1 sc in each sc and 4 sc in each ch-4 space across, turn (21 sc)
R9. Ch 2 (counts as 1st dc), *dc in next, ch 1, skip 1, dc in next* across, dc in last stitch, turn (12 dc, 9 ch-1)
R10. Ch 2 (counts as 1st dc), *dc in next dc, ch 1, skip ch-1, dc in next dc* across, dc in last dc, turn (12 dc, 9 ch-1)
R11. Hold 4” metal ring to inside of R10 and working over the ring: Ch 1, sc in each dc and in each ch-1 space across, 9 sc across bare ring, sl st to join in 1st sc (30 sc)
R12. Ch 18, skip 9, sl st in next* 3X; fasten off. (3 ch-40 spaces)
MEDIUM
R1. Make a magic ring, ch 1, 6 sc in ring (6)
R2. 2 sc arnd (12)
R3. *2 sc, sc* arnd (18)
R4. *2 sc, sc x 2* arnd (24)
R5. *2 sc, sc x 3* arnd (30)
R6. *2 sc, sc x 4* arnd (36)
R7. *2 sc, sc x 5* arnd (42)
R8. *2 sc, sc x 6* arnd (48)
R9. Ch 29, skip 7, sl st in next* 5X; leave remaining 7 sts unworked; fasten off. (5 ch-29 spaces)
R10. Attach yarn to center of 1st ch-29 space, sc in same space, *ch 7, sc in center of next ch-29 space* 4X, turn (5 sc, 4 ch-7)
R11. Ch 1, 1 sc in each sc and 7 sc in each ch-7 space across, turn (33 sc)
R12. Ch 2 (counts as 1st dc), *dc in next, ch 1, skip 1, dc in next* across, dc in last stitch, turn (18 dc, 15 ch-1)
R13. Ch 2 (counts as 1st dc), *dc in next dc, ch 1, skip ch-1, dc in next dc* across, dc in last dc, turn (18 dc, 15 ch-1)
R14. Repeat R13
R15. Hold 6” metal ring to inside of R14 and working over the ring: Ch 1, Ch 1, sc in each dc and in each ch-1 space across, 15 sc across bare ring, sl st to join in 1st sc (48 sc)
R16. Ch 29, skip 15, sl st in next* 3X; fasten off. (3 ch-29 spaces); Go to Finishing
LARGE
R1. Make a magic ring, ch 1, 6 sc in ring (6)
R2. 2 sc arnd (12)
R3. *2 sc, sc* arnd (18)
R4. *2 sc, sc x 2* arnd (24)
R5. *2 sc, sc x 3* arnd (30)
R6. *2 sc, sc x 4* arnd (36)
R7. *2 sc, sc x 5* arnd (42)
R8. *2 sc, sc x 6* arnd (48)
R9. *2 sc, sc x 7* arnd (54)
R10. *2 sc, sc x 8* arnd (60)
R11. *2 sc, sc x 9* arnd (66)
R12. Ch 40, skip 10, sl st in next* 5X; leave remaining 10 sts unworked; fasten off. (5 ch-40 spaces)
R13. Attach yarn to center of 1st ch-40 space, sc in same space, *ch 10, sc in center of next ch-40 space* 4X, turn (5 sc, 4 ch-10)
R14. Ch 1, 1 sc in each sc and 10 sc in each ch-10 space across, turn (45 sc)
R15. Ch 2 (counts as 1st dc), *dc in next, ch 1, skip 1, dc in next* across, dc in last stitch, turn (24 dc, 21 ch-1)
R16. Ch 2 (counts as 1st dc), *dc in next dc, ch 1, skip ch-1, dc in next dc* across, dc in last dc, turn (24 dc, 21 ch-1)
R17. Repeat R16
R18. Hold 8” metal ring to inside of R17 and working over the ring: Ch 1, Ch 1, sc in each dc and in each ch-1 space across, 21 sc across bare ring, sl st to join in 1st sc (66 sc)
R19. Ch 40, skip 21, sl st in next* 3X; fasten off. (3 ch-40 spaces); Go to Finishing
Finishing
- Optional: Hold all 3 ch-18/29/40 chains (from last row) together and stitch around a 2” wooden ring.
- Optional: Attach a tassel to the bottom center at R1.
- Optional: Insert wood slice or tray into the bottom of the hanger.
- Hide all strings.
And that’s how you crochet the easy boho plant hanger!

Happy Crocheting!

Written pattern and photographs © 2023 Sonya Blackstone of Blackstone Designs. Please do not sell, share, or modify this pattern, but instead share the link to where the pattern can be found. You may sell items you make with this pattern. This pattern, as with all Blackstone Designs/Sonya Blackstone patterns, are not for educational use without written permission from the designer. All rights reserved.
Sonya Blackstone is a participant in the Amazon Services LLC Associates Program, an affiliate advertising program designed to provide a means for us to earn fees by linking to Amazon.com and affiliated sites.




From the small version:
R6. Ch 18, skip 4, sl st in next* 5X; leave remaining 4 sts unworked; fasten off. (5 ch-29 spaces)
R7. Attach yarn to center of 1st ch-18 space, sc in same space, *ch 4, sc in center of next ch-18 space* 4X, turn (5 sc, 4 ch-4)
Do I chain 18 per the instructions or 29 per the total count at the end of R6?
Hi Genevieve!
Great catch! That was a copy/paste error! You will chain 18!
-Sonya
do the yarn requirements shown for each plant hanger take the double strands into account? want to ensure I get sufficient yarn.
Hi Joyce!
Yes, it does!
-Sonya