The Bayside Tank is an airy crochet tank top that’s quick to work up and yields a beautiful finish. Plus, it’s easily customized to make it fit individual body types.
This post contains affiliate links. At no extra cost to you, I may receive a small commission from purchases made through affiliate links, which helps me to keep bringing awesome free content!
Worked in simple steps with an easy to create stitch pattern, this crochet tank top can be made in an afternoon!
This pattern also takes little supply! Just some yarn and a hook… and of course a needle and scissors to finish it off!
This would make for a great car ride project too! If you’re traveling for a few hours, you could potentially have it done by the time you reach your destination!
Get the ad-free version from one of the shops below:


Let’s make the Bayside Tank!
Materials
Thin Worsted Weight Yarn (#4)
- Main (3,3.5,4,4.5,5,5.5)oz
I/9/5.50mm Hook
Yarn Needle
Scissors
Gauge
Before Blocking: 13 sts x 9.5R = 4”
Gauge Swatch: *2 hdc, skip 1*
Sizes
Child’s (Chest)
2T (21”/53cm)
4T (23”/58.5cm)
6Y (25”/63.5cm)
8Y (26.5”/67cm)
10Y (28”/71cm)
12Y (30”/76cm)
Stitch Guide
arnd = around
BLO = back loop only
ch = chain
hdc = half double crochet
sc = single crochet
sk = skip
sl st(s) = slip stitch(es)
sp(s) = space(s)
st(s) = stitch(es)
YO = Yarn Over
Skill Level
Easy
Written in U.S. Terms


Notes
- The tank shown is a 4Y chest with and 6Y length. Follow the ribbed band instructions to get the chest circumference and then the body instructions to get the needed length. OR you can simply follow one size throughout.
- The pattern instructions are color coded for convenience. Find your size above and work the instructions that correspond with that color.
- Pattern is written for smallest size, with changes for larger sizes in parenthesis.
- Final row count shows smallest size in parenthesis and larger sizes in brackets.
- Where asterisks appear, repeat the instruction between them as indicated.
- This pattern is worked from the bottom up.
- For striping I changed my colors every 2 rows.
Instructions
RIBBED BAND
With Main Color,
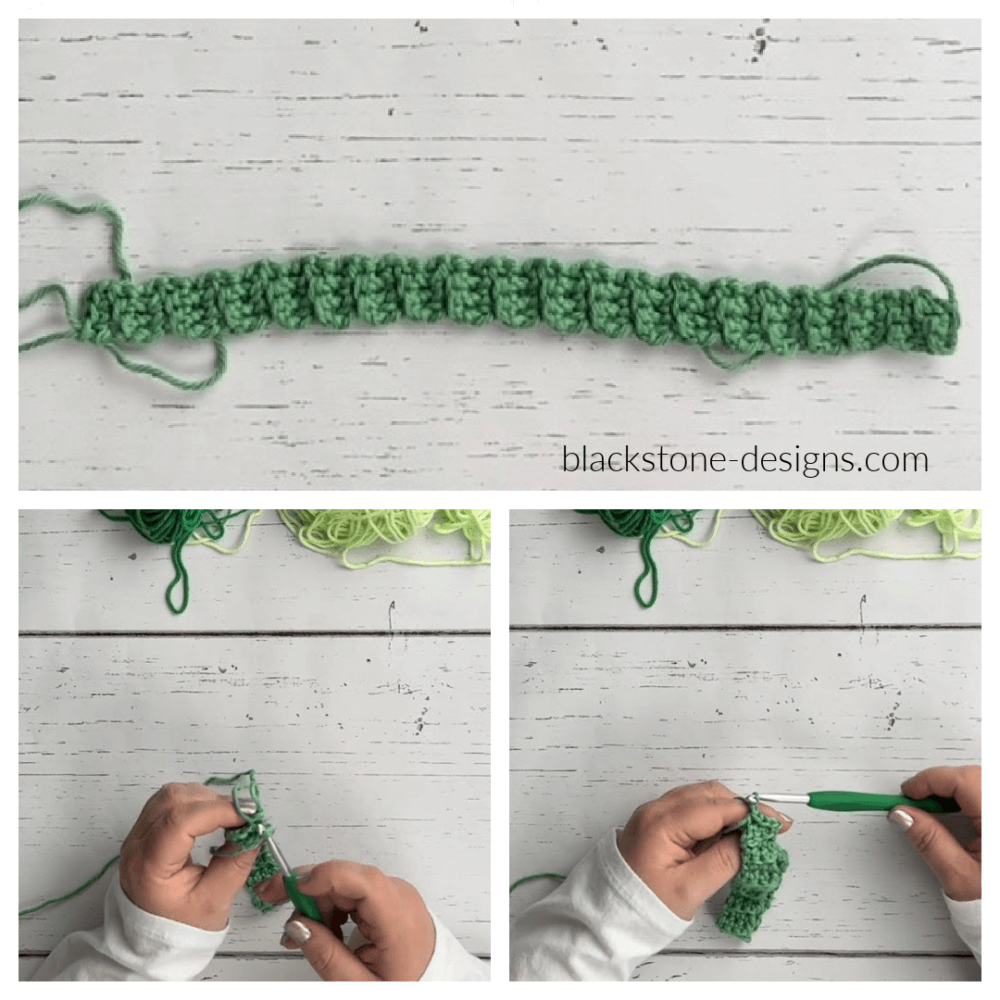
R1. Ch 7, sc in the back bump of 2nd ch and across, turn (6)
R2. Ch 1, BLO sc across, turn (6)
R3-66(72,78,84,90,96). Repeat R2 (band length should match the chest measurements listed above); hold short ends together and slip stitch through each stitch across, working through both layers to join them, flip band right side out (seam on the inside), keep a working loop, and continue:
BODY
Continuing with Main Color,
R1. Ch 1, sc in the end of each row arnd, sl st to join (66)[72,78,84,90,96]
With Any Colors (here and throughout),
R2. Ch 1, *2 hdc, skip 1* arnd, sl st to join (66)[72,78,84,90,96]
R3. Ch 1, *skip 1st hdc, 2 hdc in next* arnd, sl st to join (66)[72,78,84,90,96]
For Size 2T only: Repeat R3 until the shirt (+ Ribbed Band) measures 7”, ending with an even number of hdc rows.
For Size 4T only: Repeat R3 until the shirt (+ Ribbed Band) measures 8”, ending with an even number of hdc rows.
For Size 6Y only: Repeat R3 until the shirt (+ Ribbed Band) measures 9”, ending with an even number of hdc rows.
For Size 8Y only: Repeat R3 until the shirt (+ Ribbed Band) measures 10”, ending with an even number of hdc rows.
For Size 10Y only: Repeat R3 until the shirt (+ Ribbed Band) measures 12.5”, ending with an even number of hdc rows.
For Size 12Y only: Repeat R3 until the shirt (+ Ribbed Band) measures 13.5”, ending with an even number of hdc rows.
Lay the shirt flat; front side should be facing up. Personally, I like the seam hidden, so I laid the shirt flat with the join seam on the side.
For Size 2T only:
R1. Using whichever color comes next in your color scheme: attach yarn to front side, 6 sts in from the right, making sure to join in the 2nd hdc of the set, *2 hdc, skip 1* 11X, turn (22 hdc)
R2. Ch 1, *2 hdc in 1st hdc, skip next* across; Fasten. (22 hdc)
For Size 4T only:
R1. Using whichever color comes next in your color scheme: attach yarn to front side, 6 sts in from the right, making sure to join in the 2nd hdc of the set, *2 hdc, skip 1* 12X, turn (24 hdc)
R2. Ch 1, *2 hdc in 1st hdc, skip next* across; Fasten. (24 hdc)
For Size 6Y only:
R1. Using whichever color comes next in your color scheme: attach yarn to front side, 7 sts in from the right, making sure to join in the 2nd hdc of the set, *2 hdc, skip 1* 12X, turn (24 hdc)
R2. Ch 1, *2 hdc in 1st hdc, skip next* across; Fasten. (24 hdc)
For Size 8Y only:
R1. Using whichever color comes next in your color scheme: attach yarn to front side, 8 sts in from the right, making sure to join in the 2nd hdc of the set, *2 hdc, skip 1* 13X, turn (26 hdc)
R2. Ch 1, *2 hdc in 1st hdc, skip next* across, turn (26 hdc)
R3-4. Repeat R2; Fasten at end of R4.
For Size 10Y only:
R1. Using whichever color comes next in your color scheme: attach yarn to front side, 8 sts in from the right, making sure to join in the 2nd hdc of the set, *2 hdc, skip 1* 14X, turn (28 hdc)
R2. Ch 1, *2 hdc in 1st hdc, skip next* across, turn (28 hdc)
R3-4. Repeat R2; Fasten at end of R4.
For Size 12Y only:
R1. Using whichever color comes next in your color scheme: attach yarn to front side, 9 sts in from the right, making sure to join in the 2nd hdc of the set, *2 hdc, skip 1* 15X, turn (30 hdc)
R2. Ch 1, *2 hdc in 1st hdc, skip next* across, turn (30 hdc)
R3-4. Repeat R2; Fasten at end of R4.
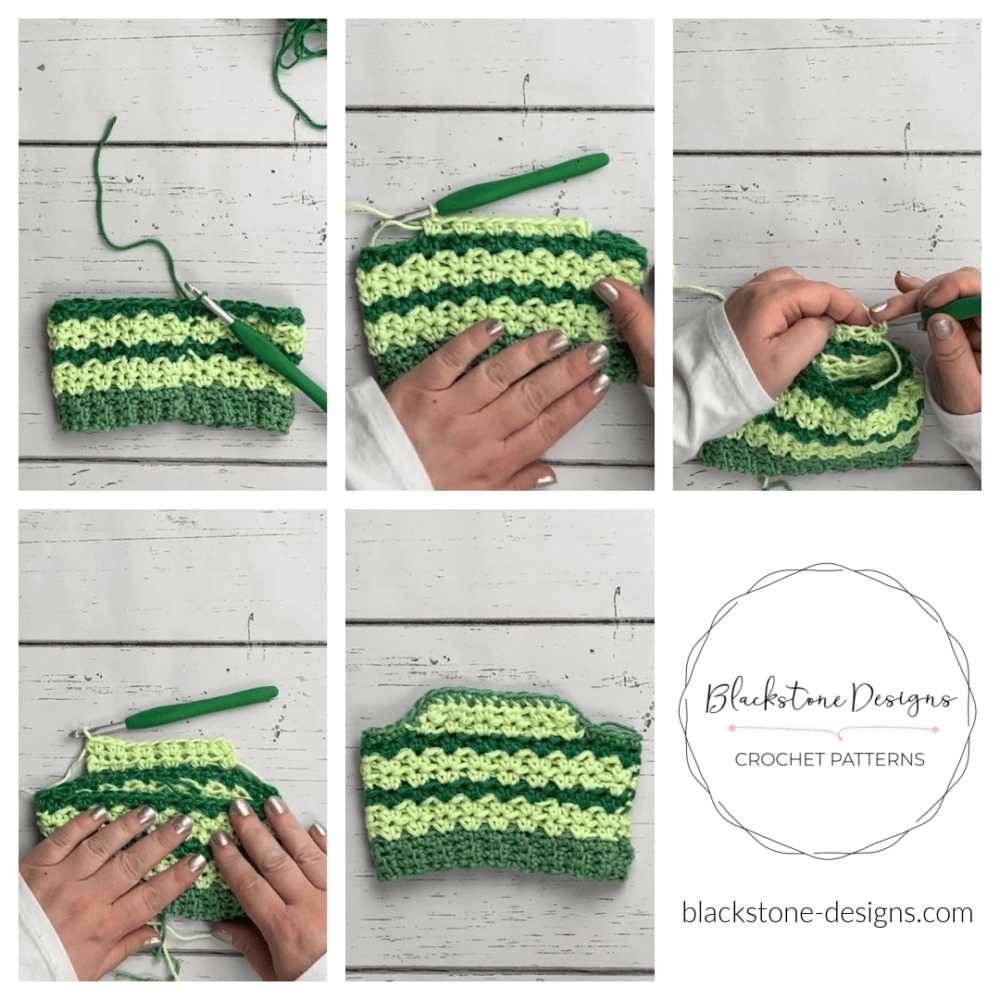
All Sizes
With Main Color,
R1. Attach yarn to any stitch on the front side; Ch 1, sc in each st and in the end of each row arnd, sl st to join (70)[76,82,92,98,104]
R2. Ch 1, sc in each st arnd, sl st to join; Fasten. (70)[76,82,92,98,104]
STRAPS (Make 2)
With Main Color,
R1. Ch 5, sc in the back bump of 2nd ch and across, turn (4)
R2. Ch 1, BLO sc across, turn (4)
R3-18(20,22,24,26,28). Repeat R2
R19(21,23,25,27,29). Ch 1, sl st in the end of each row and in each st arnd; Fasten.

Finishing
- Attach one end of the straps to the outer ‘corner edges’ of the front panel.
- Lay shirt flat, face down with front panel centered, and count 9(10,11,12,13,14) stitches in from the sides (skipping these stitches) and attach opposite ends of straps to the next 4 stitches, this should leave 7(8,9,10,11,12) stitches between the straps on the back.
- Hide all strings
And that’s how you make the Bayside Tank!

Looking for more patterns for kids?
You might like these:
Flamingo Friend
Pocket Full of Sunshine
Watermelon Chunky Slippers for Kids
Happy Crocheting!
Written pattern and photographs © 2022 Sonya Blackstone of Blackstone Designs. Please do not sell, share, or modify this pattern, but instead share the link to where the pattern can be found. You may sell items you make with this pattern. This pattern, as with all Blackstone Designs/Sonya Blackstone patterns, are not for educational use without written permission from the designer. All rights reserved.
Sonya Blackstone is a participant in the Amazon Services LLC Associates Program, an affiliate advertising program designed to provide a means for us to earn fees by linking to Amazon.com and affiliated sites.